- Inspect
- Driveways, parking areas, and walks
- Siding, trim, and flashings
- Eaves, soffits, and fascias where accessible from ground level
- Chimneys
- Exterior doors
- Vehicle doors and their installed openers
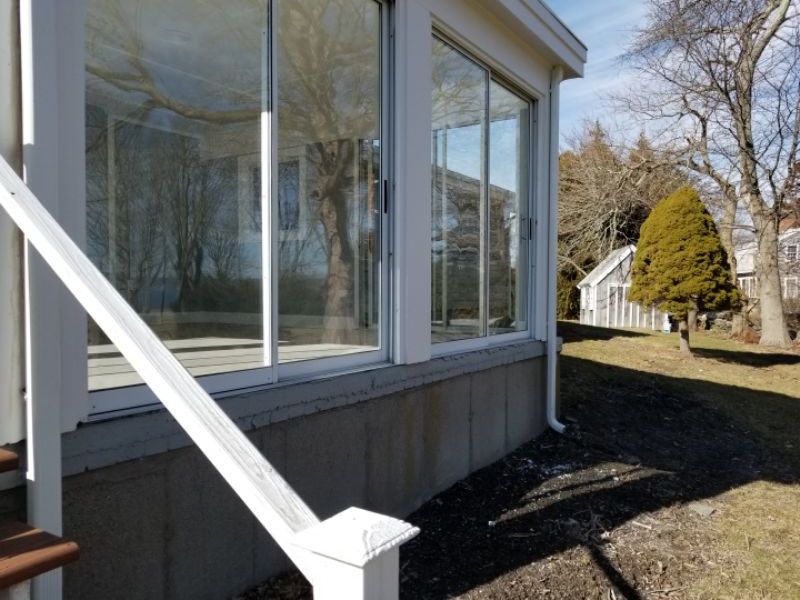
- Attached or adjacent steps, stoops, porches, decks, balconies, patios, ramps, and their associated railing systems
- Fences, except for extensive pasture fencing or electric livestock barriers
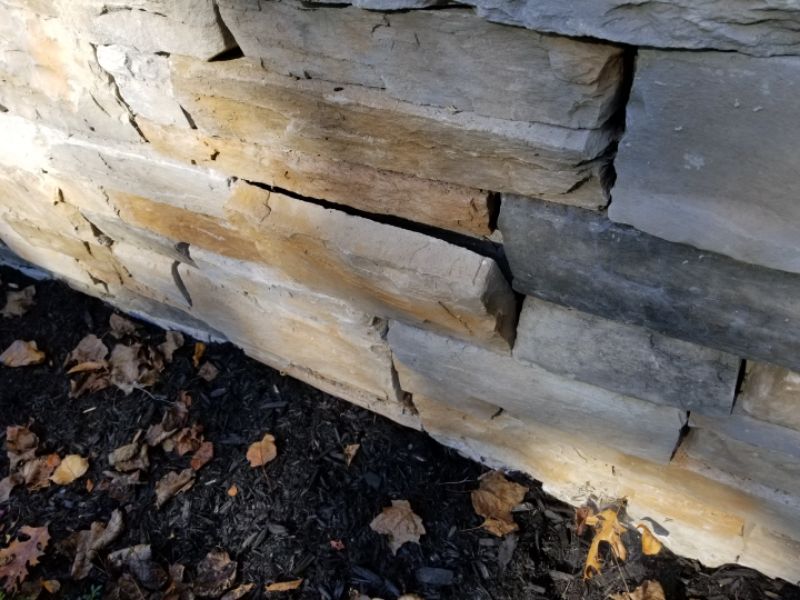
- Retaining walls
- Describe
- Dominant materials used in construction of aforementioned components
- Not required
- Screening, shutters, awnings, and similar seasonal accessories
- Any portion of a chimney or flue that is not readily or safely accessible
- Geological and soil conditions
- Seawalls, break-walls, boat houses or lifts, and docks
- Erosion control and earth stabilization measures
- Recreational facilities (swimming pools, spas, saunas, steam baths, exercise, entertainment, athletic, playground or other similar equipment)
Driveway
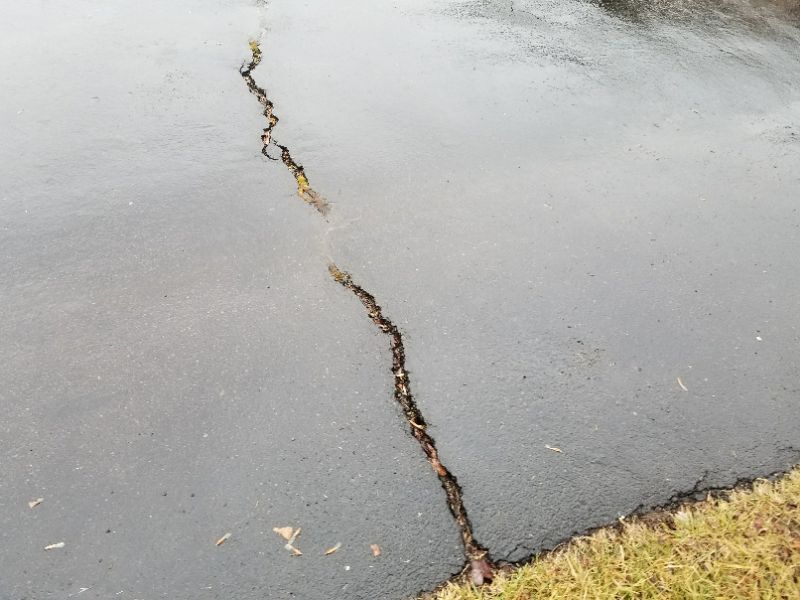
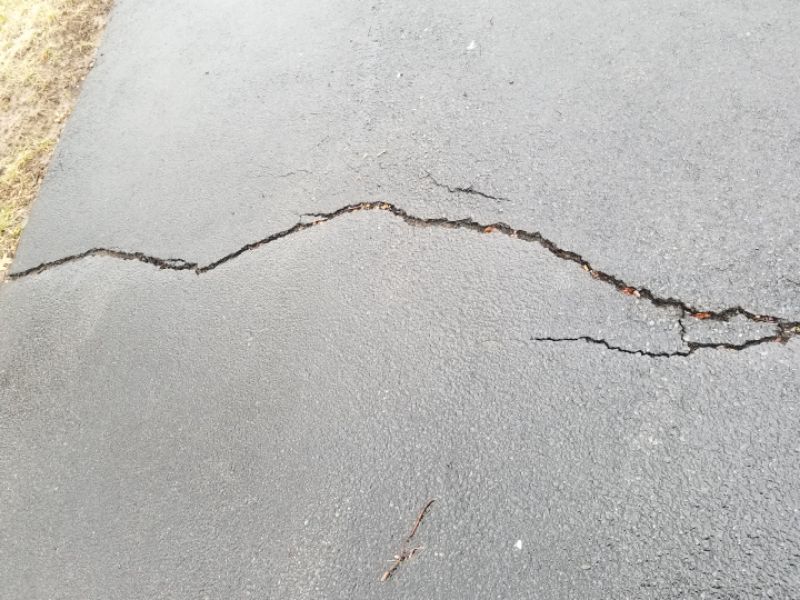
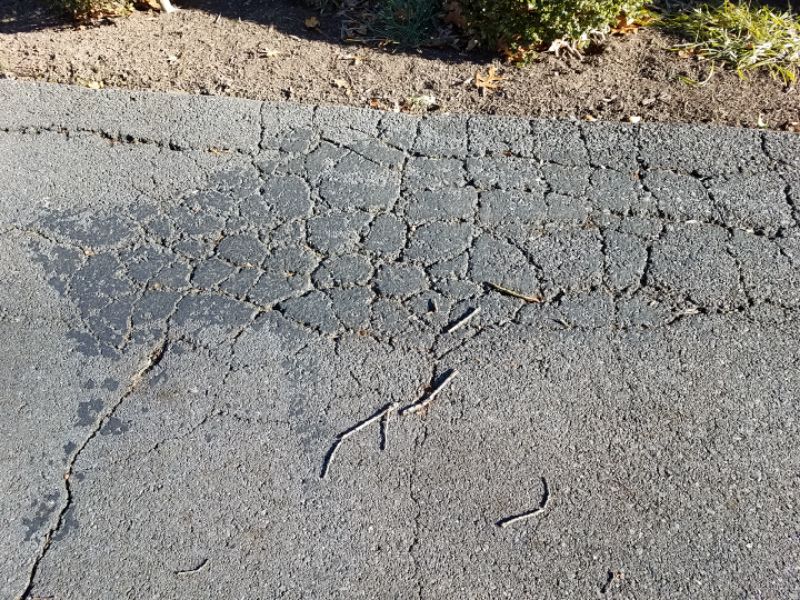
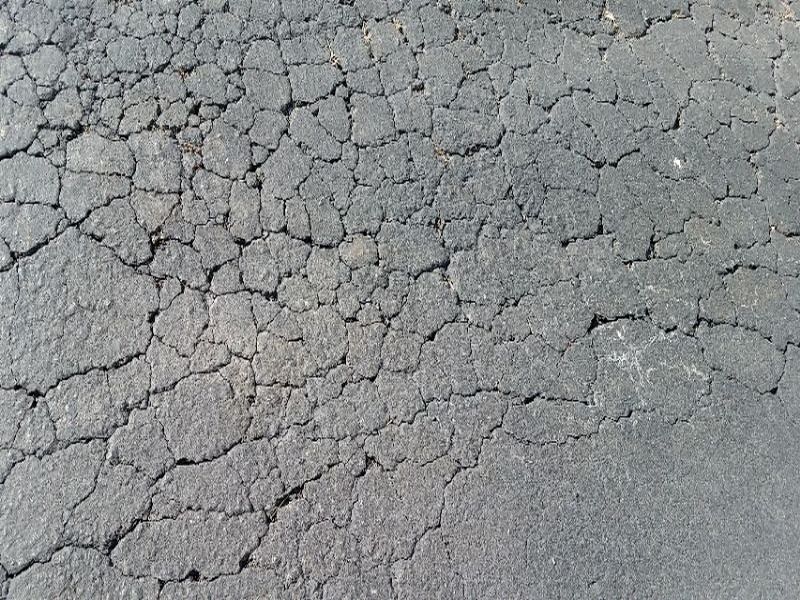
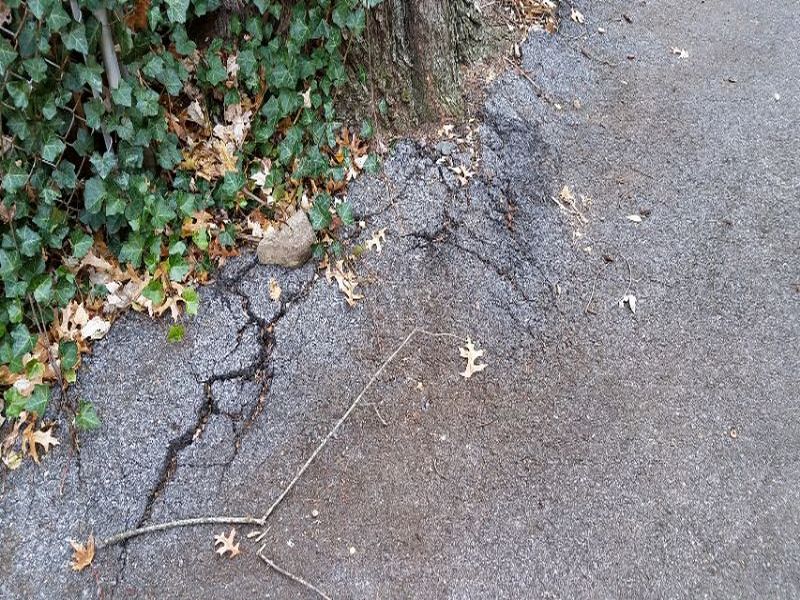
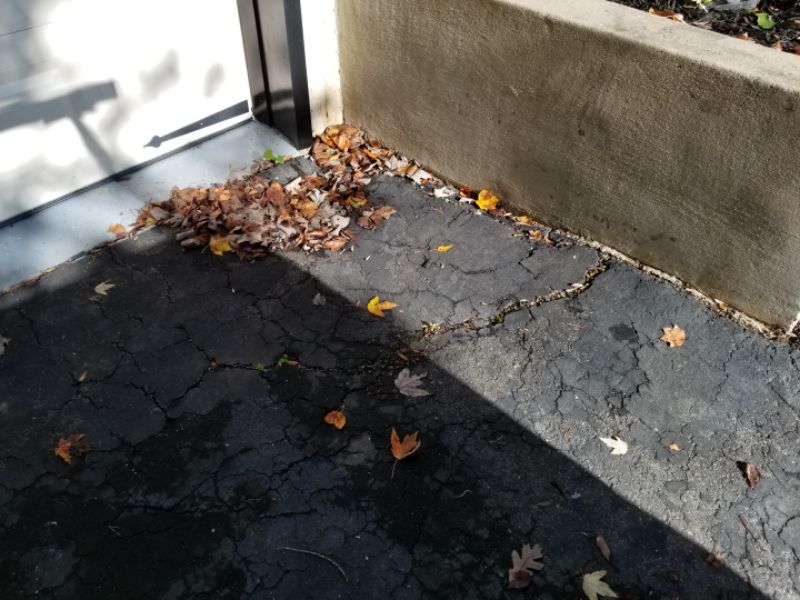
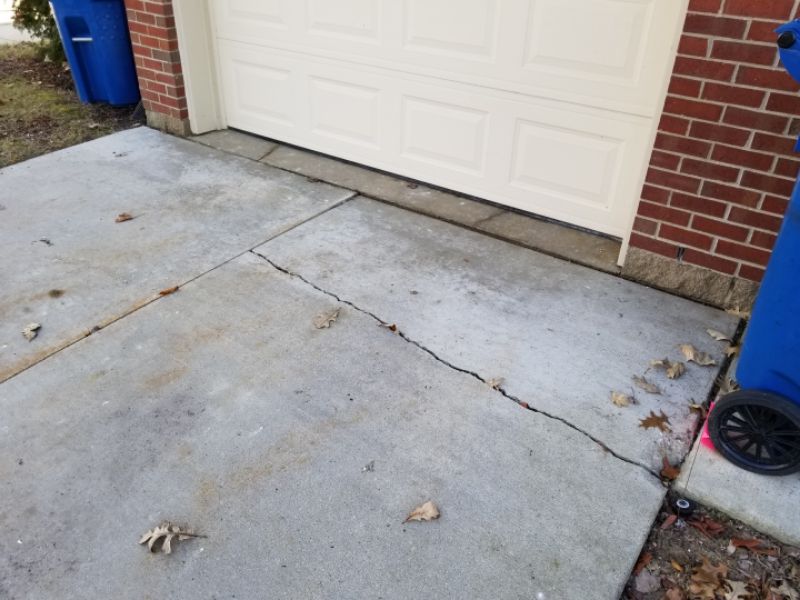
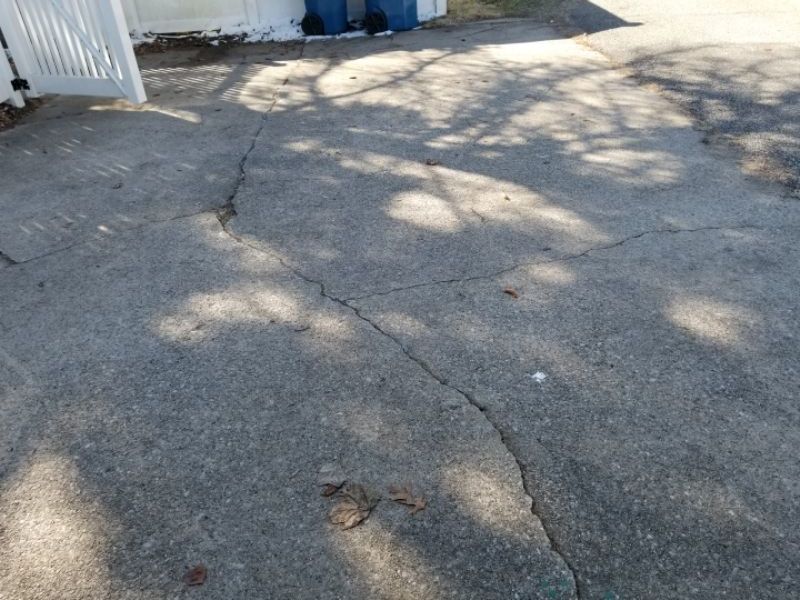
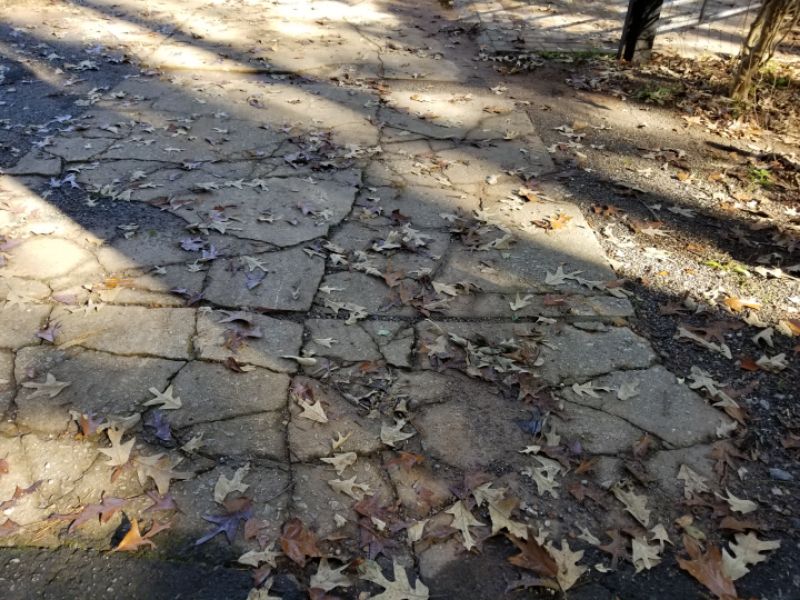
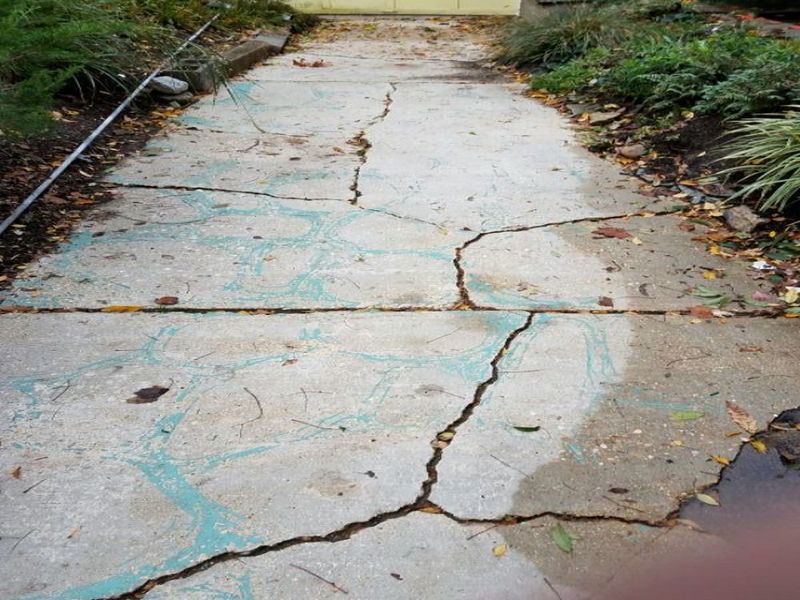
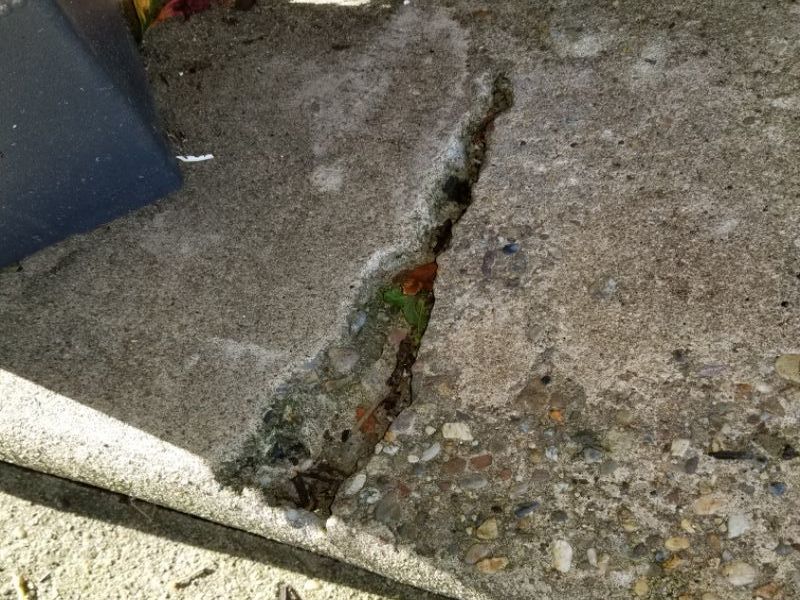
Observe the overall lay of the driveway, paying careful attention to slope and drainage. Where will the water go, and is it managed properly away from the home? Driveways must never be installed above the level of a sill plate or the exterior siding. They should be sufficiently below the threshold level of any exterior entry to avoid deterioration or water intrusion into the interior. Walk the driveway. Look for any damage: cracking, tilting, spalling, settlement or heaving, or large gaps (especially between the driveway and the home). Is there undermining from improper water management? If there is a garage, are the apron and entry built to prevent water flow into the garage?
The driveway is cracked. Seal and repair the cracks to prevent water penetration and further deterioration.
The driveway is deteriorated. Repair the driveway to prevent further damage.
Tree roots are causing the driveway to heave. Remove the roots or the tree, and repair the driveway as needed.
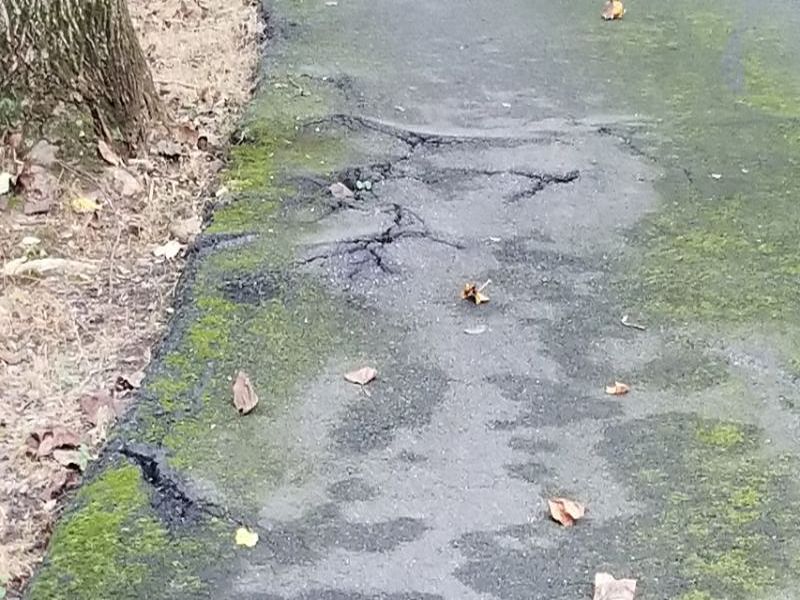
The driveway is settled towards the home and can cause water penetration. Make repairs to direct water away from the house.
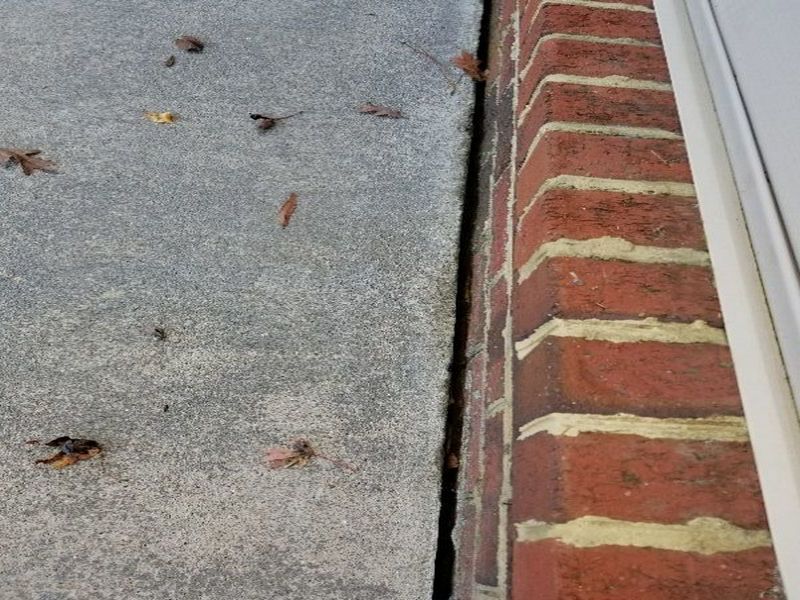
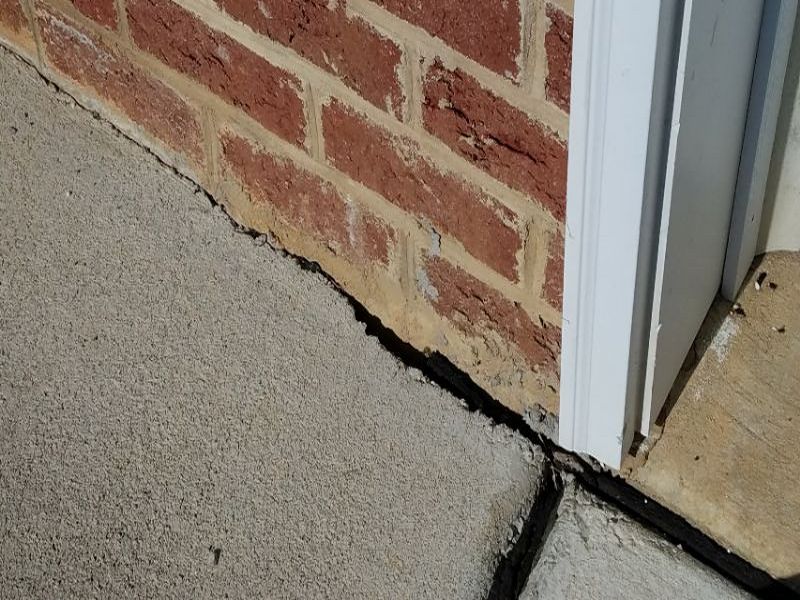
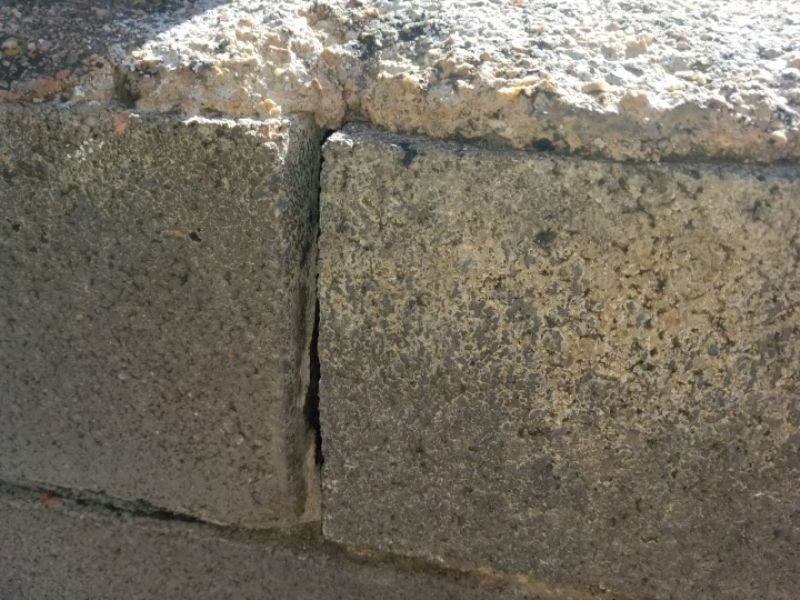
There is a gap between the driveway and the building, which can permit water penetration into the foundation. Fill and seal the gap.
The driveway has potholes. This is a trip hazard, and will permit moisture entry and further damage . Fill and seal the potholes.

The driveway is cracked. Seal and repair the cracks to prevent water penetration and further deterioration.
The driveway is deteriorated. Repair the driveway as needed to prevent further deterioration.
Tree roots are causing the driveway to heave. Remove the roots or the tree, and repair the driveway as needed.
The driveway is settled towards the home and can cause water penetration. Make repairs to direct water away from the house.
There is a gap between the driveway and the building, which can permit water penetration into the foundation. Fill and seal the gap.
The driveway apron is cracked. Cracks permit moisture to enter and cause further damage. Repair and seal the cracks.


There are voids under the driveway. This will permit settlement and ongoing deterioration. Fill and seal the voids.

The driveway has settled at the garage slab, creating a trip hazard. Raise the settled area, or add a layer to even out the transition.

The driveway has cracked and settled/heaved. This is a trip hazard. Further damage is likely. Repair and seal the driveway.
The driveway is settled towards the home and can cause water penetration. Make repairs to direct water away from the house.


Driveway Limitation and Information Statements
Near/at end useful life, budget for replacement: The driveway is near or at the end of its useful life. We recommend establishing a budget to replace the driveway.
Past end useful life, budget for replacement: The driveway is past the end of its useful life. We recommend establishing a budget to replace the driveway.
Minor cracks, no differential movement, seal cracks: The driveway has minor cracks with no differential movement. Seal the cracks to prevent water intrusion.
Spalling, cosmetic issue: The driveway is spalling, which is the separation of the surface layer, and is the result of improper finishing or weathering. Spalling is a cosmetic issue and generally does not affect the functionality of the driveway. Repairing spalled concrete is specialty work and will fail if not performed properly.
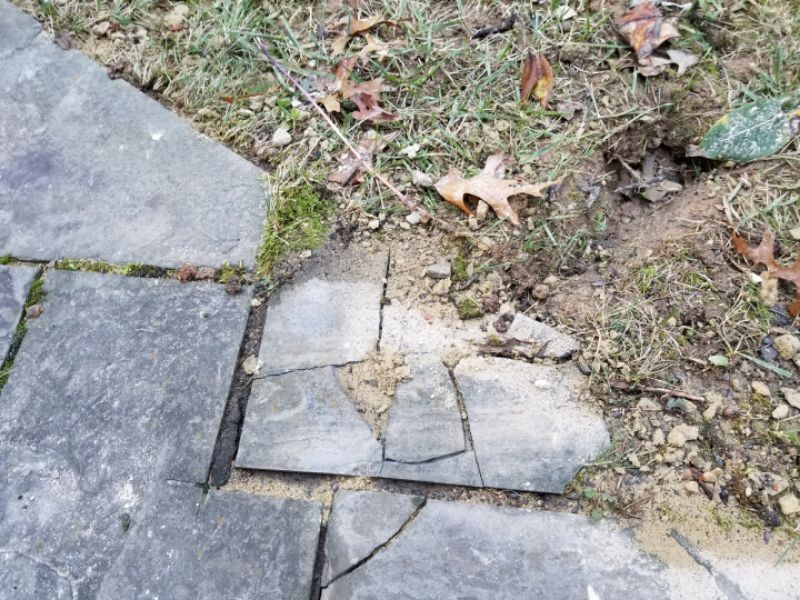
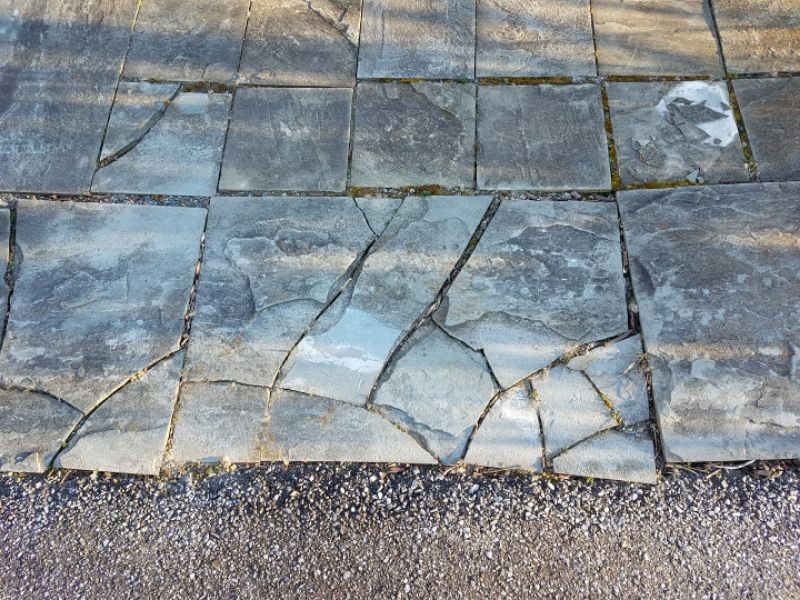
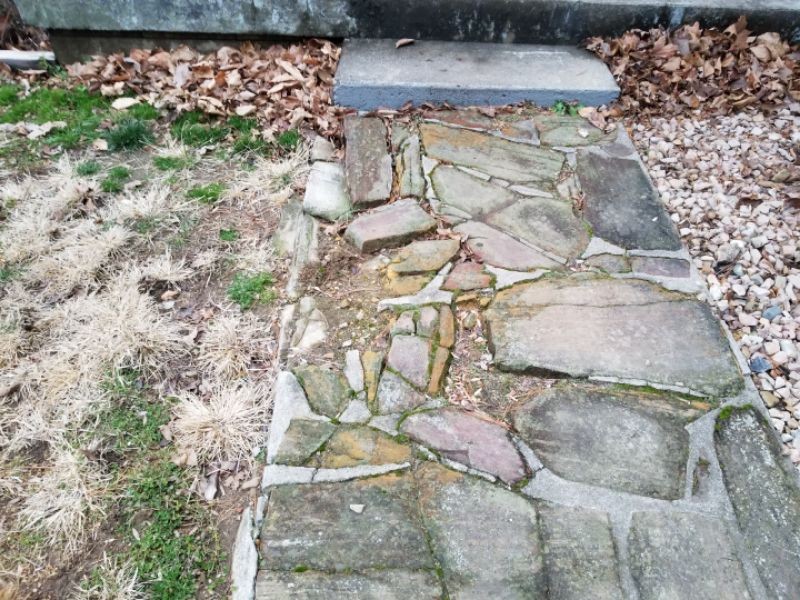
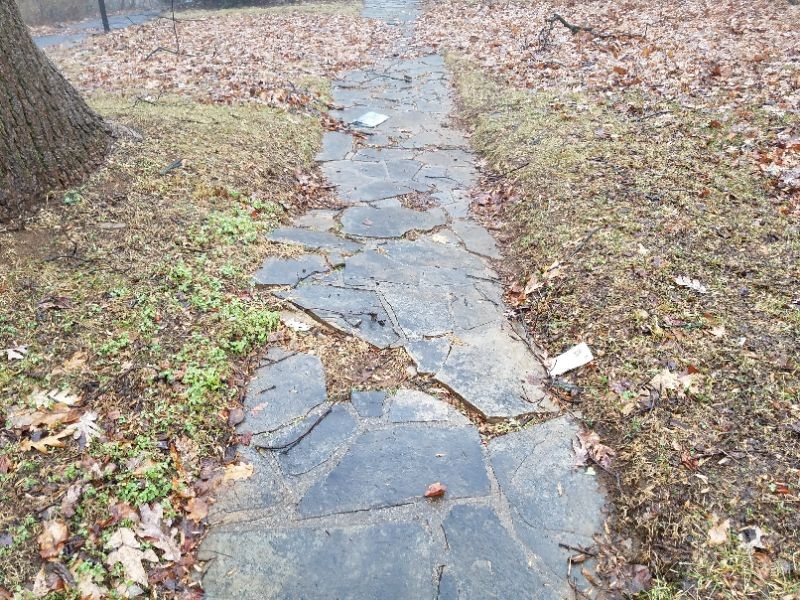
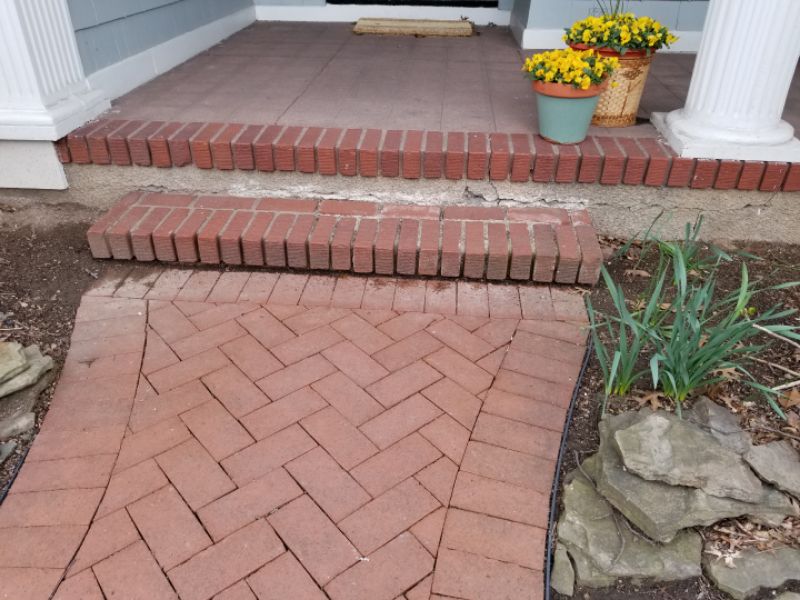
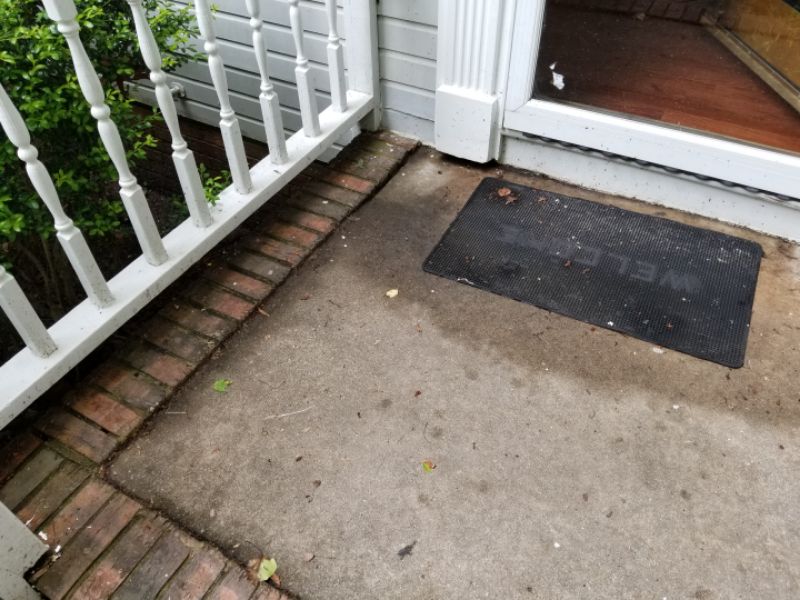
Walks
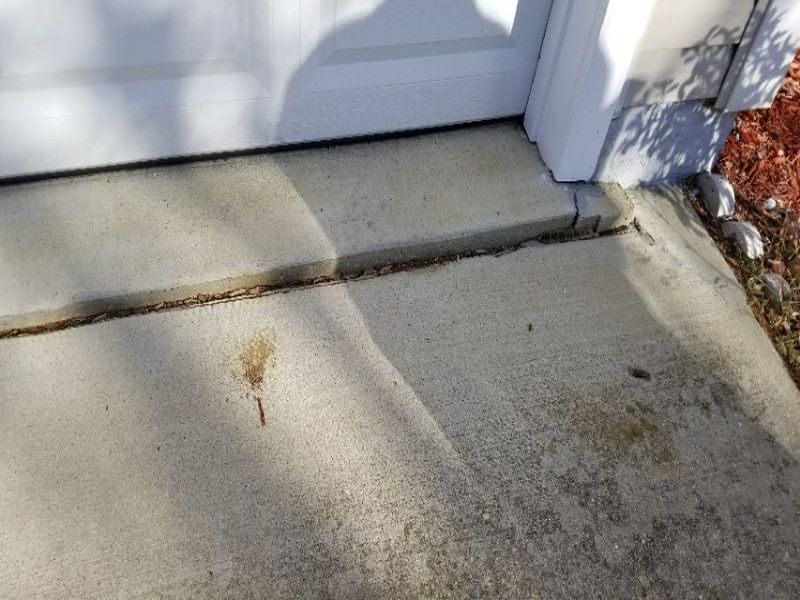
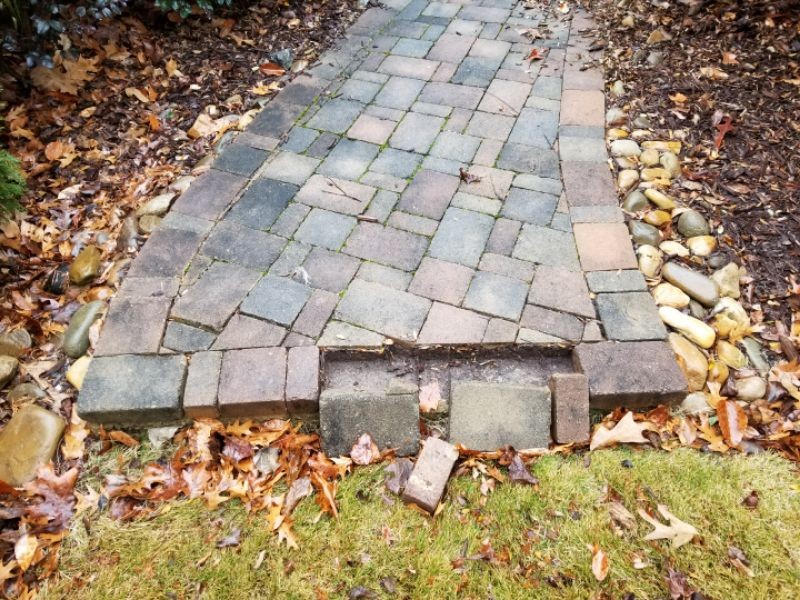
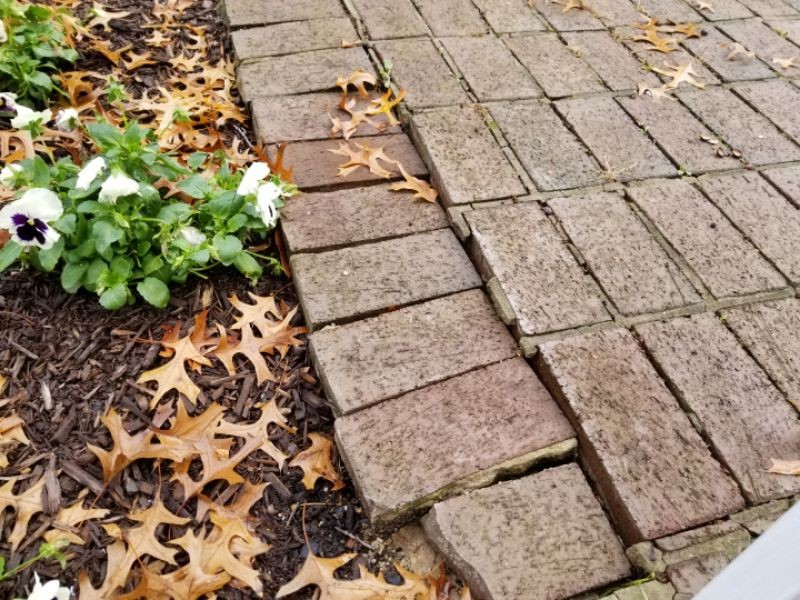
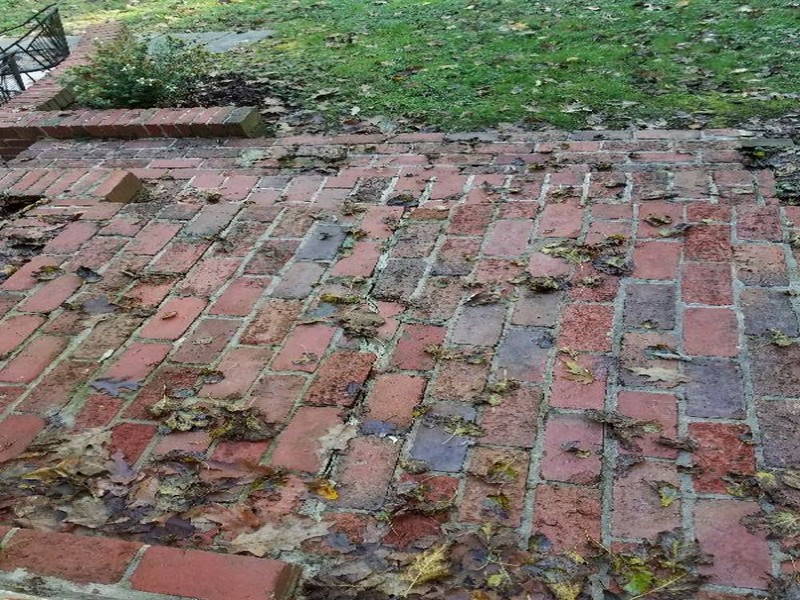
Observe the overall lay of the walks. Drainage and how the walks shed water are important. Inspect for damage, deterioration, settlement and heaving, gaps (especially between the walk and the home), undermining, and deterioration of joints that will allow water penetration and ongoing damage. Special attention should be paid wherever a walk joins the steps or stoops; this has implications for drainage and changes in riser height due to settlement and heaving.
The walk has minor cracks with no differential movement. This permits moisture penetration, which can cause further damage. Repair and seal the cracks.
The walk is cracked. Cracks permit moisture to enter which can cause further damage. Repair and seal the cracks.
The walk is deteriorated. If the deterioration is not properly treated, the walk will continue to degrade. Repair or replace the walk as needed.

Tree roots are causing the walk to heave. This condition will likely worsen unless the roots or trees are removed. Remove the roots or the tree and repair the walk as needed.
The walk is settled or heaved. This is a trip hazard. Repair the walk.
The walk is settled or heaved near the steps. This is a trip hazard because the step’s riser heights are now different. Repair the walk to ensure an acceptable riser height.
The walk is settled near the stoop. This is a trip hazard because the stoop’s riser height has become excessive. Repair the walk to ensure an acceptable riser height.
The walk has settled toward the home. This may permit water penetration into the structure. Repair the walk to direct surface water away from the foundation.
There is a gap between the walk and the building. This may permit water to penetrate the foundation. Fill and seal the gap.
There are voids under the walk. This will permit settlement and ongoing deterioration. Fill and seal the voids.

There are deteriorated mortar joints at the walk. This will allow water penetration and further damage. Repair the mortar joints.

The walk is damaged. This is a trip hazard, and will likely allow further deterioration. Repair the walk as needed.
The walk is deteriorated. If the deterioration is not properly treated, the walk will continue to degrade. Repair or replace the walk as needed.
The walk is settled or heaved. This is a trip hazard. Repair the walk.
The walk is settled or heaved near the steps. This is a trip hazard because the step’s riser heights are now different. Repair the walk to ensure an acceptable riser height.
The walk is cracked. Cracks permit moisture to enter which can cause further damage. Repair and seal the cracks or replace the damaged paver(s).
The walk is deteriorated. If the deterioration is not properly treated, the walk will continue to degrade. Repair the walk.
The walk is settled or heaved. This is a trip hazard. Repair the walk.

The walk is settled or heaved near the steps. This is a trip hazard because the step’s riser heights are now different. Repair the walk to ensure an acceptable riser height.
The walk is cracked. Cracks permit moisture to enter which can cause further damage. Repair and seal the cracks.
There are deteriorated mortar joints at the walk. This will allow water penetration and lead to further damage.
The walk is damaged. This is a trip hazard, and will likely allow further deterioration. Repair the walk as needed.
The walk is deteriorated. If the deterioration is not properly treated, the walk will continue to degrade. Repair or replace the walk as needed.
The walk is settled or heaved. This is a trip hazard. Repair the walk.
Tree roots are causing the walk to heave. This will likely worsen unless the roots or trees are removed. Remove the roots or the tree, and repair the walk as needed.
Walks Limitation and Information Statements
Near/at end useful life, budget for replacement: The walk is near or at the end of its useful life. We recommend establishing a budget to replace the walk.
Past end useful life, budget for replacement: The walk is past the end of its useful life. We recommend establishing a budget to replace the walk.
Minor cracks, no differential movement, seal cracks: The walk has minor cracks with no differential movement. Seal the cracks to prevent water intrusion.
Spalling, cosmetic issue: The walk is spalling, which is the separation of the surface layer, and is the result of improper finishing or weathering. Spalling is a cosmetic issue and generally does not affect the functionality of the walk. Repairing spalled concrete is specialty work and will fail if not performed properly.
Some municipalities require property owners to maintain adjacent sidewalks: Some municipalities require property owners to maintain adjacent sidewalks. Consult municipal authorities to determine your repair and maintenance responsibilities, including snow and debris removal requirements.
Wood spacers installed, replace as required: There are wood spacers installed in the walk. When wood is in direct contact with soil, the wood is vulnerable to deterioration from moisture and pest activity. Plan to replace the wood spacers as required.
Siding
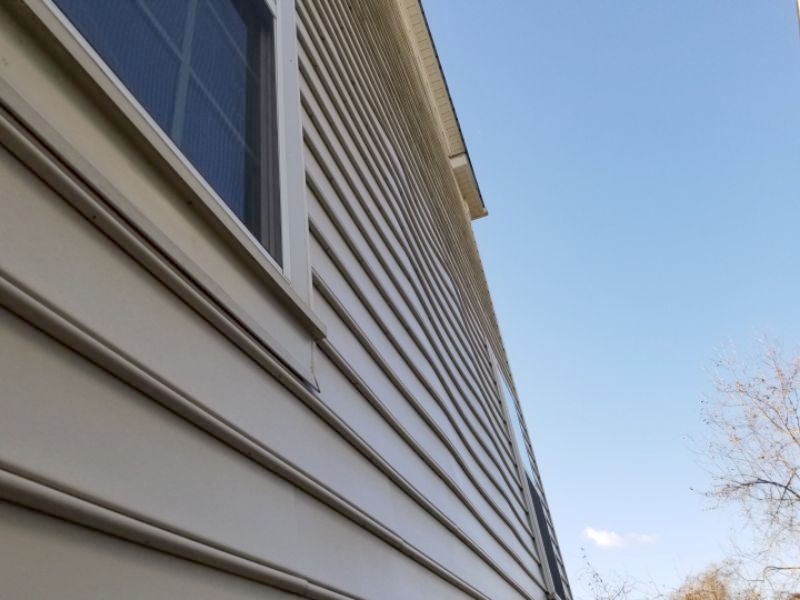
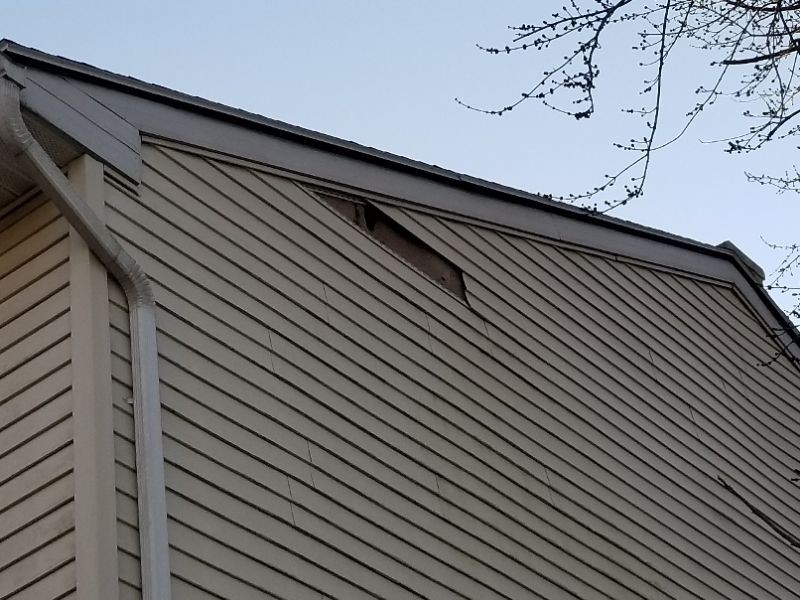
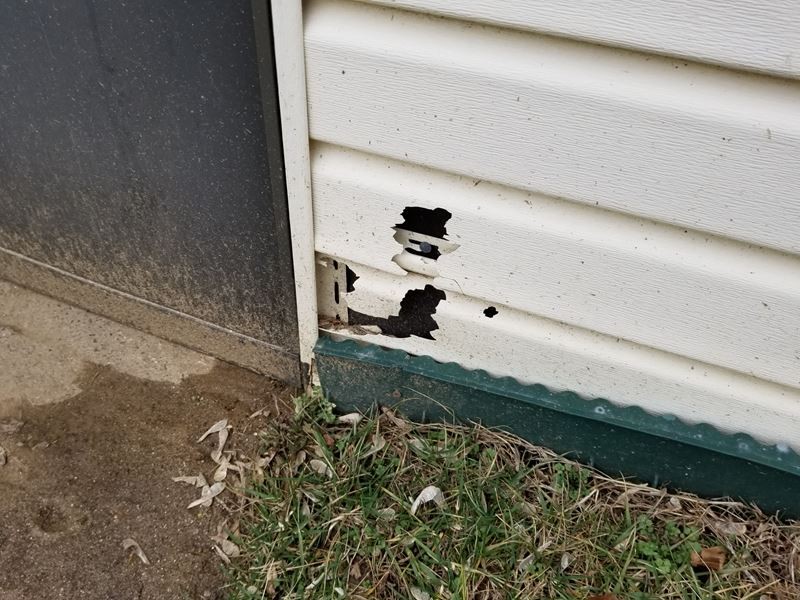
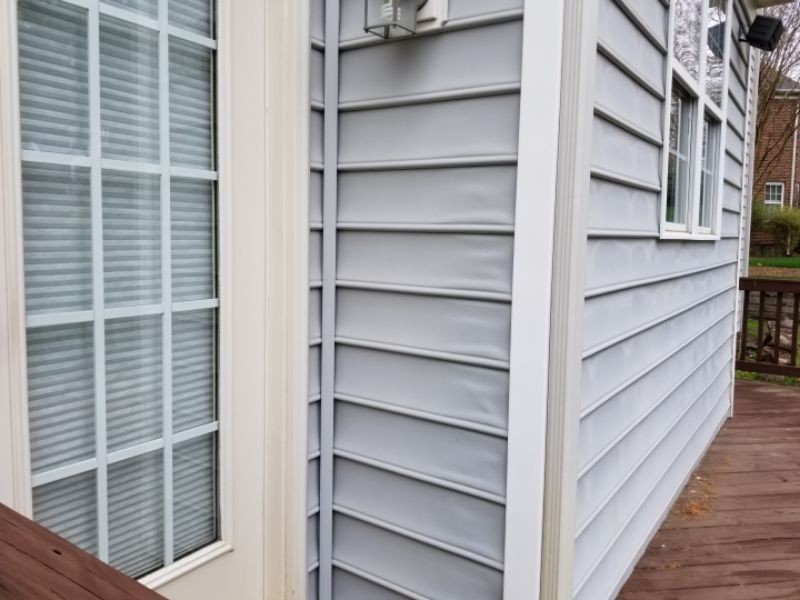
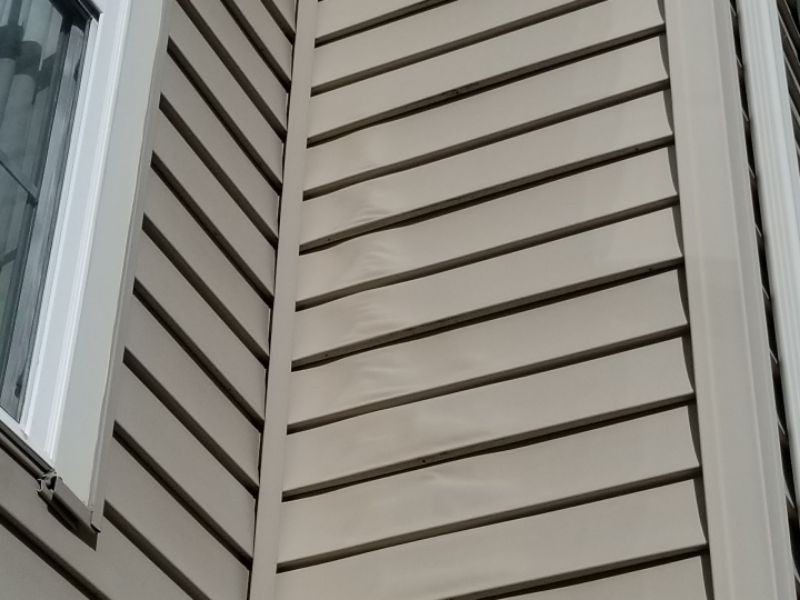
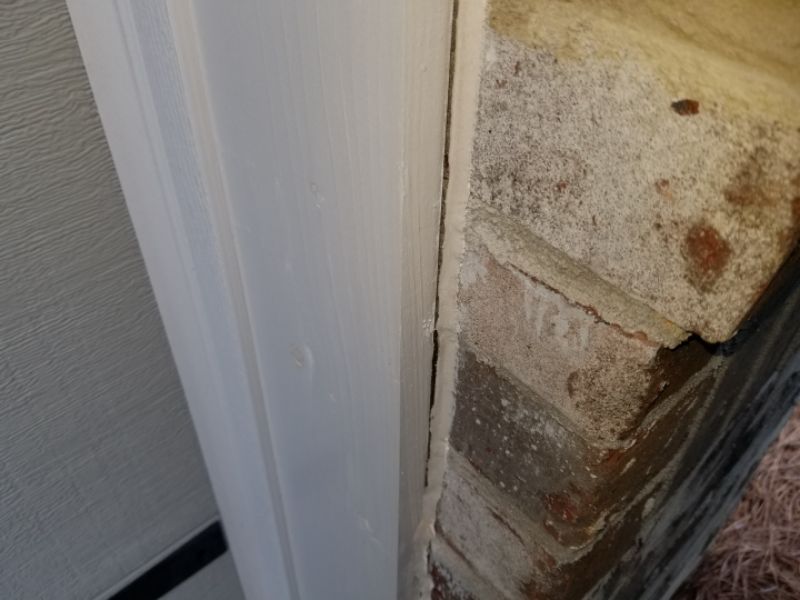
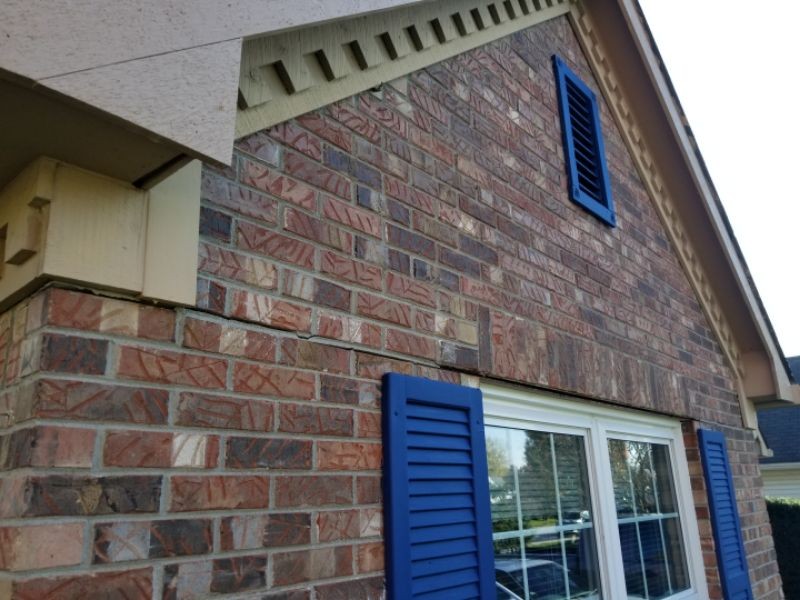
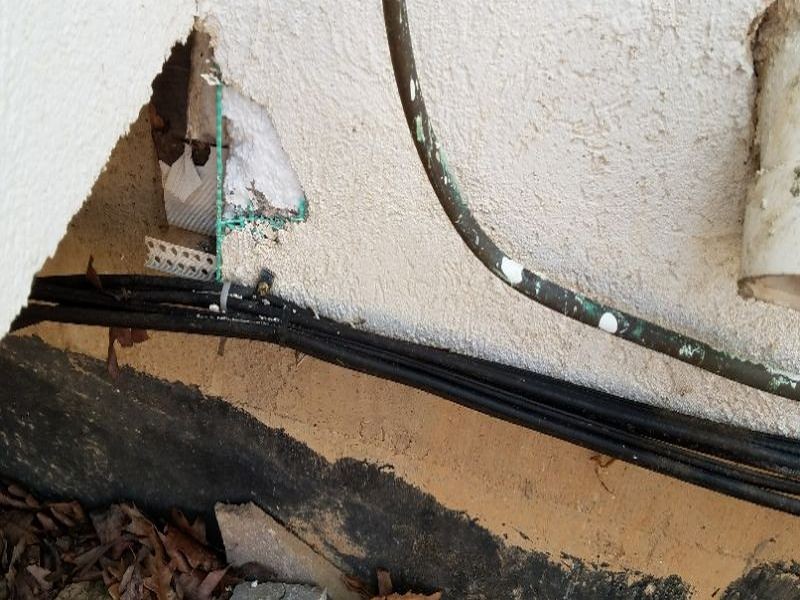
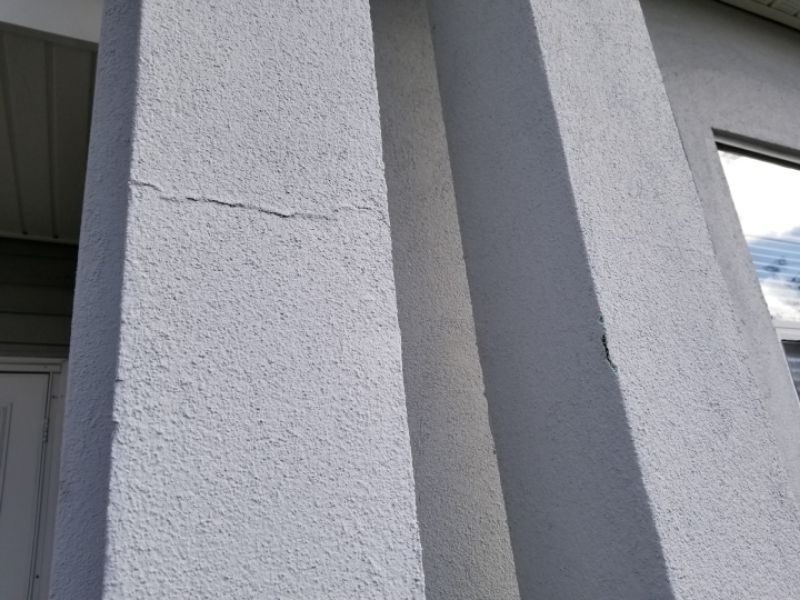
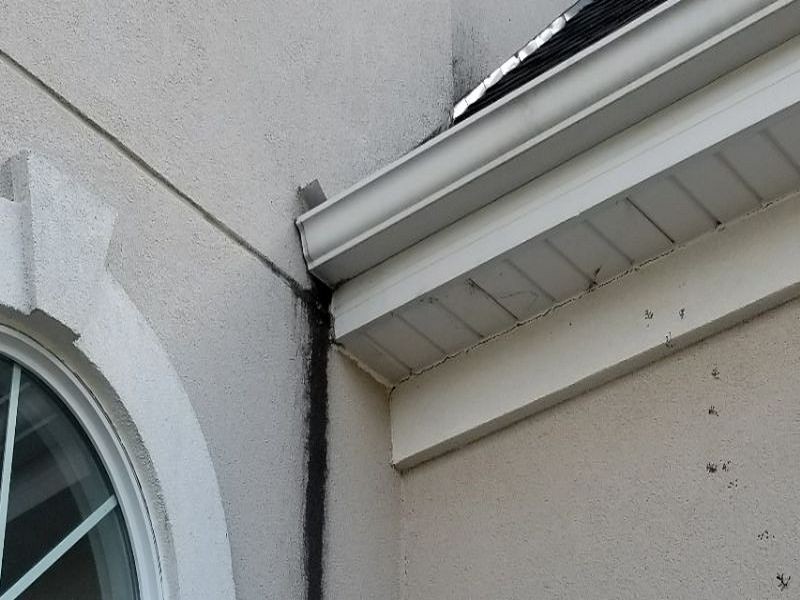
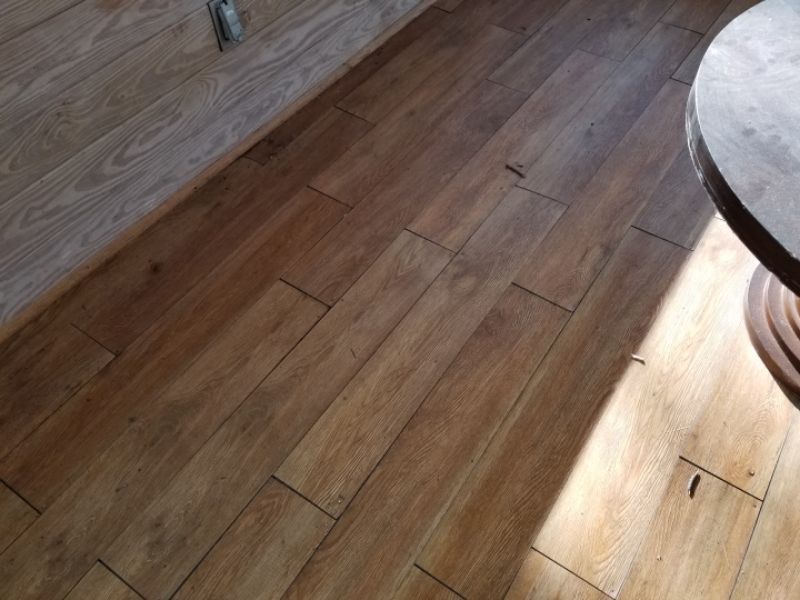
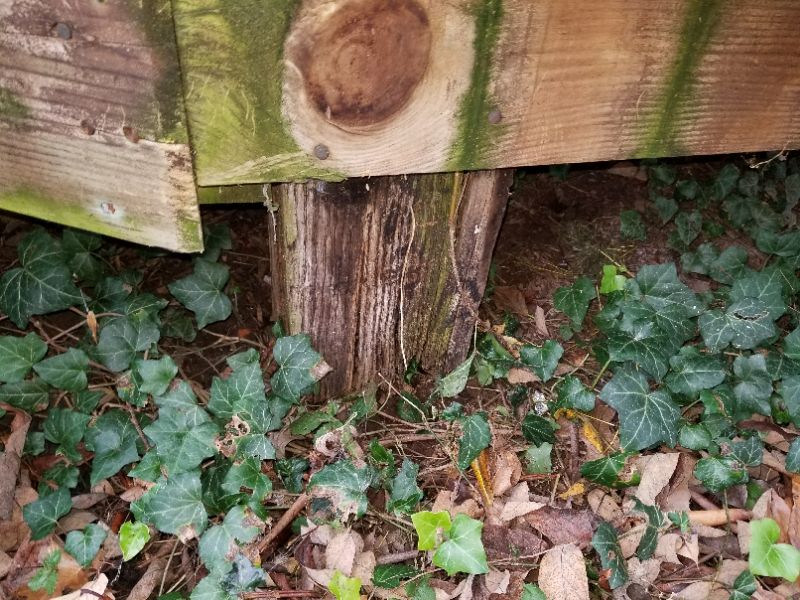
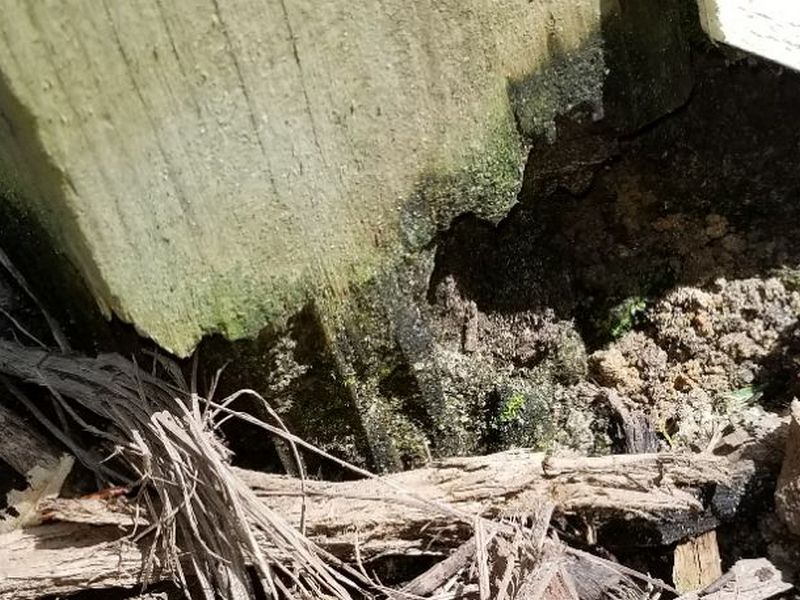
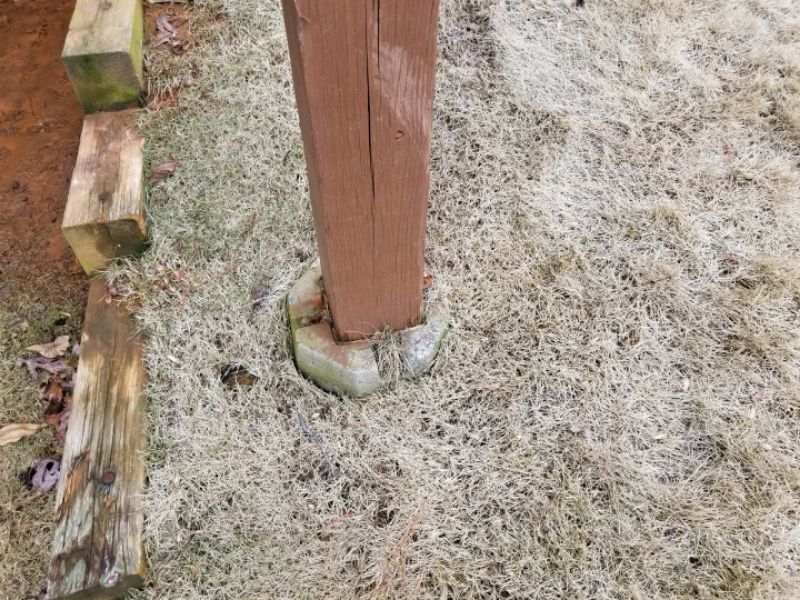
Observe and inspect the siding from up close and at a distance. Looking at “the big picture” will help you avoid getting lost in the details while overlooking a larger problem. Remember that a home’s siding is its weatherproof “skin.” Any gaps or openings can allow water to enter and cause deterioration. Be alert to areas where missing house wrap can be observed. Inspect for damage, deterioration, cracks, gaps, loose sections, missing siding, and improperly-installed or missing flashing(s). Note areas of bulging or displaced siding, or an overall lack of uniformity. This can indicate installation issues and/or an underlying structural concern. Inspect for proper clearances between the siding and adjacent surfaces, e.g. roofs, grade, decks and patios, penetrations, and flashings.
Different siding materials must be identified as separate Components, i.e. Siding 1, Siding 2, etc. Note that “problem” siding systems, e.g., EIFS and MSV, should be reported with a Defect Statement and recommendation for a specialist’s evaluation even when no issues are observed. Information Statements for Composition Board and “traditional” Stucco have been provided to allow you to bring these systems to the client’s attention without rating it “Defective.” These should ONLY be used when there are no observed defects or concerns with the siding.
Clearances and flashings are critical in preventing water penetration and siding deterioration. Even high quality long-lived materials will fail if allowed to be too close to other surfaces. Proper flashings serve to mechanically exclude water at transitions. Caulk alone is generally a temporary measure.
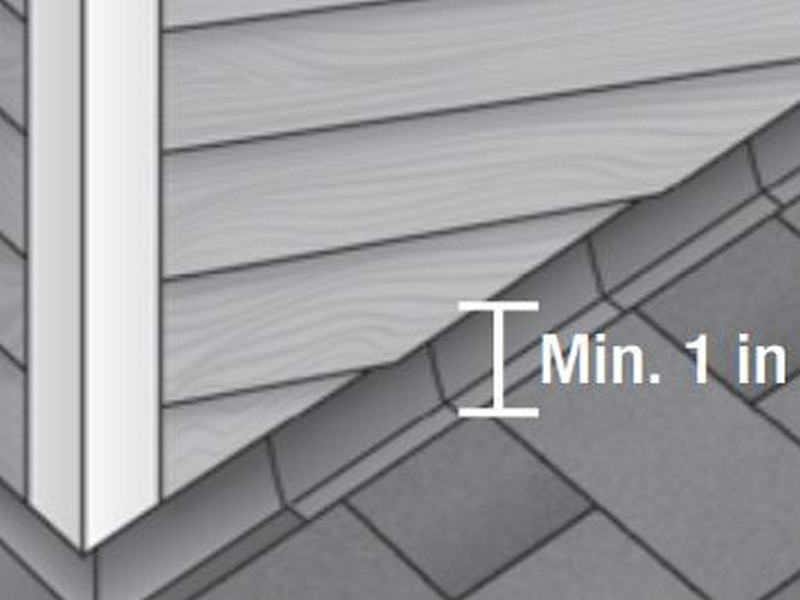
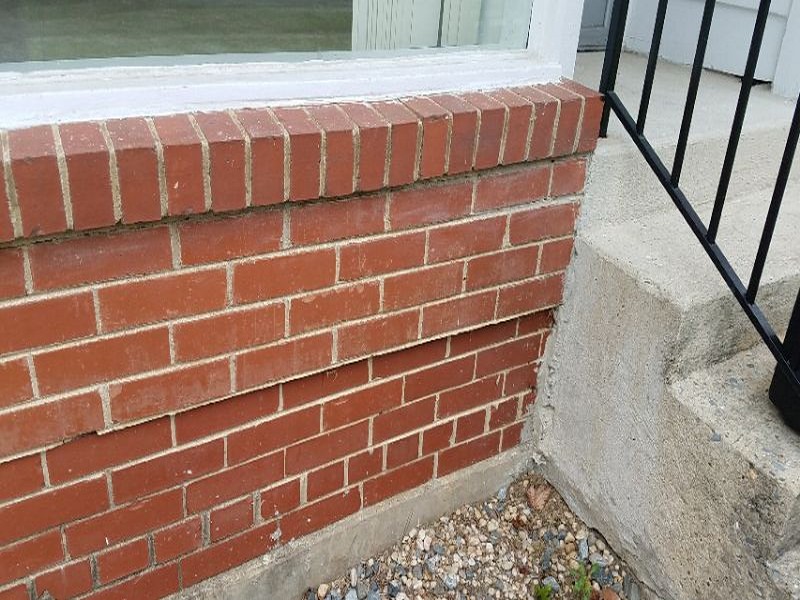
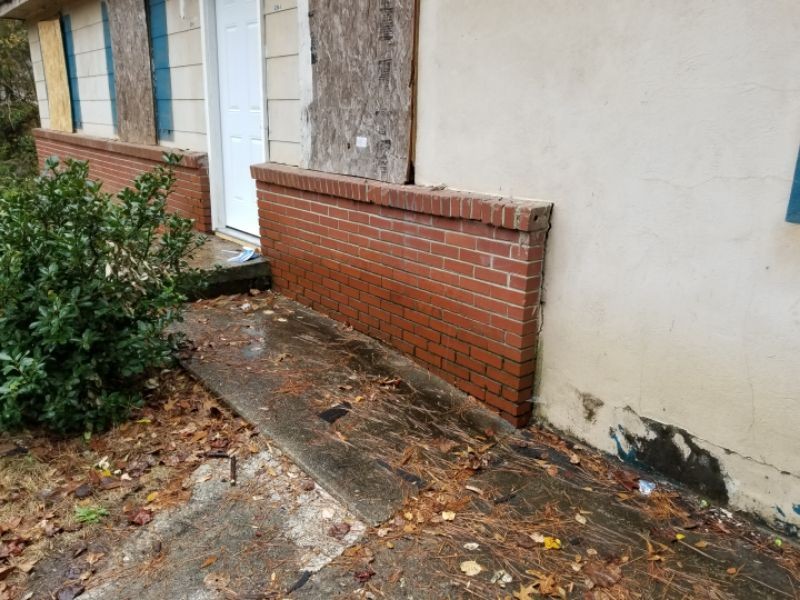
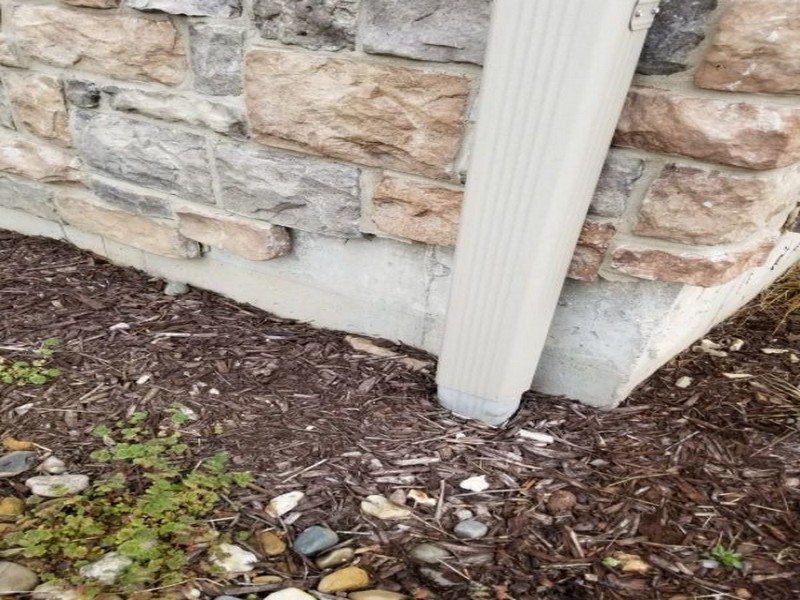
Sidings should be 6″ above the grade. Brick veneer, MSV, and EIFS should have weep holes, a weep screed, or flashings at this same clearance.
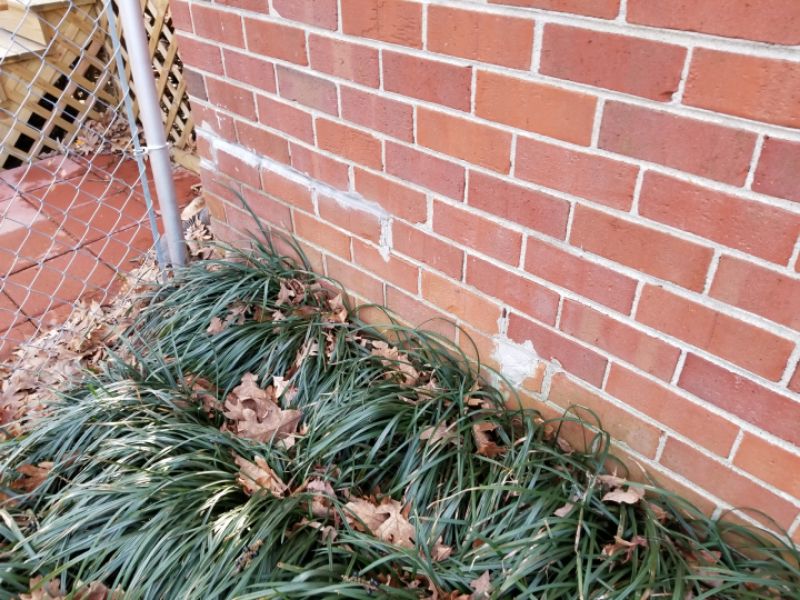
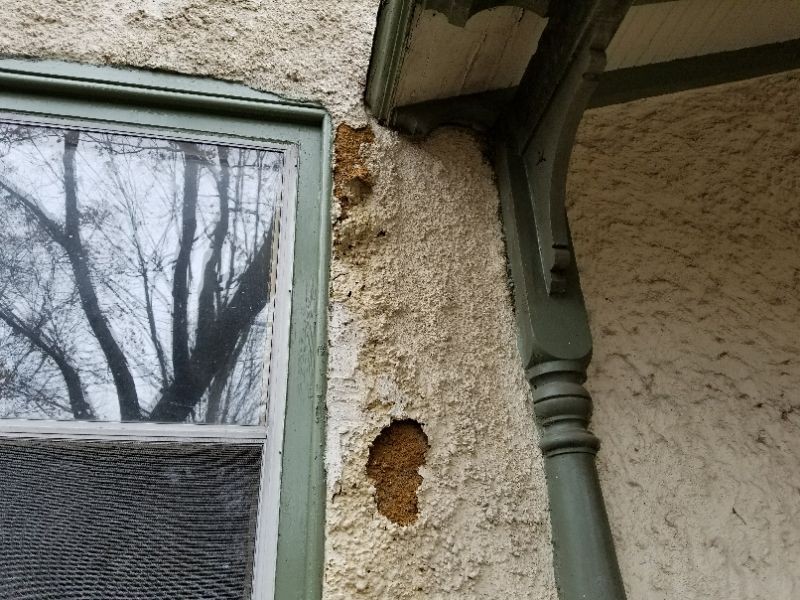
The siding is too close to, or in direct contact with, the ground. This is conducive to moisture damage and wood-destroying insect infestation. Remove the ground from direct contact with the siding.
![]()
![]()
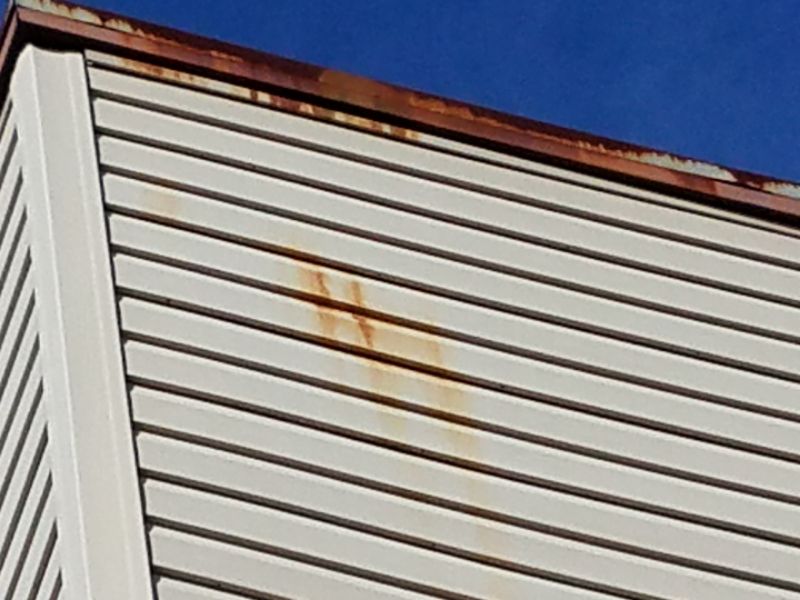
Water running down a roof will deteriorate the siding without proper clearances.
The siding is too close to the roof surface. This creates a condition conducive to water intrusion, deterioration, and mold growth. Hire a siding contractor to trim and reinstall the siding.
![]()
![]()
Siding materials should be at least 1″ above a slab surface. Special rules apply to masonry, MSV, and EIFS.
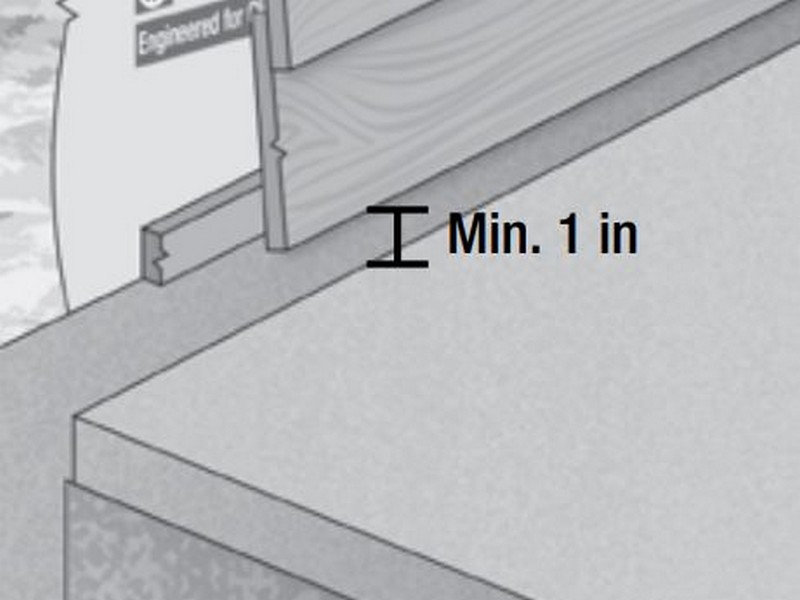
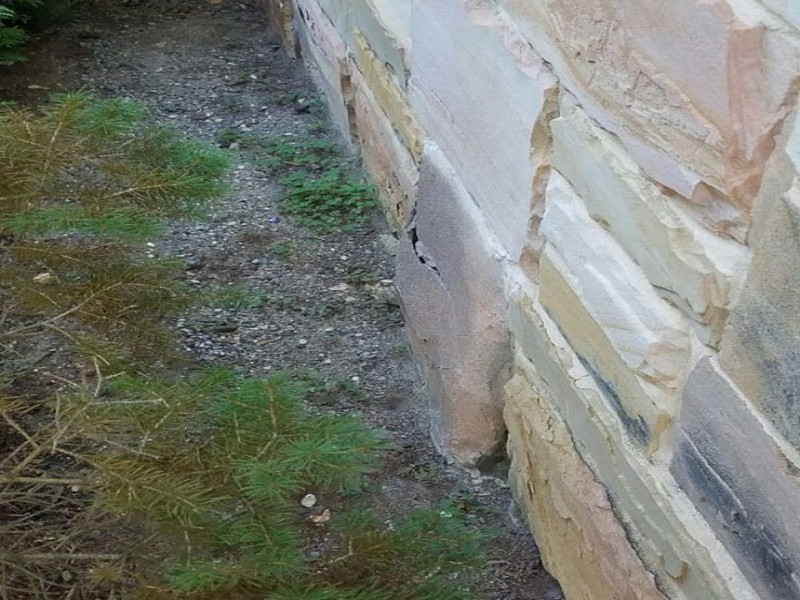
The siding is too close to, or in direct contact with, a slab or hard surface. This is conducive to moisture damage and wood-destroying insect infestation. Hire a siding contractor to trim and reinstall the siding.
![]()
Siding must have appropriate clearances from decking, as well as have proper flashings installed.
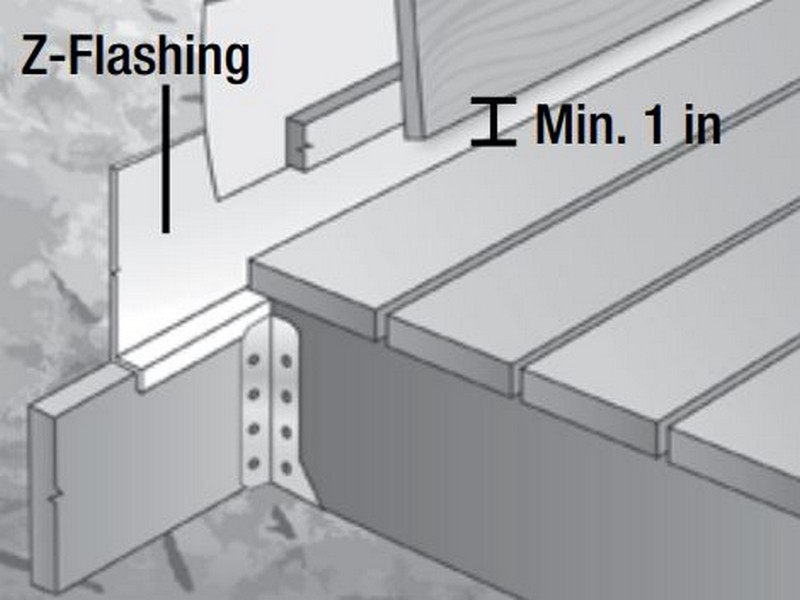
Some siding warranties require butt-end flashings behind the joints. Overall, it’s a “best practice.” Check for the presence of a house wrap when possible.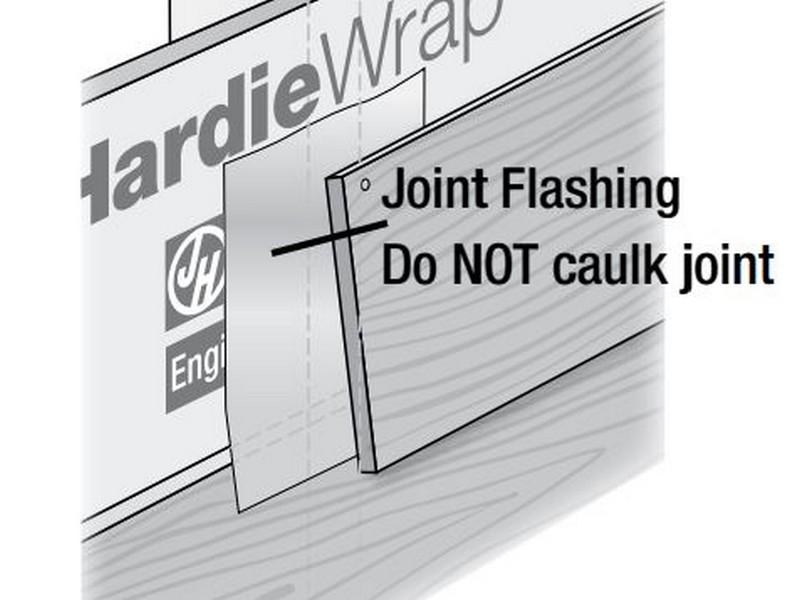
There is house wrap missing behind the siding. House wrap limits moisture and air flow through the building’s exterior walls. Add house wrap and replace siding as required.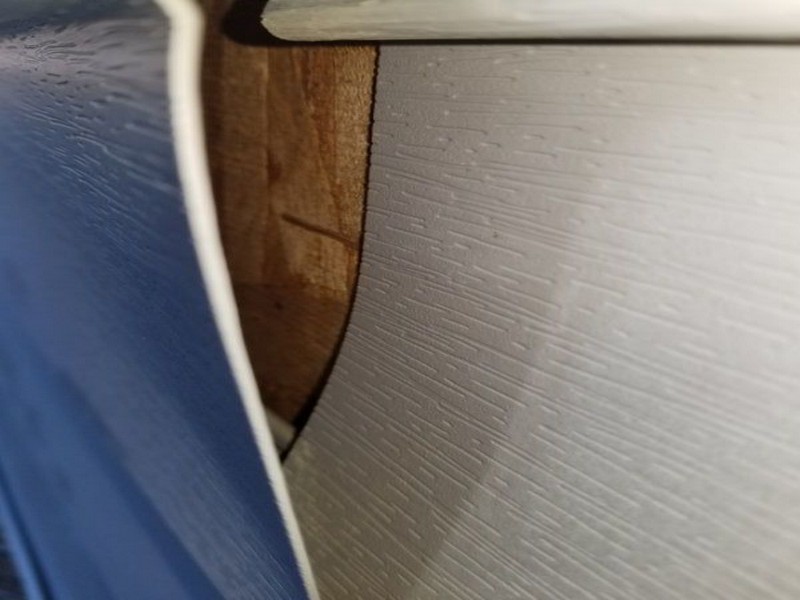
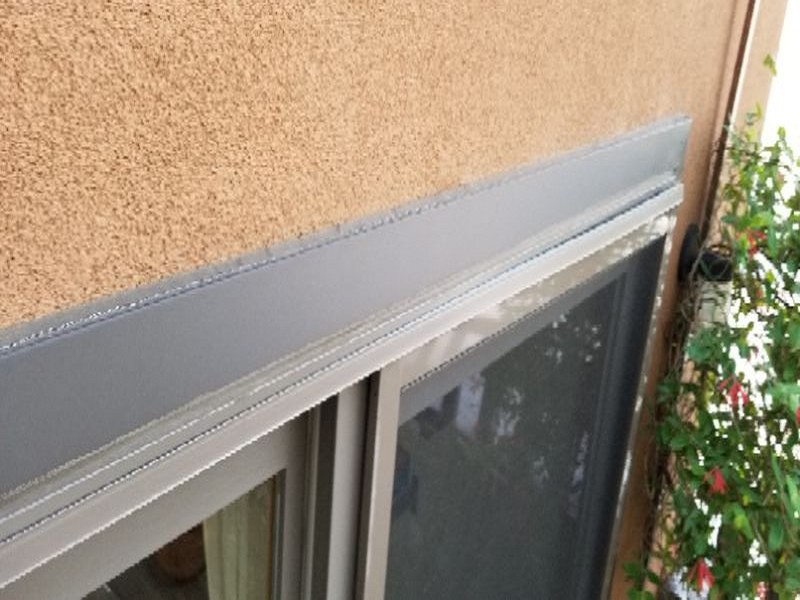
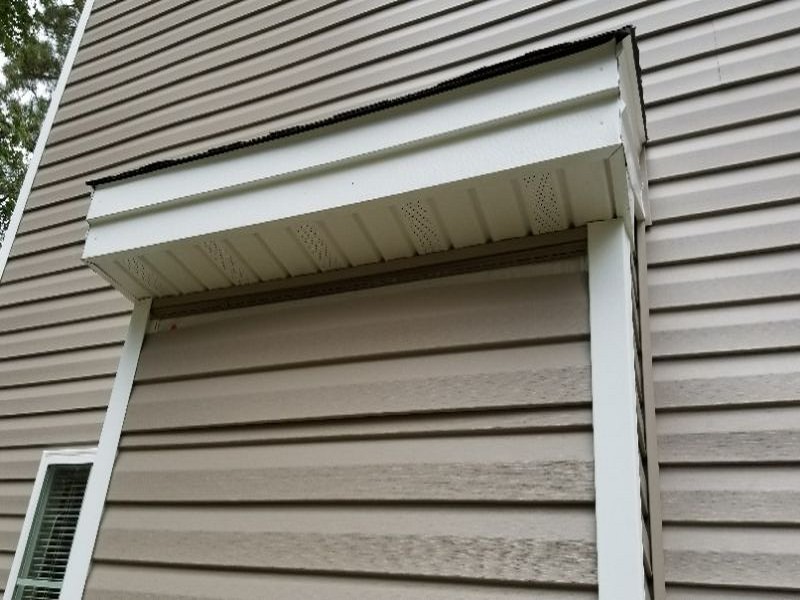
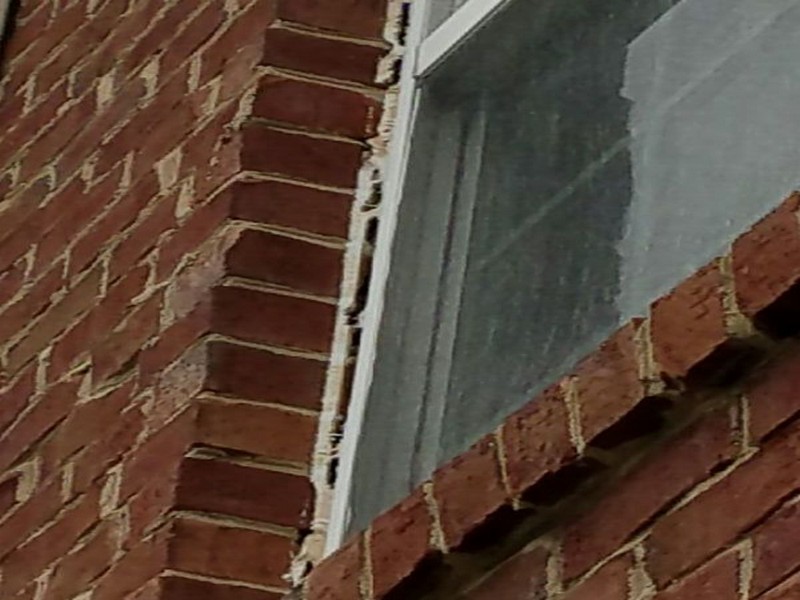
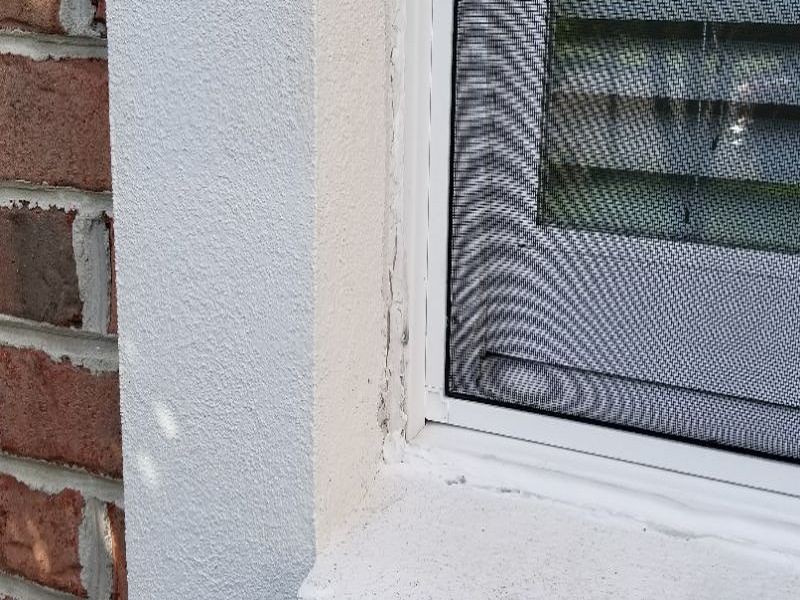
Flashings at horizontal transitions are critical for excluding water. Above windows and doors this is called a “head flashing.”
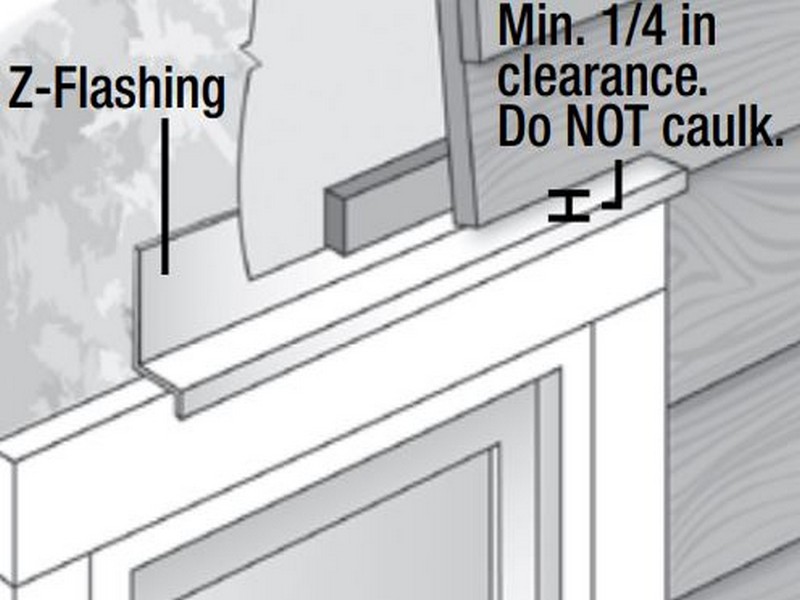
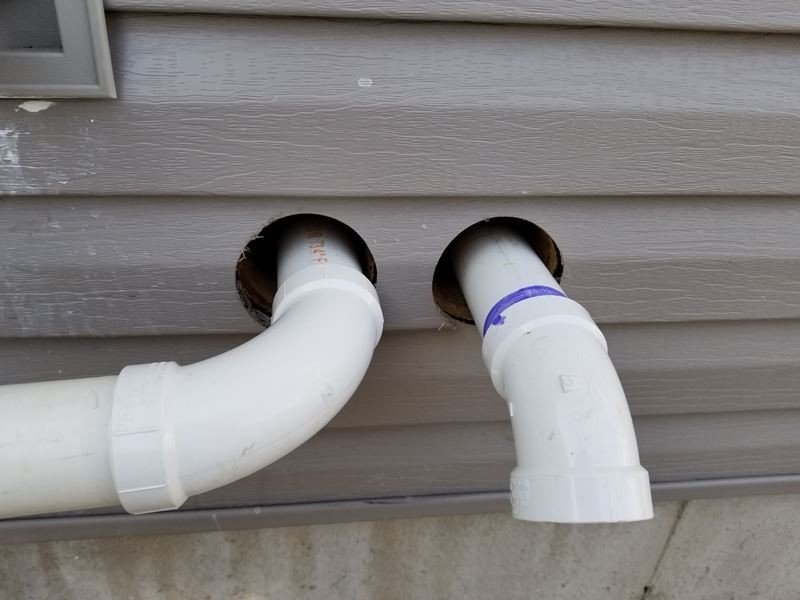
“Block penetrations” through a wall are horizontal flashings.
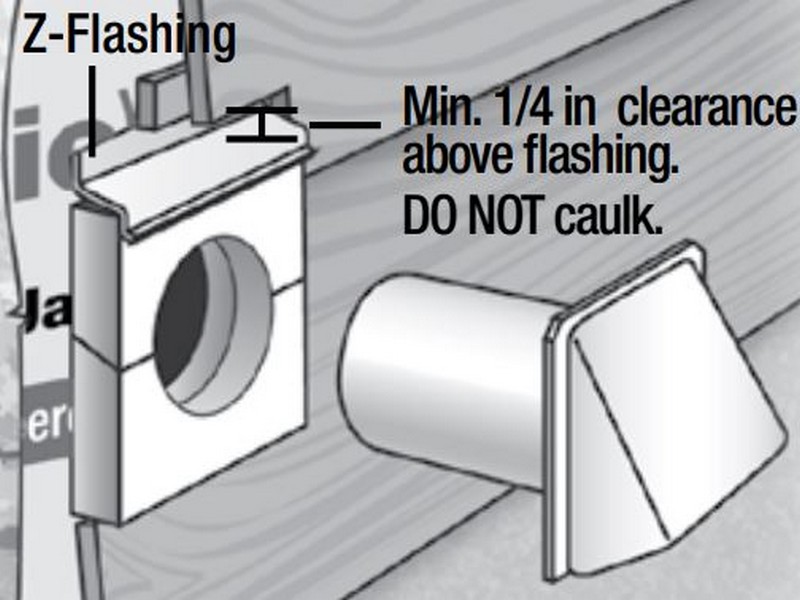
The “head flashing” is missing over the opening in the exterior wall. This can allow water penetration and deterioration. Hire a contractor to make the required repairs.
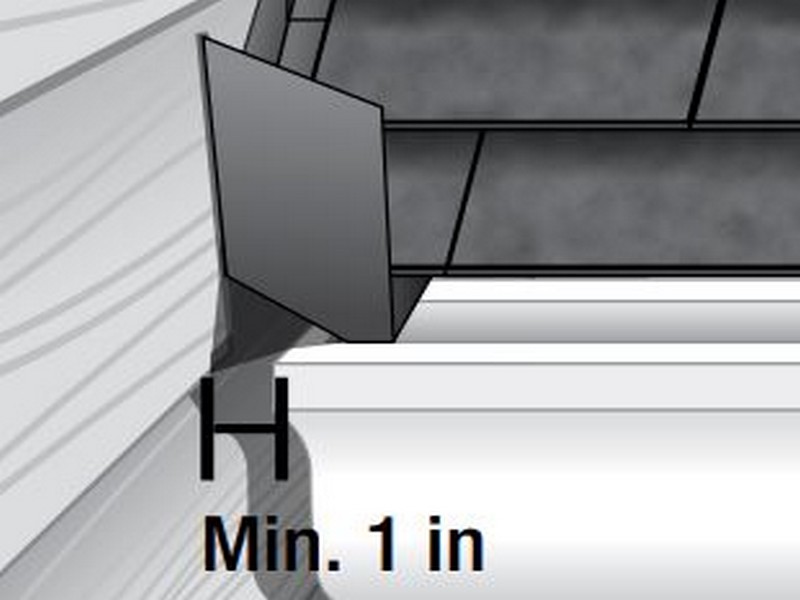
A “kick-out” flashing is essential where the side of a roof terminates against a wall. It prevents water from driving behind the siding.
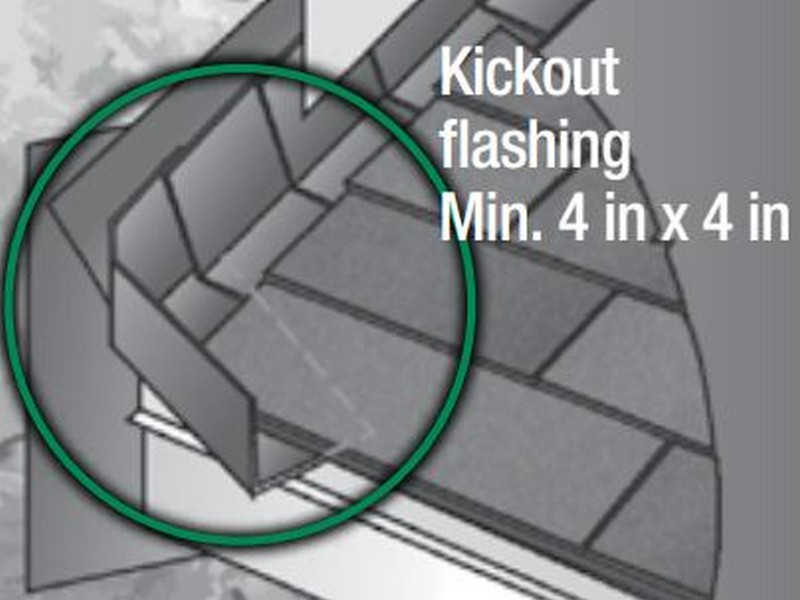
When a gutter is installed, the kick-out should be positioned to divert water into it.
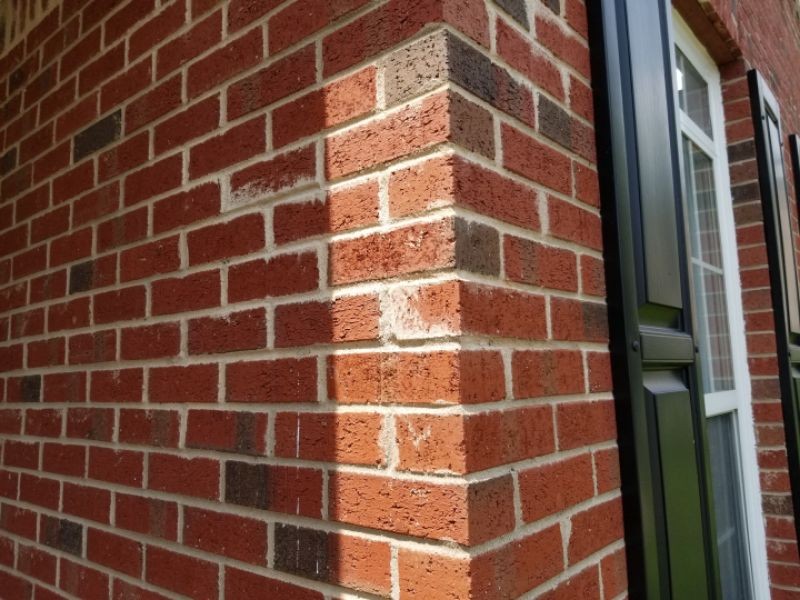
The transition between masonry and other sidings requires clearances and flashings.
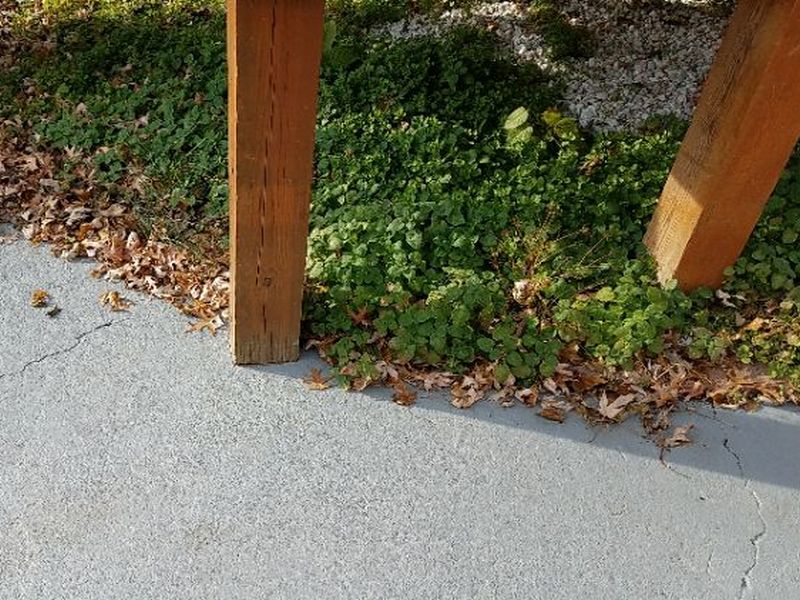
There is vegetation in contact with the siding. Vegetation can cause damage and premature deterioration to the siding. Trim or relocate any plants and trees to provide at least a one foot air space around the home.
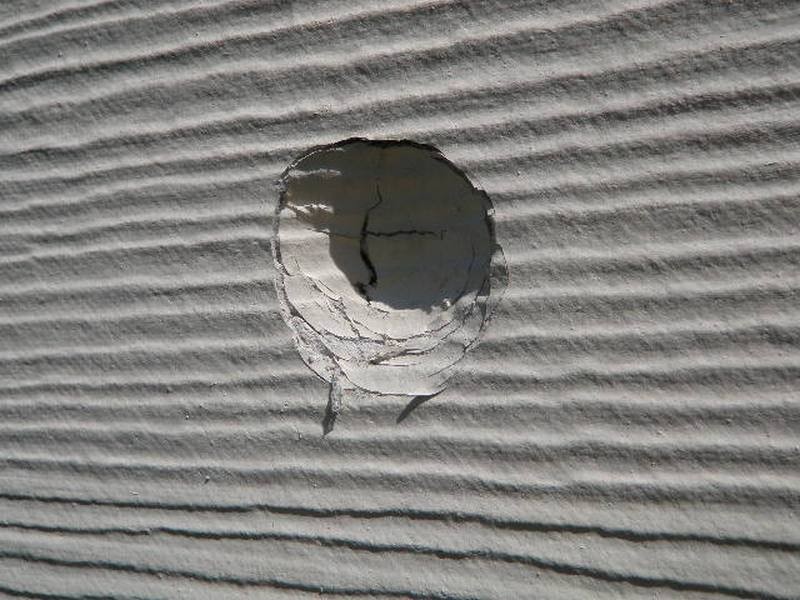
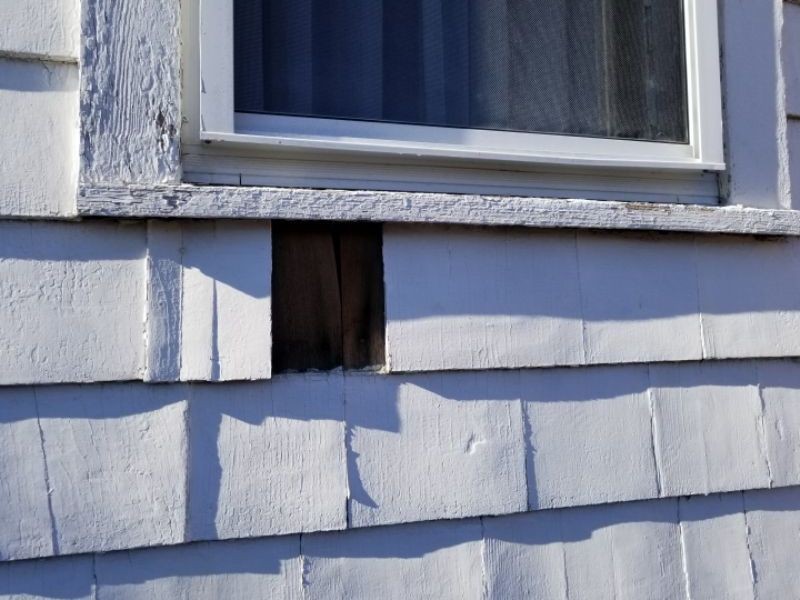
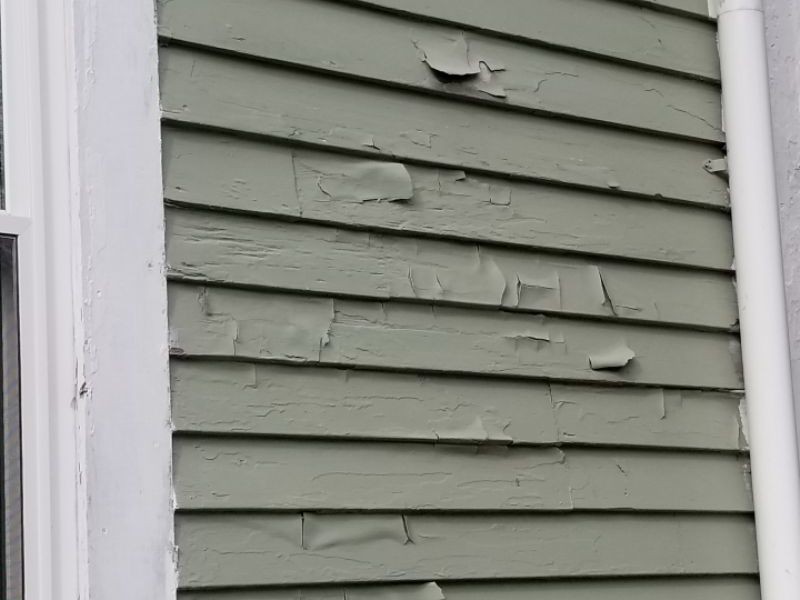
There is damaged or deteriorated siding. This permits moisture to enter and will cause further deterioration. There may be hidden damage behind the siding. Replace the siding and repair damage which may be revealed.
There is loose or missing siding. This permits moisture to enter. There may be hidden damage behind the siding. Replace the siding and repair damage which may be revealed.
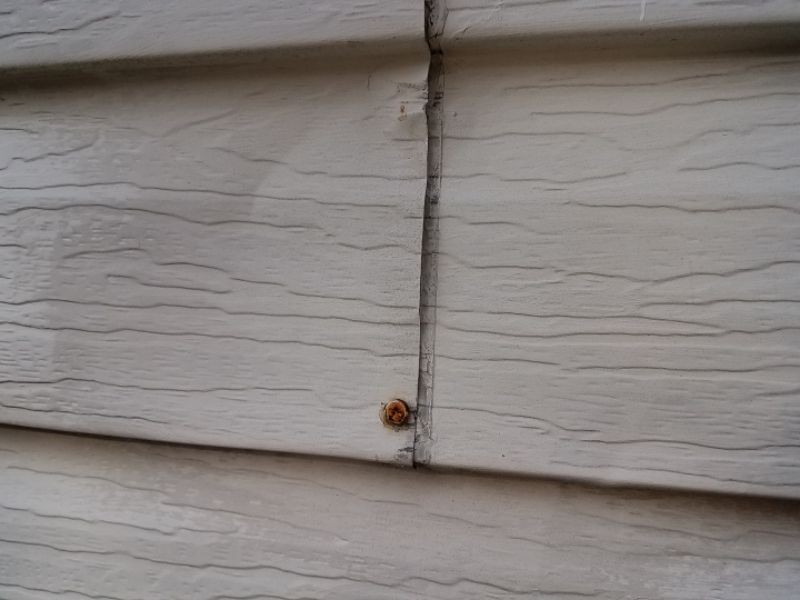
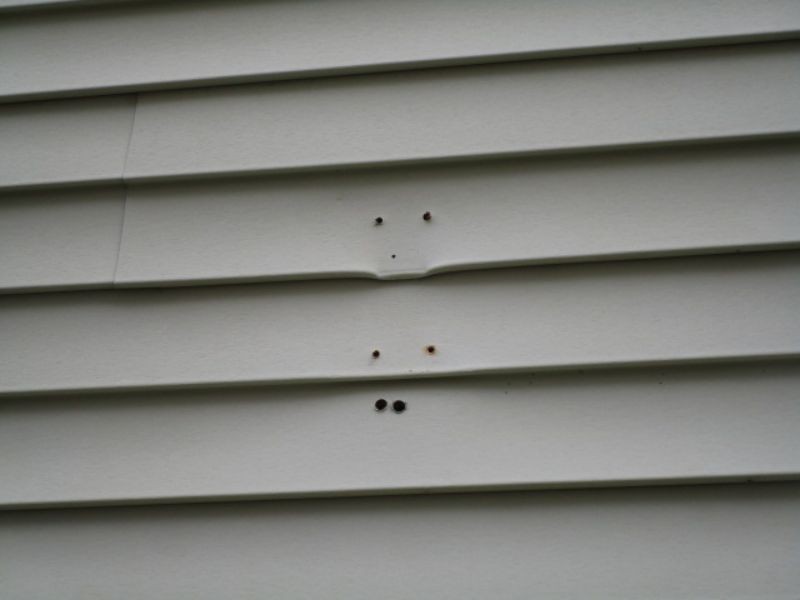
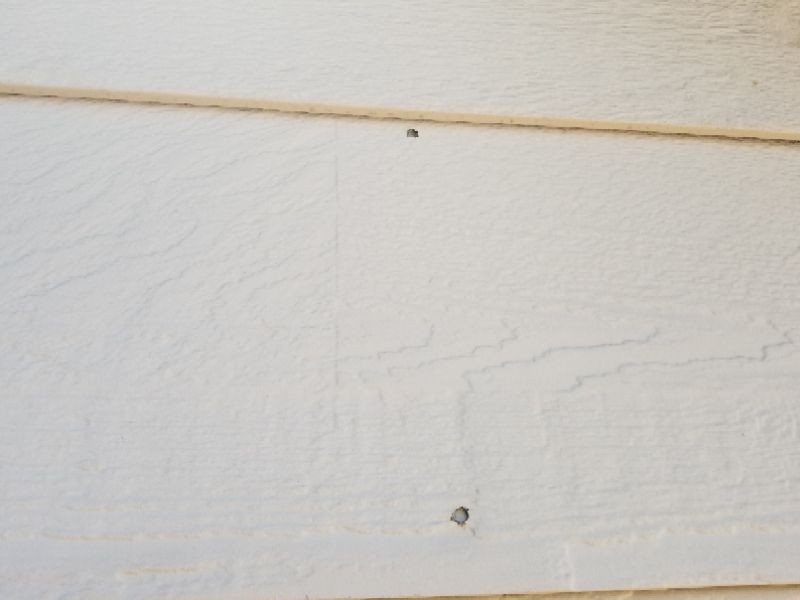
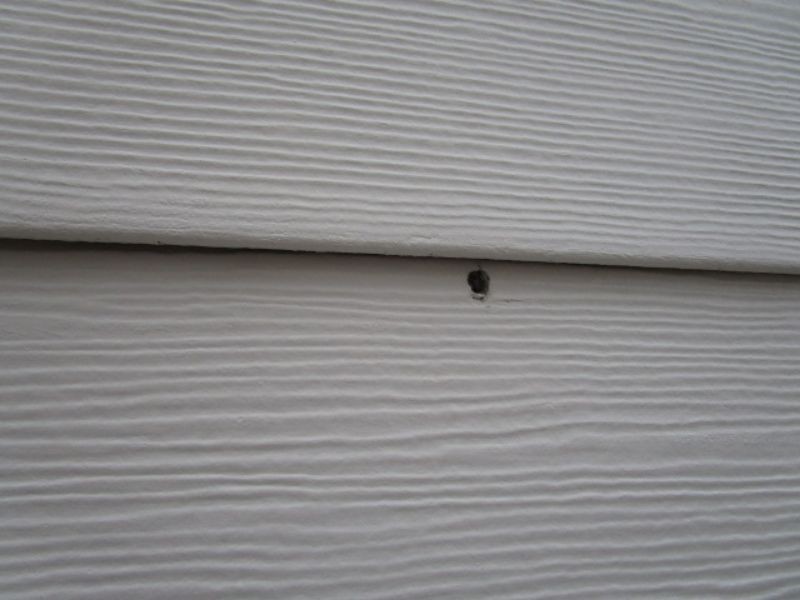
There are fasteners or nails in the siding. This may allow water intrusion and premature deterioration. Ensure that fasteners or nails are properly waterproofed.
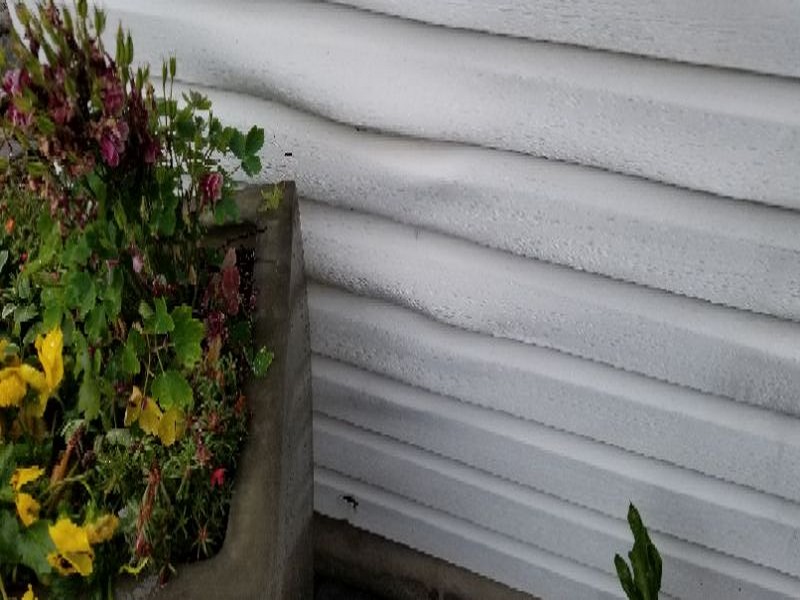
Vinyl siding must be installed “loosely.” You should be able to move the panels side-to-side. This allows for expansion and contraction, and prevents buckling. Panels should have a 1” overlap. No caulking should be installed except where the vinyl trim pieces meet another material, e.g. at the wood window trim. There should not be fasteners driven through the siding. Penetrations such as light fixtures and vent openings should have a trim box rather than relying solely on caulk.
The vinyl siding is buckled. This indicates that it is installed too tightly to allow for proper expansion and contraction. Have the siding reinstalled as needed.
There are gaps in the siding. This permits moisture to enter. Repair the siding and repair damage which may be revealed.

There is loose or missing siding. This permits moisture to enter. There may be hidden damage behind the siding. Replace the siding and repair damage which may be revealed.
There is damaged or deteriorated siding. This permits moisture to enter and will cause further deterioration. There may be hidden damage behind the siding. Replace the siding and repair damage which may be revealed.
The vinyl siding is damaged from heat. This is often due to using a BBQ grill too near the siding, and can allow water penetration. Repair or replace the siding as needed.
The vinyl siding is damaged from heat. This appears to be due to reflection from the adjacent window, and may allow water penetration. Replace the siding as needed and consult with a window specialist for preventative measures.
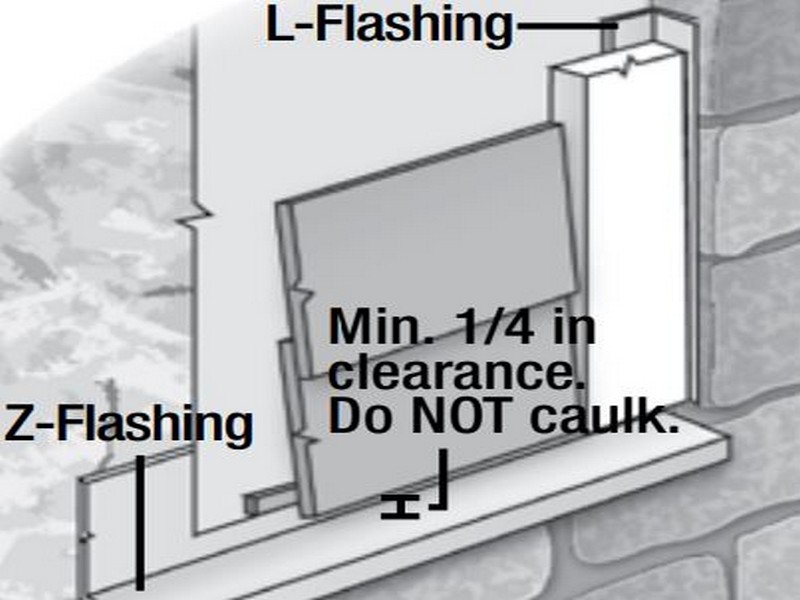
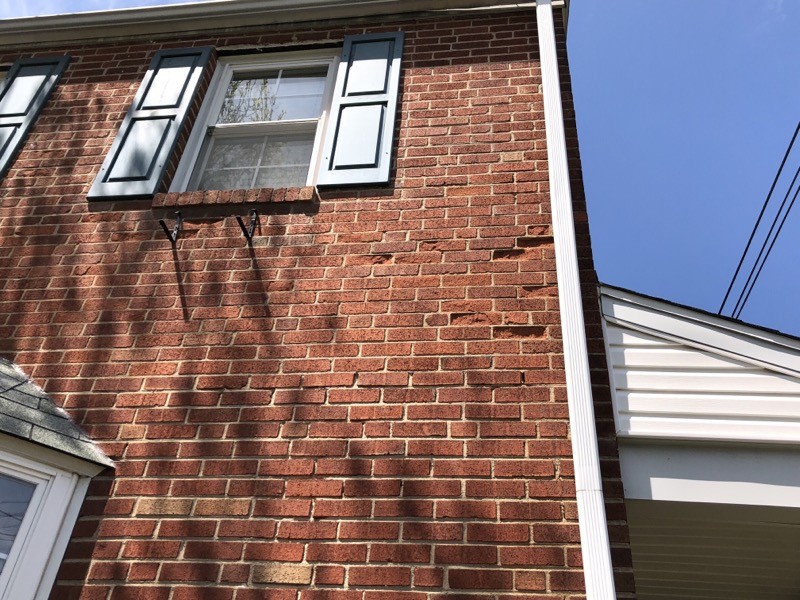
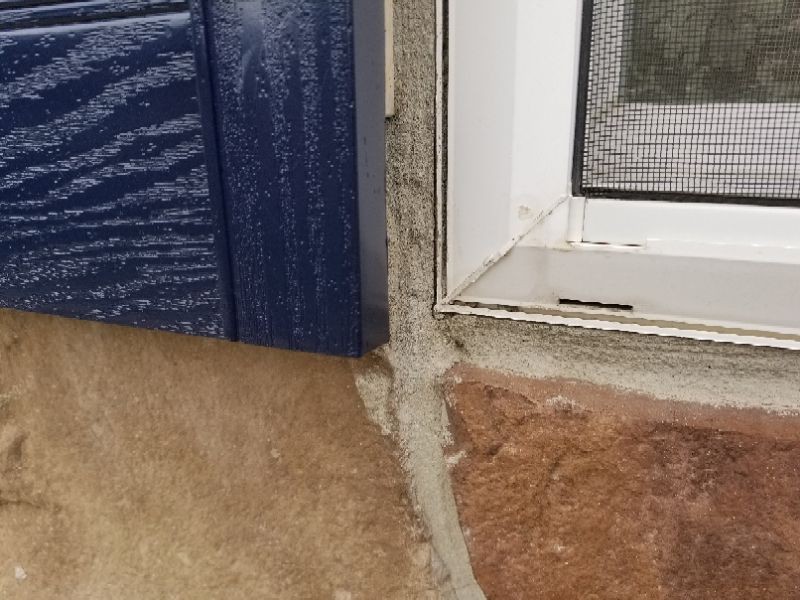
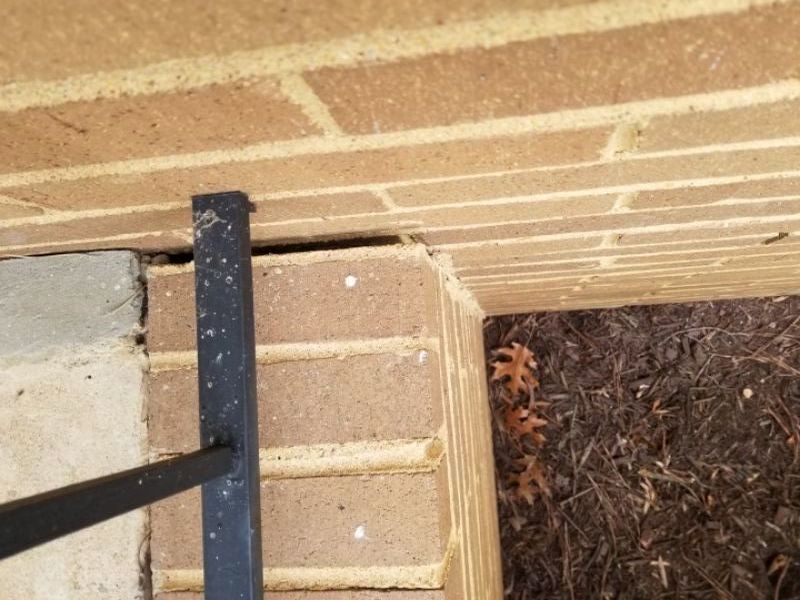
Be alert to missing or deteriorated mortar in the joints. Existing mortar repairs must be reported with a recommendation to consult with the homeowner and/or a mason to determine the history and whether there are ongoing issues. The area at window and door lintels should be inspected for any signs of lintel corrosion and/or masonry cracking. The transition joint between the masonry and the window or door trim should be a small and uniform gap that is suitable for caulking. Excess width and/or caulking should be reported.
Mortar repairs on soft antique brickwork using modern hard Portland mortar should be noted as a defect. It can cause spalling, which is a defect regardless of the mortar type. Be alert to displacement in brick veneer systems. This can be most readily observed at openings. Weep holes should be present above the flashings at window and door openings and at the base course above the grade.
The caulk is missing or deteriorated at the masonry openings. This can allow water penetration. Repair the caulk.
There is excess caulk at the masonry opening, which is likely to fail and permit water penetration. Caulks are not designed to span more than a 1/4″ gap. Hire a contractor to make repairs as needed.
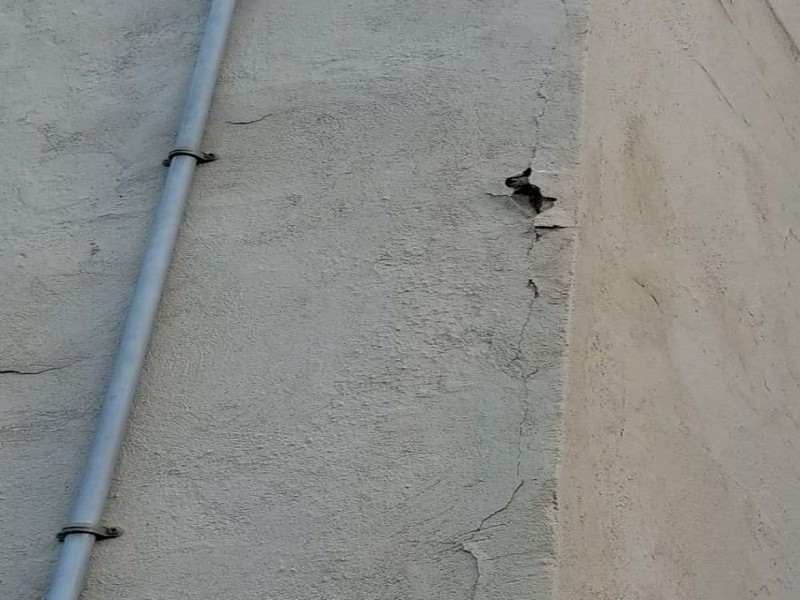
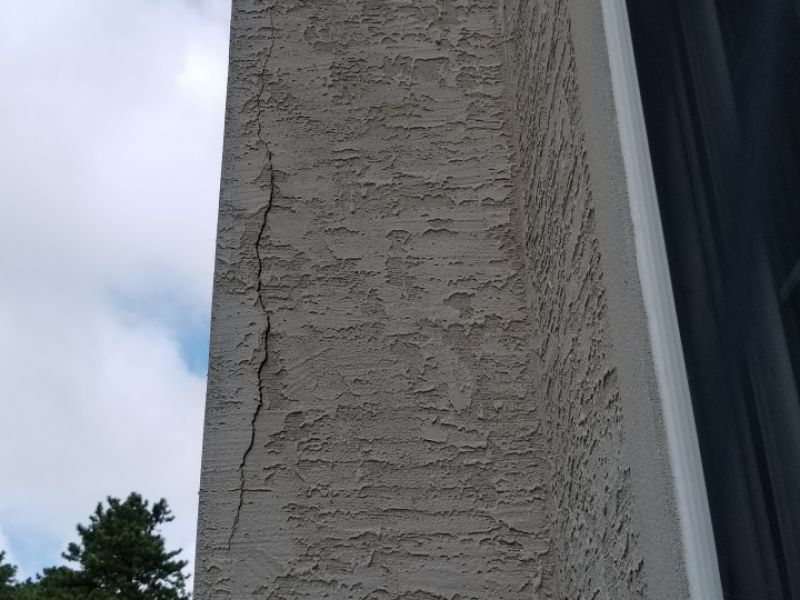
There are cracks in the siding. This permits moisture penetration and will cause further damage. Repair the cracks.
There is damaged or deteriorated siding. This permits moisture to enter and will cause further deterioration. There may be hidden damage behind the siding. Replace the siding and repair damage which may be revealed.
There is evidence of repairs to the siding. This implies past damage or movement. The extent of any concerns is unknown. Consult with the homeowner or a mason to determine what actions are needed.
The steel lintel is rusting. This can cause it to expand and cause cracking in the masonry. Repair and seal the lintel as needed.
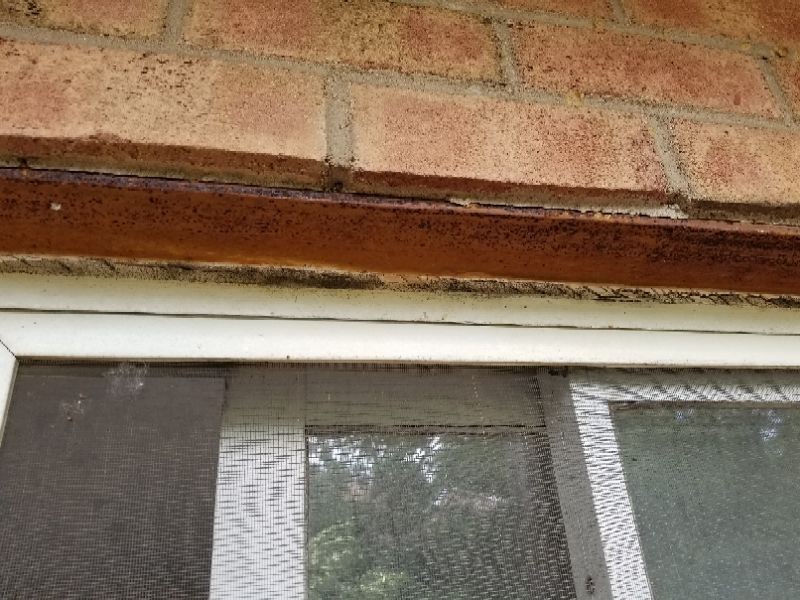

The steel lintel is corroded and is causing the surrounding masonry to crack. This will allow water penetration and further damage. Hire a mason to repair or replace the lintel as needed.
There are deteriorated mortar joints in the siding. This permits moisture penetration and will cause further damage. Repair the mortar joints.
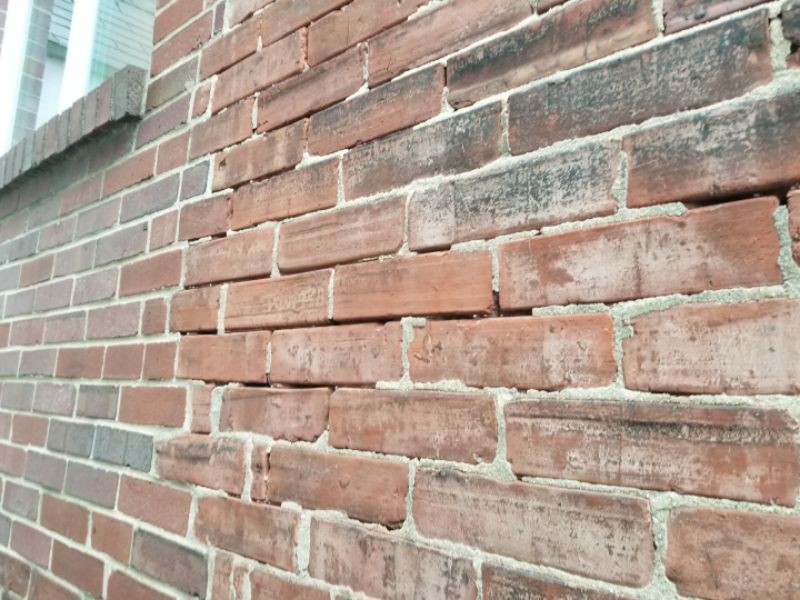
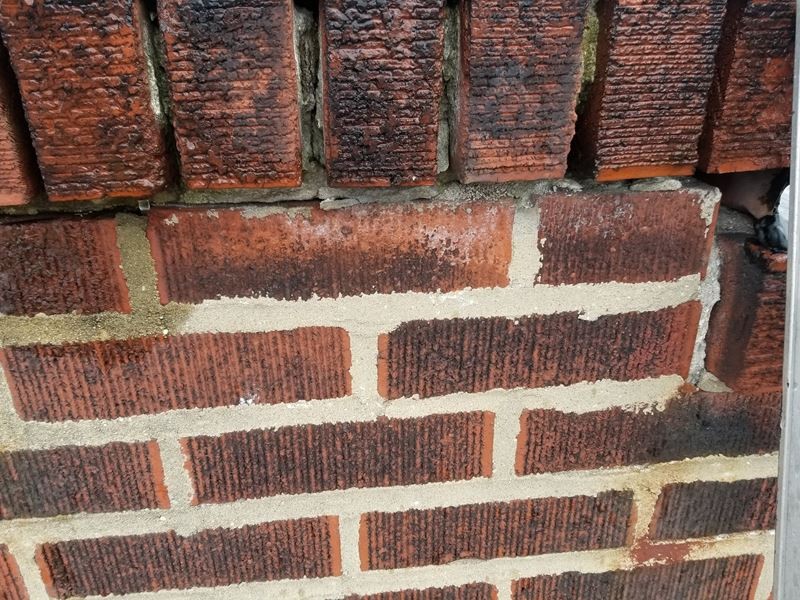
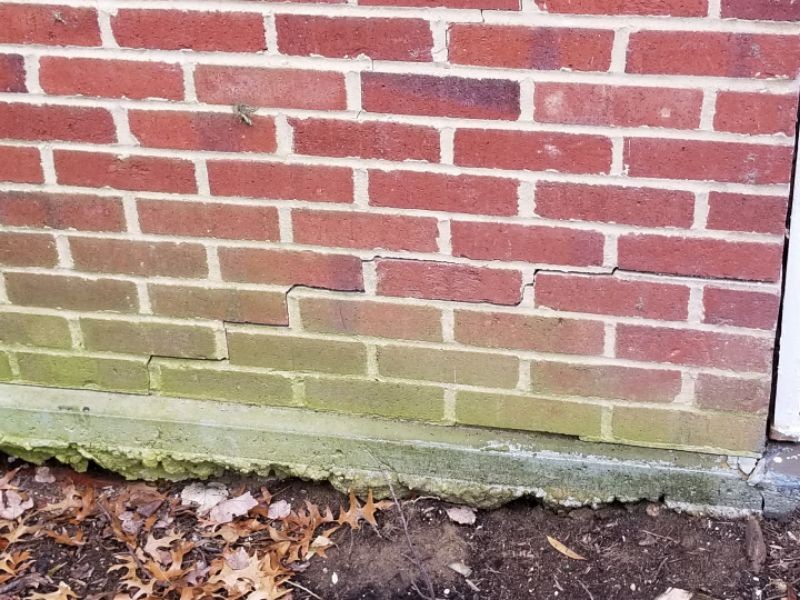
There are spalling bricks; spalling occurs when moisture penetrates the masonry and freezes. This permits further deterioration. Hire a mason to make required repairs.
There are spalling bricks and evidence that repairs using improper “Portland” mortar have been completed. Modern mortar is generally unsuitable for older, soft brickwork and will cause ongoing damage. Hire a mason with experience working with antique brickwork to make required repairs.
The masonry veneer lacks weep holes. Weep holes are required above openings in the wall and above the grade to allow moisture to escape. Hire a mason to make repairs as needed.
The weep holes in the masonry veneer are blocked. This prevents moisture from being able to drain out from behind the veneer. Unblock the weep holes.
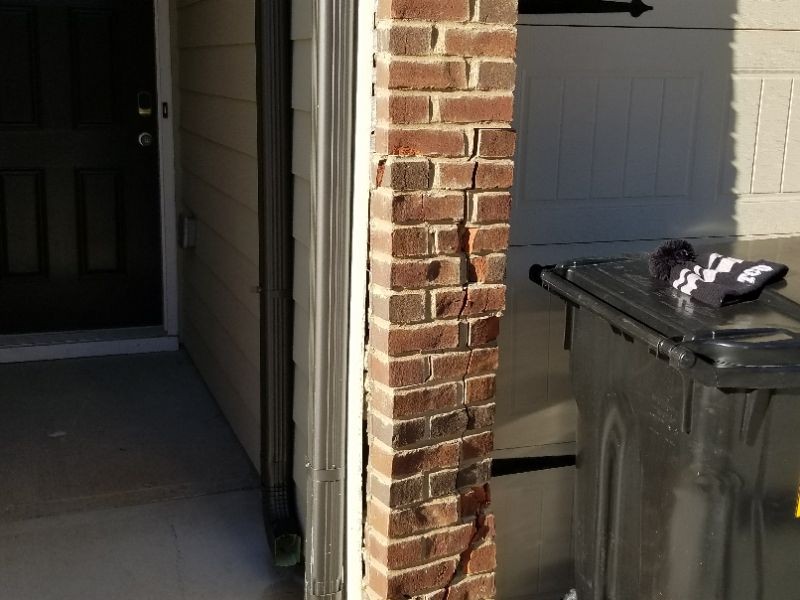
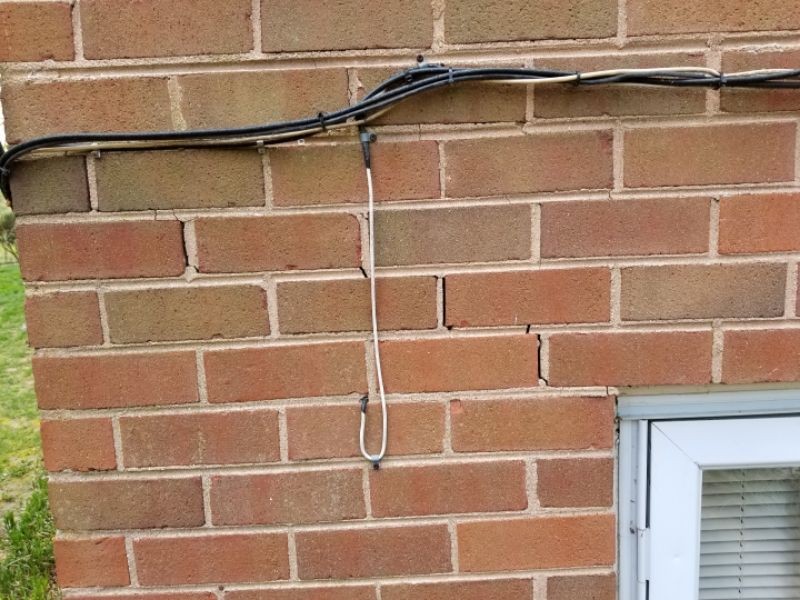
The masonry veneer is leaning, or has cracks with lateral displacement. This indicates movement or failure which may be ongoing. Hire a mason for an evaluation and repairs as needed.
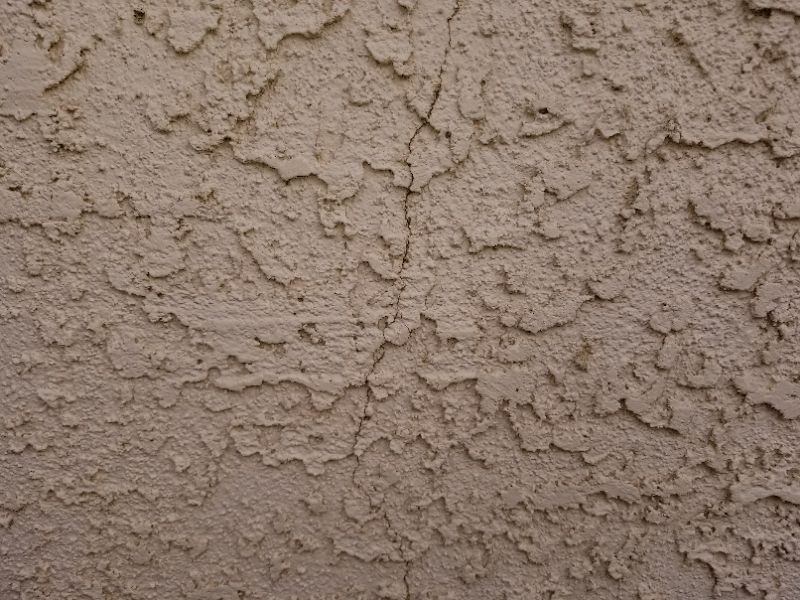
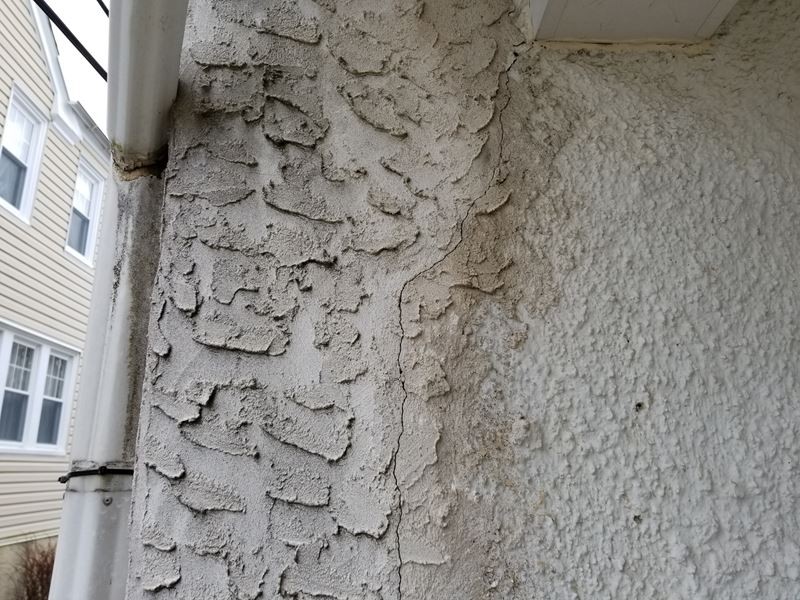
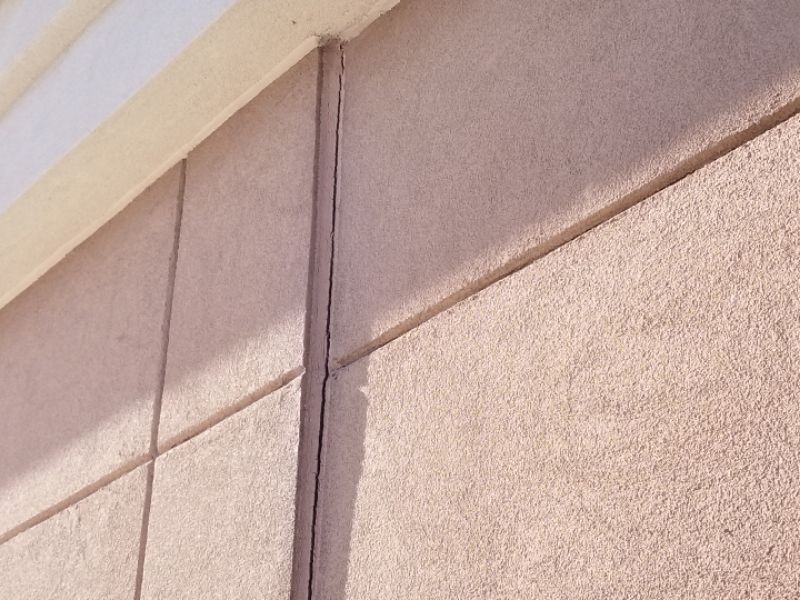
Conventional cement-based stucco over lath or masonry is generally long-lasting. Minor cracks, while common, are notable. Bulging and delaminations are signs of water penetration and failure.
There are cracks in the siding. This permits moisture penetration and will cause further damage. Repair the cracks.
There is damaged or deteriorated siding. This permits moisture to enter and will cause further deterioration. There may be hidden damage behind the siding. Replace the siding and repair damage which may be revealed.
These systems must be inspected carefully for any signs of failure, improper installation, or concerns. Cracks, stains, delaminations, and missing flashings should be reported. The available Information Statements can only be used if no issues are noted.
Transitions between the siding system and a dissimilar material must be a well-maintained, caulked gap of no more than ¼”. EIFS systems should have expansion joints (not “V” grooves) built into the installation at the floor lines of multi-story buildings, and in large surface areas exceeding 144 sf. Weep screeds should be installed at or below the foundation plate line on exterior stud walls. The weep screed should be placed a minimum of 4 inches above the earth or 2 inches above paved surface areas.
An exterior insulating finish system (EIFS) type of siding is present. Some of these stucco systems have had concerns because of concealed water penetration issues that are not readily apparent. While no signs of defects are evident, we cannot identify latent problems during the course of this visual Home Inspection, which is non-intrusive. Due to concerns surrounding this material, a specialized inspection of the EIFS siding is recommended. Furthermore, it is suggested to have an EIFS-certified professional perform annual inspections.
There are gaps in the siding. This permits moisture to enter. Repair the siding and repair damage which may be revealed. An in-depth inspection by a qualified EIFS specialist is recommended.
There is damaged or deteriorated siding. This permits moisture to enter and will cause further deterioration. There may be hidden damage behind the siding. Replace the siding and repair damage which may be revealed. An in-depth inspection by a qualified EIFS specialist is recommended.
The kick-out flashing is inadequate, and significant overflow is evident. EIFS siding is especially vulnerable to water penetration below the roof/sidewall junction. Have a qualified EIFS specialist provide an in-depth inspection and repairs as needed.
A manufactured stone veneer (MSV) type of siding is present. Some of these systems have had concerns because of concealed water penetration issues that are not readily apparent. While no signs of defects are evident, we cannot identify latent problems during the course of this visual Home Inspection, which is non-intrusive. Due to concerns surrounding this material, a specialized inspection of the MSV siding is recommended. Furthermore, it is suggested to have an MSV-certified professional perform annual inspections.
There are deteriorated mortar joints in the siding. This permits moisture penetration and will cause further damage. Have repairs and an in-depth inspection performed by a qualified MSV specialist.
There are cracks in the MSV siding. This permits moisture penetration and will cause further damage. Have repairs and an in-depth inspection performed by a qualified MSV specialist.
There is loose or missing siding. This permits moisture to enter. There may be hidden damage behind the siding. Have repairs and an in-depth inspection performed by a qualified MSV specialist.
There is damaged or deteriorated siding. This permits moisture to enter and will cause further deterioration. There may be hidden damage behind the siding. Have repairs and an in-depth inspection performed by a qualified MSV specialist.
The MSV is installed without a flexible sealant at the transition to different materials. This is contrary to industry standards, and will likely fail and admit water. Have repairs and an in-depth inspection performed by a qualified MSV specialist.

The MSV siding is installed in contact with the ground, and without a weep screed above the grade. This is contrary to industry standards and will likely lead to water penetration and deterioration. Have repairs and an in-depth inspection performed by a qualified MSV specialist.
The MSV siding is installed in contact with the deck, and without a weep screed above it. This is contrary to industry standards and will likely lead to water penetration and deterioration. Have repairs and an in-depth inspection performed by a qualified MSV specialist.
The MSV siding is installed in contact with the slab, and without a weep screed above it. This is contrary to industry standards and will likely lead to water penetration and deterioration. Have repairs and an in-depth inspection performed by a qualified MSV specialist.
The siding must have a viable paint or stain coating for protection. Pay special attention to the edges, especially on Composition Board. Swollen and/or warped siding should be reported. Exposed fasteners should not be driven below the siding’s surface; the fasteners should be sealed. The sidings must be installed with proper clearances.
A composition board siding is present. Some of these types of siding material are vulnerable to deterioration and disfigurement due to moisture absorption at the bottom edges and at butt joints. Wavy bulges are also common. Diligent maintenance is needed at all joints and edges to prevent deterioration. A regular painting schedule with a good primer and top coat should be followed to ensure reliable performance.
There is damaged or deteriorated siding. The edges of the composition boards have begun to absorb moisture. This will cause further deterioration. There may be hidden damage behind the siding. Replace the siding and repair damage which may be revealed.
There is damaged or deteriorated siding. This permits moisture to enter and will cause further deterioration. There may be hidden damage behind the siding. Replace the siding and repair damage which may be revealed.
There is loose or missing siding. This permits moisture to enter. There may be hidden damage behind the siding. Replace the siding and repair damage which may be revealed.
The siding is bare (no paint or stain). Unprotected siding will deteriorate much more rapidly than painted or stained siding. Paint or stain the siding.
The paint on the siding is peeling or blistering. This indicates moisture penetration, and will allow further damage. Repair or replace the siding, and paint as needed.
There are fasteners in the exterior siding that are driven below the surface. This will permit moisture penetration and allow deterioration. Ensure that fasteners or nails are properly waterproofed.
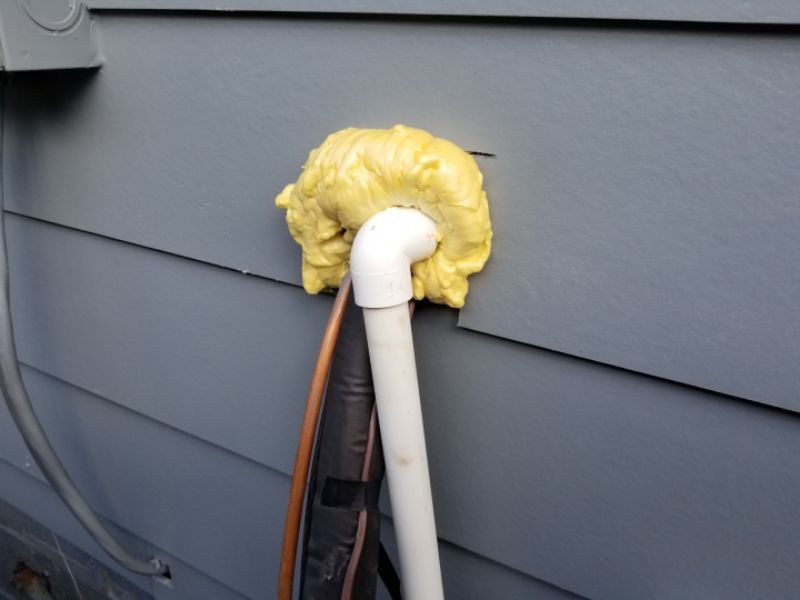
There are gaps in the siding. This permits moisture to enter. The repairs are unworkmanlike; expansive foam is not an exterior-rated product and will fail. Repair the siding and repair damage which may be revealed.
Cement Asbestos appears to be installed as an exterior finish. Do not abrade this siding in any way or disturb the surface of these shingles; asbestos fibers can be released into the air. This type of siding shingle is no longer manufactured and replacement shingles can be difficult to find. Removal is also increasingly expensive and must be performed by a specialist. Only a laboratory level analysis can confirm asbestos content. This inspection does not include any such analysis.
There is damage or deterioration to siding that appears to be cement asbestos. This permits moisture to enter and will cause further deterioration. There may be hidden damage behind the siding. Replace the siding and repair damage which may be revealed. Due to the potential heath risks associated with asbestos, all repairs should performed by a qualified specialist.
Siding Limitation and Information Statements
Cement asbestos, no lab analysis: Cement Asbestos appears to be installed as an exterior finish. Do not abrade this siding in any way or disturb the surface of these shingles; asbestos fibers can be released into the air. This type of siding shingle is no longer manufactured and replacement shingles can be difficult to find. Removal is also increasingly expensive and must be performed by a specialist. Only a laboratory level analysis can confirm asbestos content. This inspection does not include any such analysis.
Near/at end useful life, budget for replacement: The siding is near or at the end of its useful life. We recommend establishing a budget to replace the siding.
Past end useful life, budget for replacement: The siding is past the end of its useful life. We recommend establishing a budget to replace the siding.
Trim vegetation away from house: Trim the vegetation away from the house to prevent physical damage and moisture concerns.
Composition board siding statement: A composition board siding is present. Some of these types of siding material are vulnerable to deterioration and disfigurement due to moisture absorption at the bottom edges and at butt joints. Wavy bulges are also common. Diligent maintenance is needed at all joints and edges to prevent deterioration. A regular painting schedule with a good primer and top coat should be followed to ensure reliable performance.
EIFS siding statement: An exterior insulating finish system (EIFS) type of siding is present. Some of these stucco systems have had concerns because of concealed water penetration issues that are not readily apparent. While no signs of defects are evident, we cannot identify latent problems during the course of this visual Home Inspection, which is non-intrusive. Due to concerns surrounding this material, a specialized inspection of the EIFS siding is recommended. The specialist performing this inspection should address the integrity of the installation according to the manufacturer’s standards, and should perform intrusive (inside the wall) moisture readings. Furthermore, it is suggested to have an EIFS-certified professional perform annual inspections.
MSV siding statement: A manufactured stone veneer (MSV) type of siding is present. Some of these systems have had concerns because of concealed water penetration issues that are not readily apparent. While no signs of defects are evident, we cannot identify latent problems during the course of this visual Home Inspection, which is non-intrusive. Due to concerns surrounding this material, a specialized inspection of the MSV siding is recommended. The specialist performing this inspection should address the integrity of the installation according to the manufacturer’s standards, and should perform intrusive (inside the wall) moisture readings. Furthermore, it is suggested to have an MSV-certified professional perform annual inspections.
Stucco siding statement: A stucco siding system is present. Some of these stucco systems have had concerns because of concealed water penetration issues that are not readily apparent. While no signs of defects are evident, we cannot identify latent problems during the course of this visual Home Inspection, which is non-intrusive. Due to concerns surrounding this material, a specialized inspection of the siding is recommended. The specialist performing this inspection should address the integrity of the installation according to the manufacturer’s standards, and should perform intrusive (inside the wall) moisture readings. Furthermore, it is suggested to have a certified professional perform annual inspections.
Trim
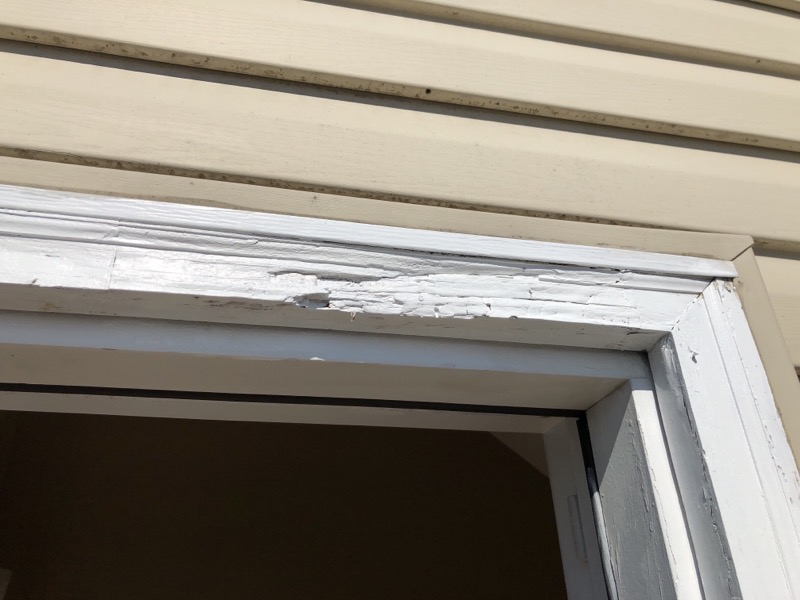
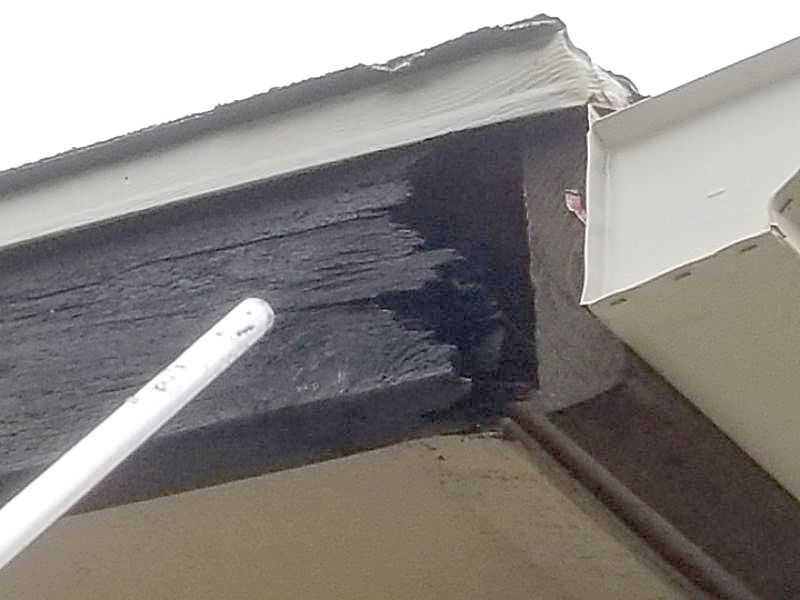
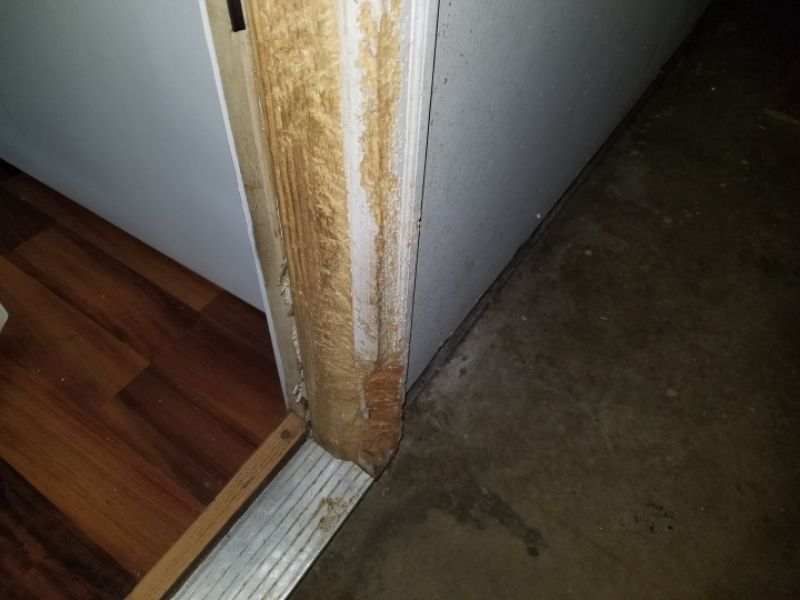
Inspect the trim for gaps, damage, deterioration, missing or deteriorated caulk, improper repairs, insect damage, loose or missing sections, inadequate clearances to grade, unsealed fasteners, missing paint or stain, and missing or improperly-installed flashings. Gently probe to reveal soft areas. Attempt to inspect any trim that is not accessible by using binoculars and/or opening upper story windows to gain physical access.
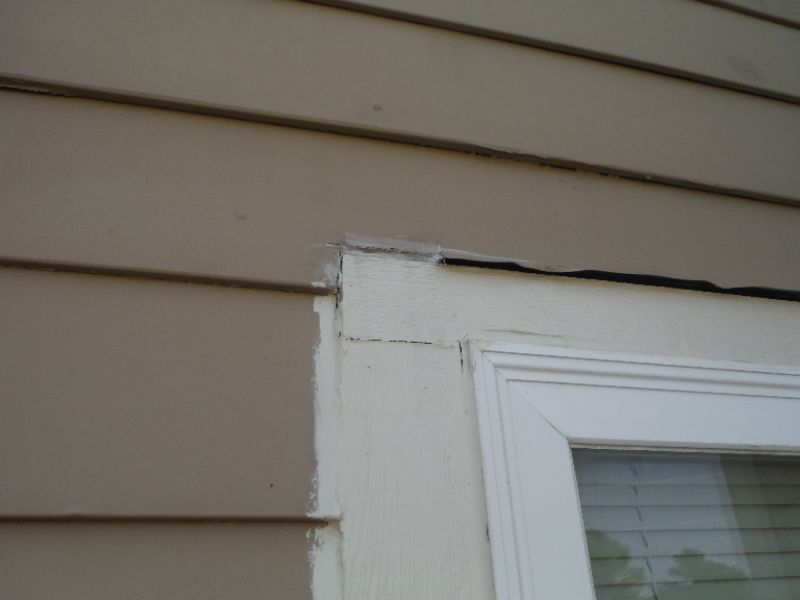
The caulk at the trim is missing or deteriorated. This permits moisture to enter. Caulk the trim, and prime and paint as needed.

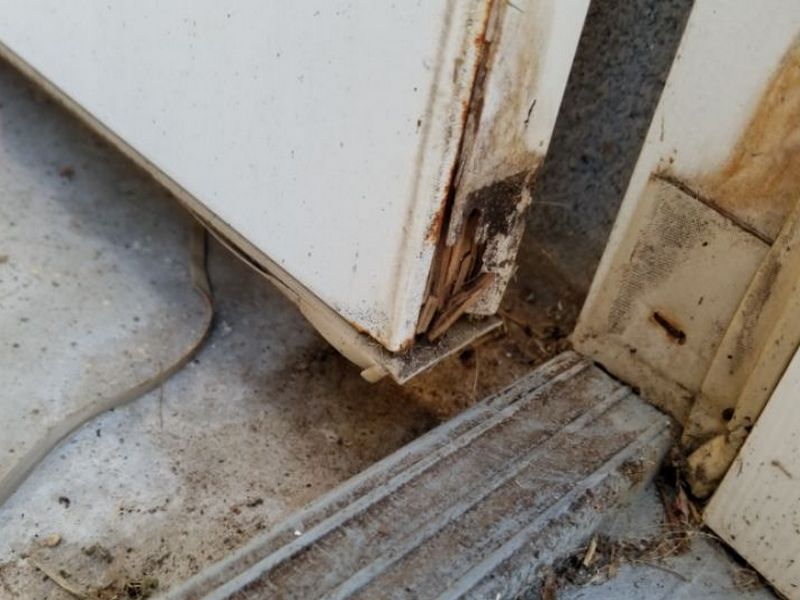
The trim is loose or missing. This permits moisture to enter. Repair or replace the trim and repair any damage which may be revealed.
The trim is damaged or deteriorated. This permits moisture to enter and will cause further deterioration. There may be hidden damage behind the trim. Replace the trim and repair any damage which may be revealed. Caulk, one-part putty fillers, and paint are not acceptable substitutes for solid material.
The trim has been repaired with patching materials. Caulk, one-part putty fillers, and paint are not acceptable substitutes for solid material. They will fail and permit moisture to enter. Replace the trim and repair any damage which may be revealed.

There are gaps large enough to allow bats, birds, vermin and insects to enter. This is a health concern. Hire a contractor to make required repairs.
Trim Limitation and Information Statements
Wood trim subject to deterioration: Wood trim is subject to deterioration and requires periodic maintenance, including cleaning. Keep trim material sealed with paint or stain to protect it from moisture penetration. Repair and caulk gaps prior to recoating.
Chimney
Chimneys are the exterior portion of a larger system. They enclose and protect the components that manage the exhaust for various combustion devices. When you observe a concern or defect in a chimney, it is important to “connect the dots” back to the interior side of the system, e.g. the fireplace, fuel-burning appliance, or a fossil fuel water heater or heating plant.
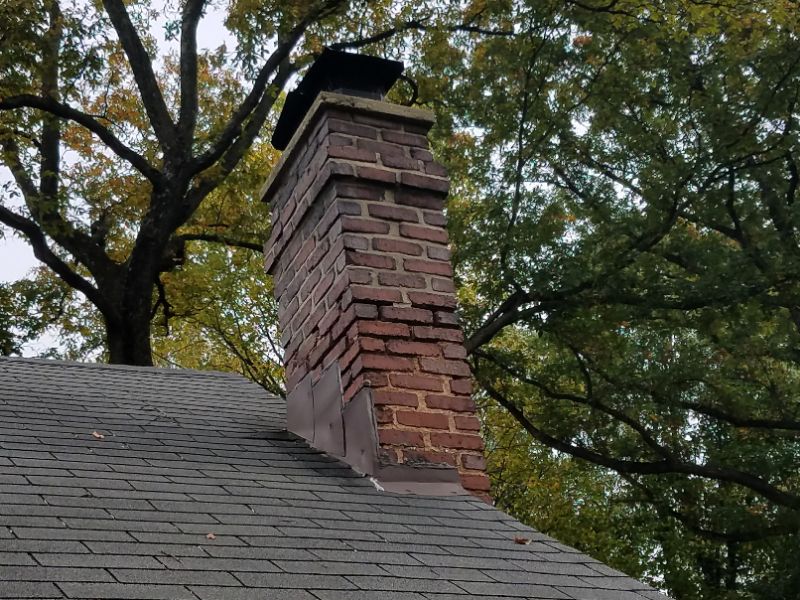
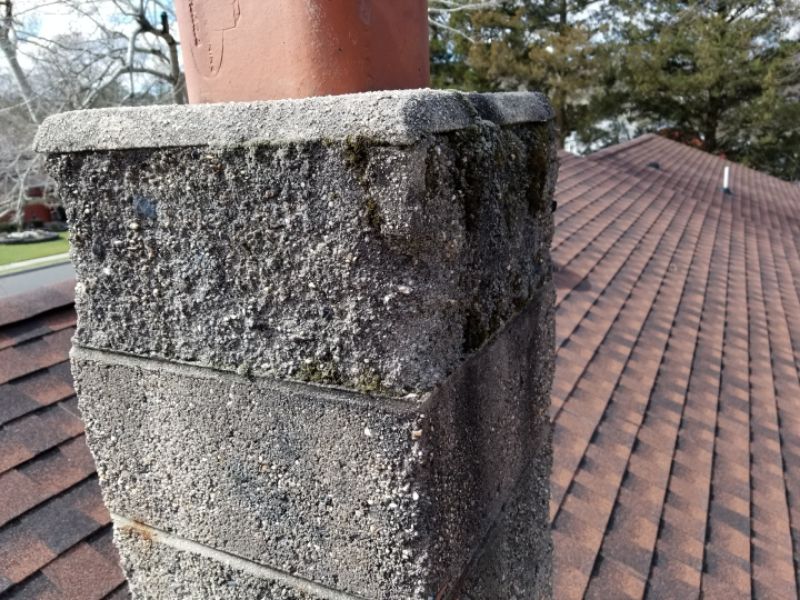
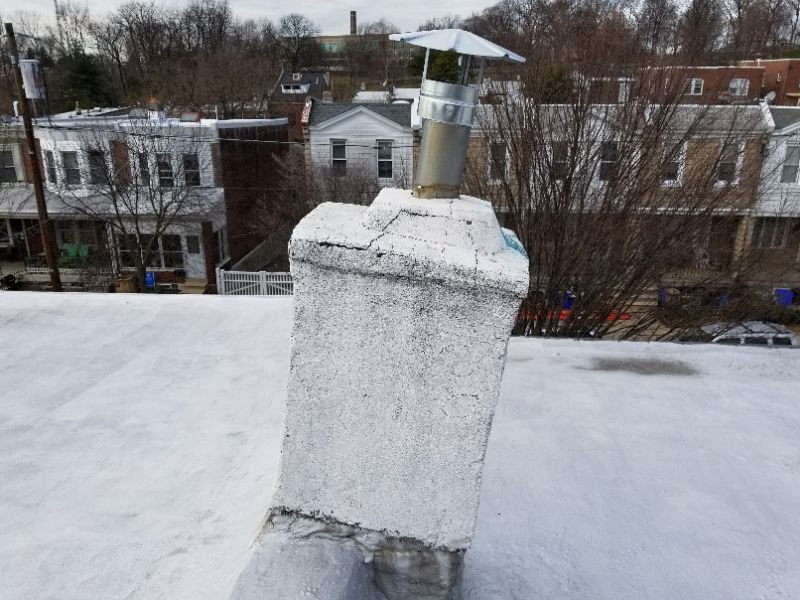
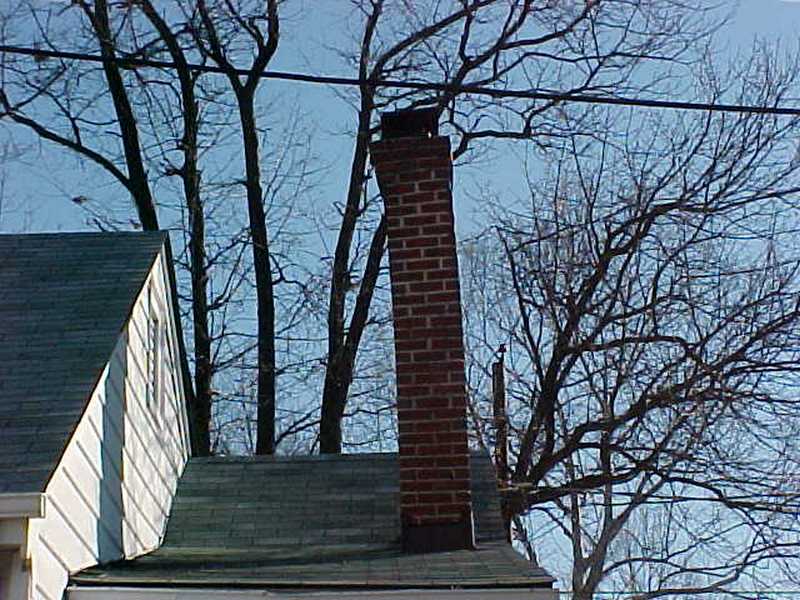
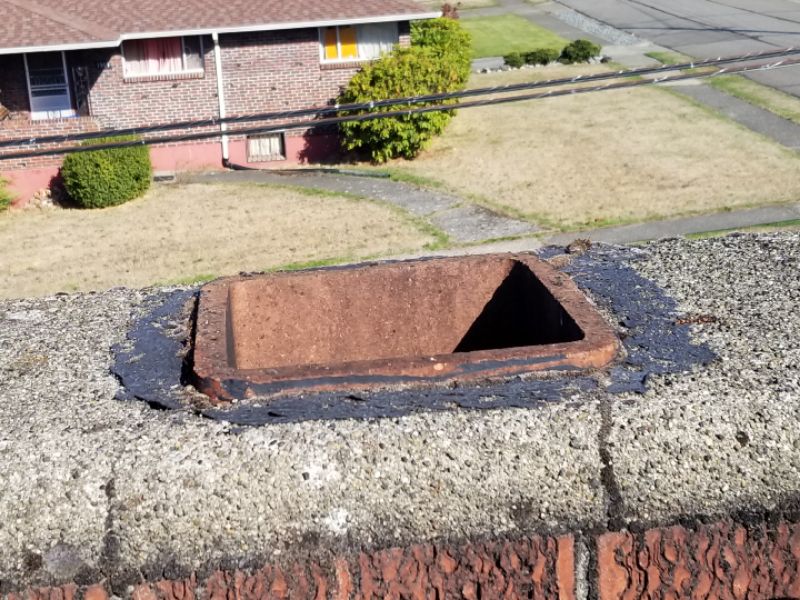
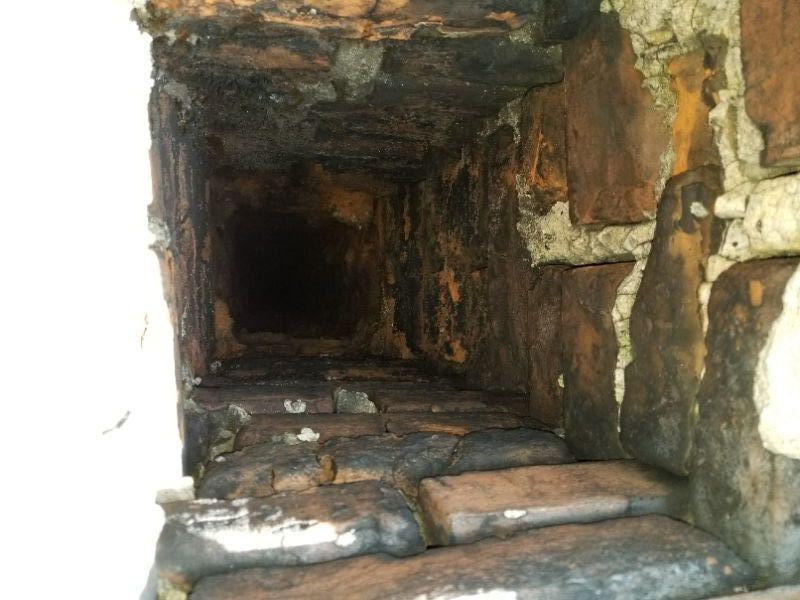
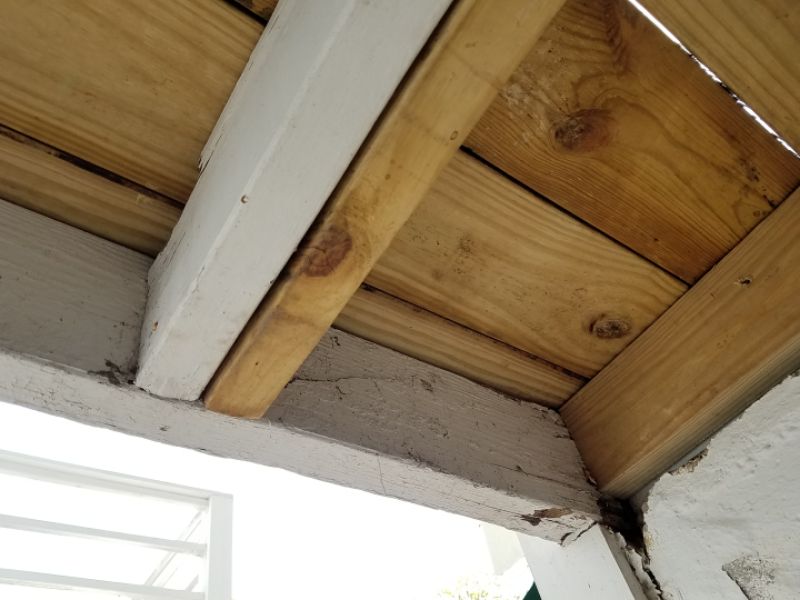
Chimneys should be inspected as a whole (the big picture) and in detail. Whenever safe and possible they should be observed from the roof level as well as from the ground. Be aware of any signs that indicate that a chimney or any of its flues have been abandoned. Be sure that you can account for all flues required by the home’s combustion sources, and that none are closed off. Inspect the chimney(s) for any signs of problems with the overall structural integrity. They should be straight without any excessive leaning. There should be no separation away from the building at side-mounted chimneys. The chimney should clear the roof properly and adhere to the “3-2-10” height and clearance rule.
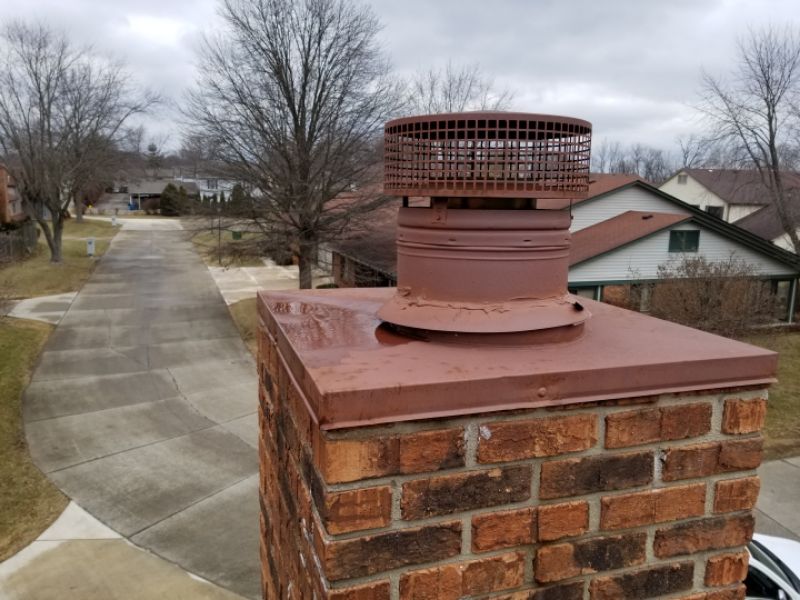
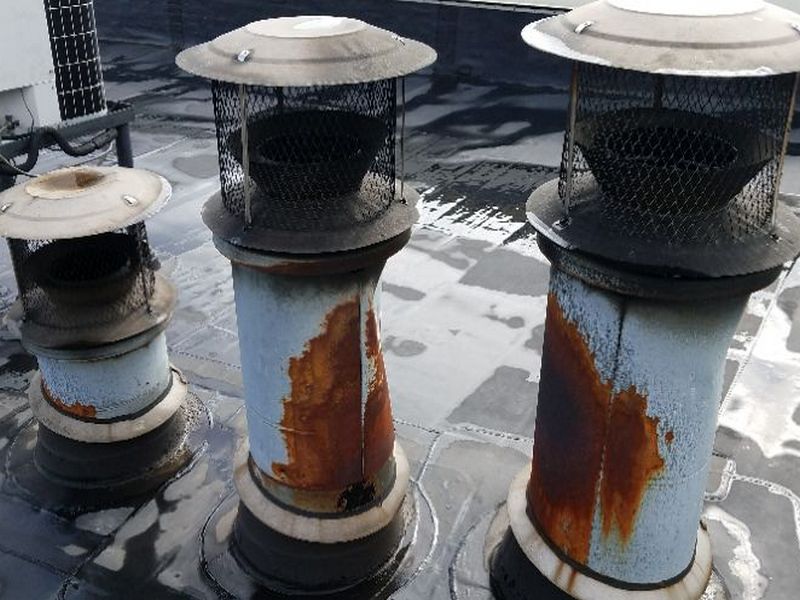
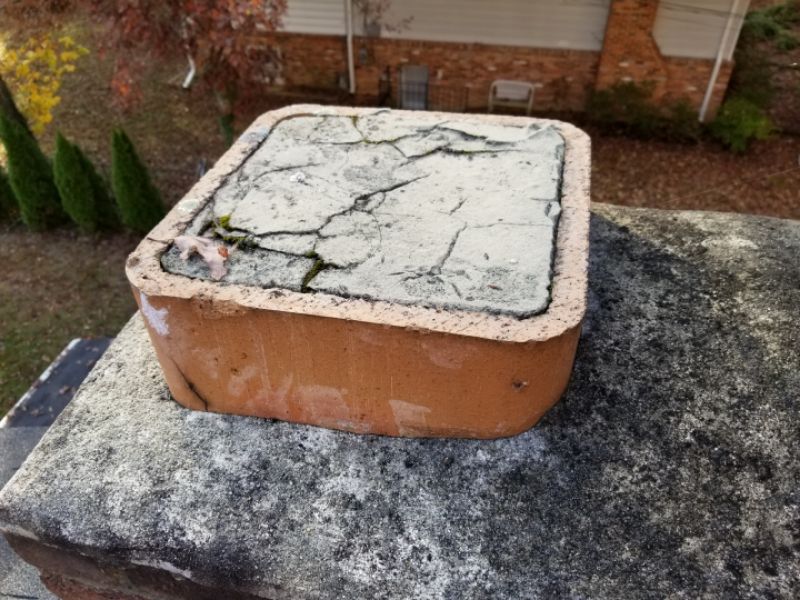
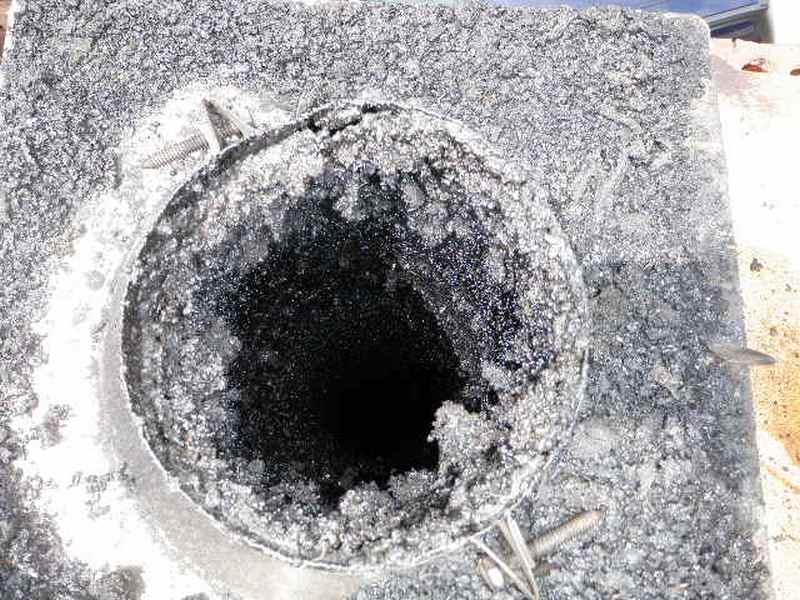
Inspect the crown or cap. It should be intact and in good condition with no cracks or openings that will allow water penetration. Metal caps should be free of significant rust or corrosion. All crowns and caps should shed water and not allow ponding. A rain cap/spark arrestor should be securely installed. Flat screening is not an acceptable flue cover.
The chimney crown is cracked. This permits water penetration into the chimney. Repair the crown.
The chimney crown is deteriorated. This permits water penetration into the chimney. Replace the crown.
The chimney crown is depressed. This permits water to pond, encouraging deterioration. Repair the crown.

The metal chimney crown is corroded. This can allow water into the chimney. Replace the crown.

The chimney is too short. Safety requires that it extend 3′ above the roof where it penetrates the roof surface. It must also be at least 2′ higher than any part of roof within 10′ of the chimney. Do not use the chimney; hire a contractor to provide further evaluation and repairs as needed.

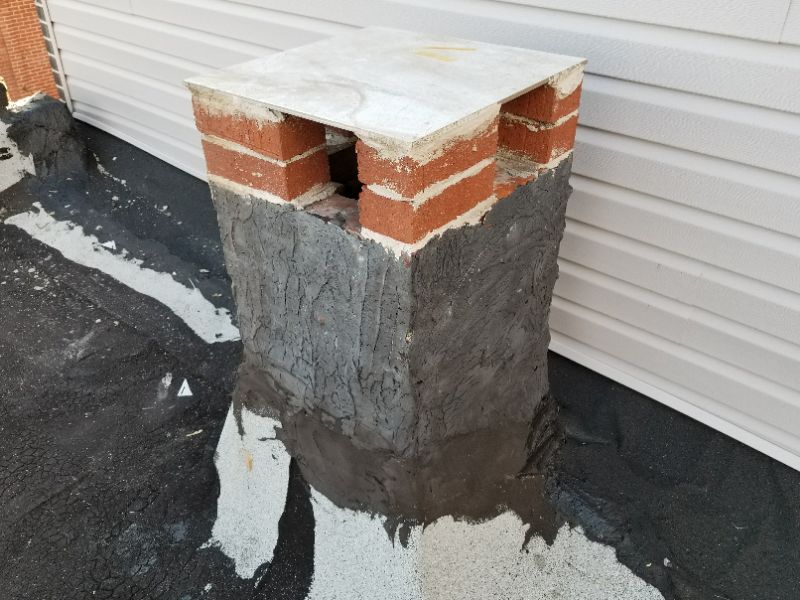
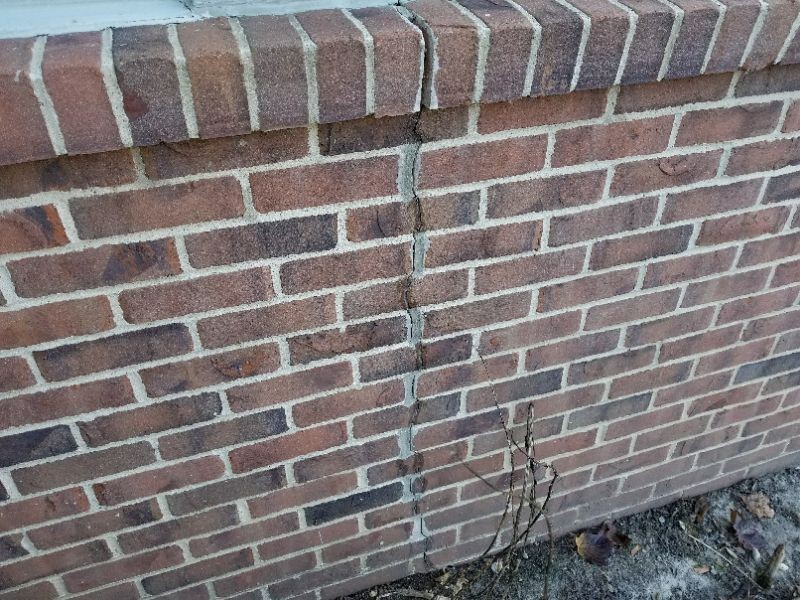
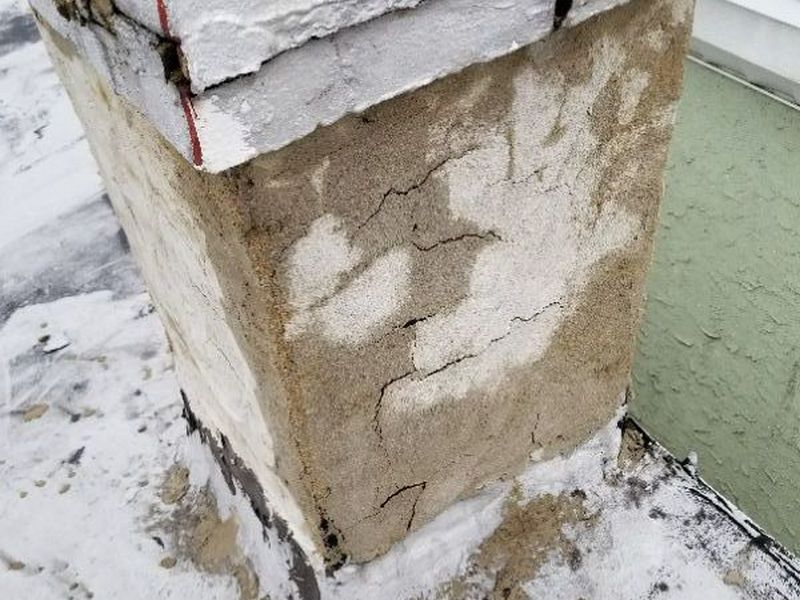
There are deteriorated mortar joints at the chimney. This allows water penetration and further damage. Repair the mortar joints.
The chimney parging is cracked. This permits water to intrude into the masonry joints of the chimney. Repair the parging; hire a contractor as required.
The chimney has vertical cracks. This implies excess flue temperatures (chimney fire) or a structural problem. This is a potential safety concern. Hire a contractor to evaluate the cracks and provide repairs as needed.
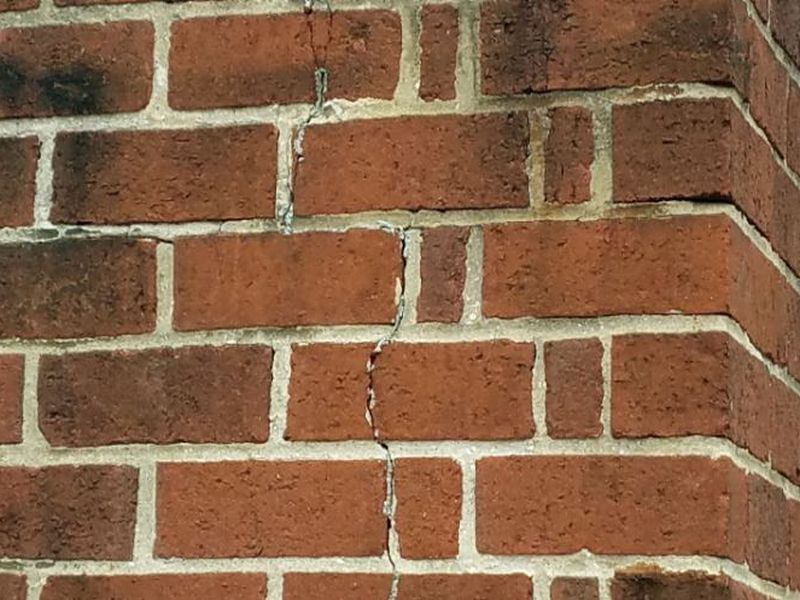
The chimney bricks are spalled. Spalling occurs when moisture penetrates the bricks and freezes. This allows further deterioration. Identify and mitigate any source of moisture; hire a mason to repair the bricks as required.
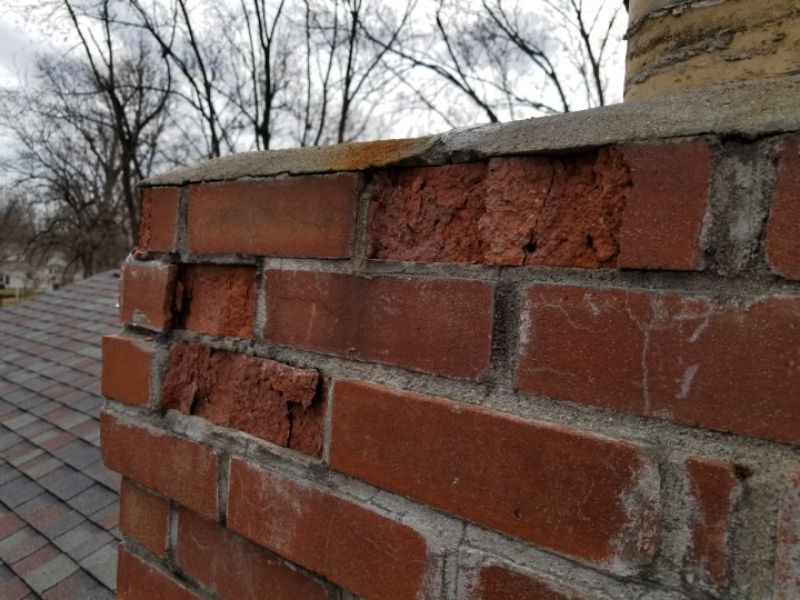
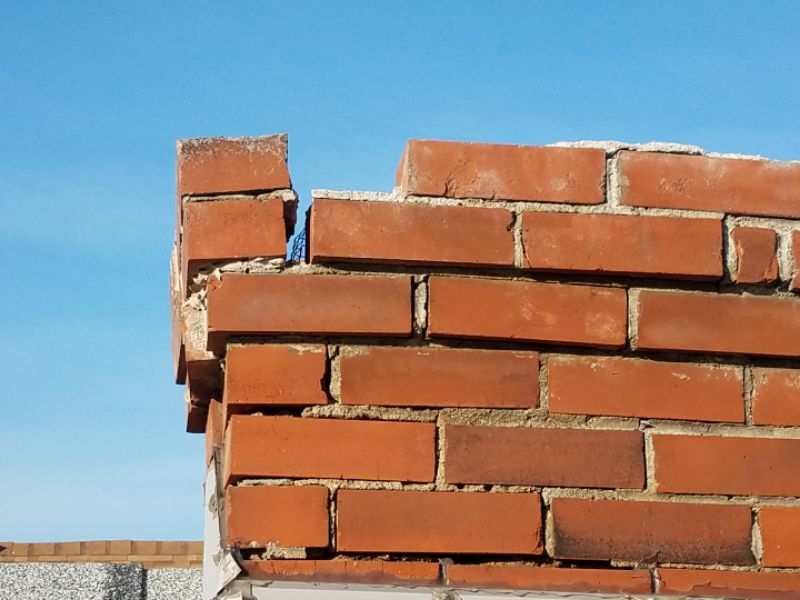
The chimney has loose or missing bricks. This permits moisture to enter and will cause further deterioration. Repair the chimney and repair any damage which may be revealed.
The chimney is deteriorated. This is a potential safety concern. Do not use the chimney; hire a contractor to provide further evaluation and repairs as needed.
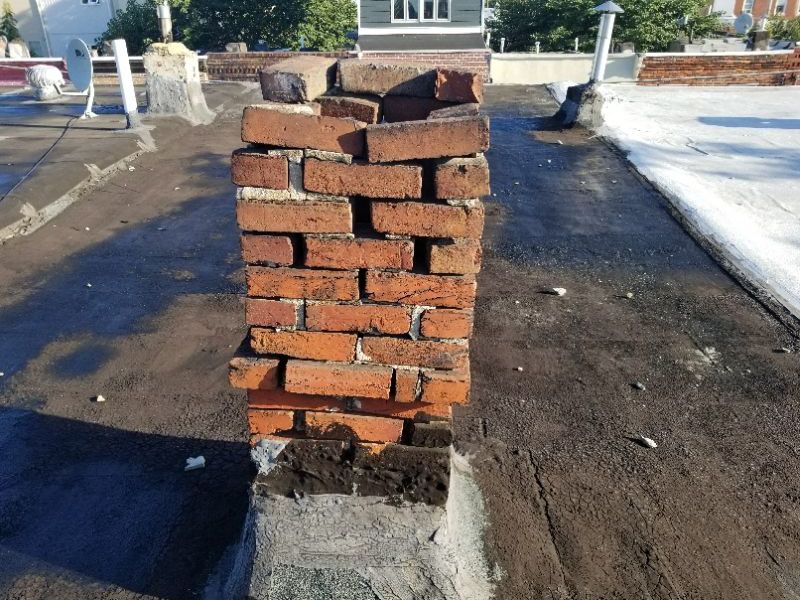
The chimney is leaning. This is a safety concern. Do not use the chimney; hire a contractor to provide further evaluation and repairs as needed.
The chimney is missing a cricket. These roof constructions help prevent water penetration into the home. Chimneys 30″ wide or greater should have a cricket to divert roof runoff around the chimney. Add a cricket to divert water away from the structure.
There is efflorescence on the chimney. This implies water penetration into the chimney structure. Identify and mitigate any source of moisture; hire a contractor as required.
There is an antenna mounted on the chimney. Wind pushing and pulling on the antenna will weaken the chimney. Remove the antenna or relocate the antenna to a different location.
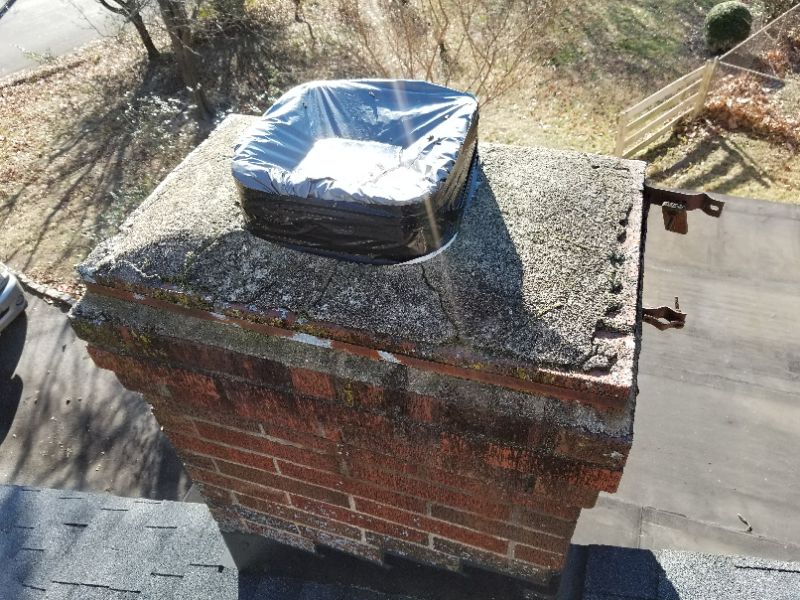
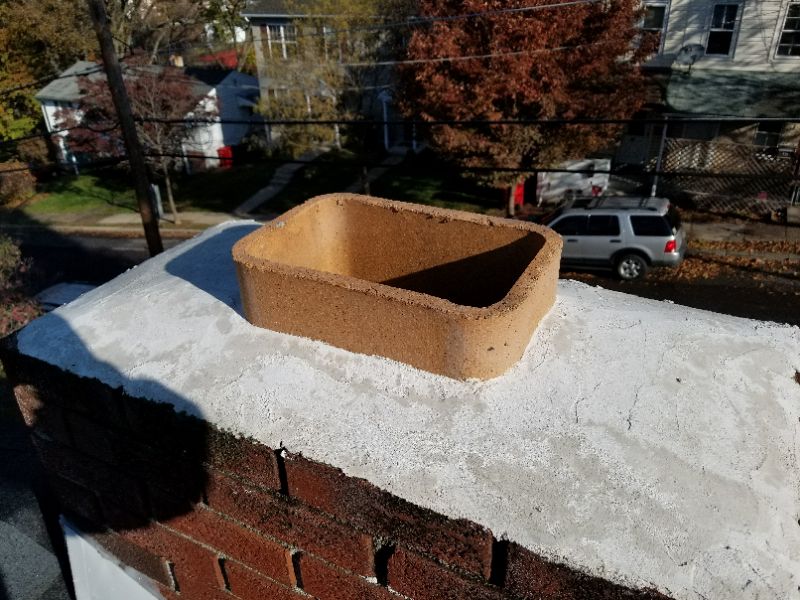
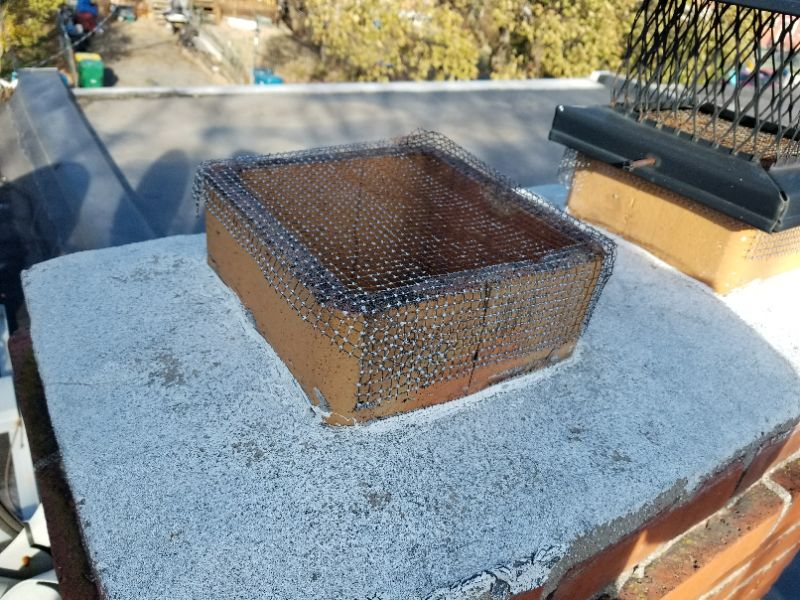
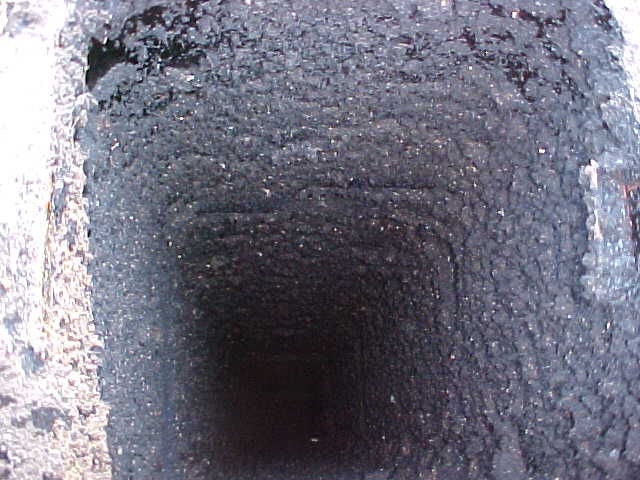
Inspect the flue interior(s) as possible. Remove the rain cap/spark arrestor if it can be easily taken on and off without breaking any seals. There should not be any signs of excess sooting or creosote build-up. A flue liner should be present. As visible, it should be continuous and without gaps or damage. You must account for all flues that are required for active combustion in the home and confirm that they are open.
The flue has been blocked or sealed off. It cannot be safely used for any combustion venting. Hire a chimney contractor for an evaluation and repairs as needed if you intend to use the flue.
The chimney is missing a rain cap/spark arrestor. This permits water penetration into the chimney. Install a rain cap/spark arrestor.
A flat screen is installed over the top of the chimney. This permits nesting to occur, hinders adequate air flow for proper drafting, and permits debris to build-up, increasing the risk of fire. Remove the screen and install a rain cap/spark arrestor.
The top of the flue does not extend at least 2″ above the crown. This encourages water penetration and inhibits proper drafting. Hire a chimney contractor for repairs as needed.
There is a creosote build-up in the chimney flue. This is a fire hazard and also limits visibility of the flue. Additional defects may be present. Hire a contractor to clean the chimney and to make required repairs.
The chimney does not have a flue liner, which can permit smoke and flue gases to enter the living area. Although it may have been common in old houses, a missing flue liner is a potential fire hazard. Do not use the chimney; hire a contractor to provide a further evaluation and repairs as needed.
The chimney flue liner is cracked/damaged. This is a fire and safety hazard. Do not use the chimney; hire a contractor to provide a further evaluation and repairs as needed.

The chimney flue liner is deteriorated. This is a fire and safety hazard. Chimney relining may be required to ensure safe use. Do not use the chimney; hire a contractor to provide a further evaluation and repairs as needed. 
NFPA 211 is the basis of applicable chimney and fireplace safety codes. The actual adoption of a given code varies by state and locality. However, the Chimney Safety Institute of America (www.CSIA.org), the leading educational and certification organization for chimney professionals, fully recognizes NFPA 211. This includes its standards for chimney and fireplace inspections. These protocols are designated Level I, II, and III Inspections.
DEFINITIONS:
Readily Accessible:
Exposed, or capable of being exposed, for operation, inspection, maintenance, or repair without the use of tools to open or remove doors, panels, or coverings.
Accessible:
Capable of being exposed for inspection, maintenance, or repair, without damage to the chimney or building structure or finish, but which may require the removal of doors, panels, or coverings using commonly available tools.
LEVEL I INSPECTION
Scope: Readily accessible areas of chimney, structure, and flue; lack of flue obstructions or combustible deposits; basic appliance installation and connections.
Access required: Readily accessible portions of chimney exterior and interior; accessible portions of appliance and chimney connection.
Circumstances: Annual inspection during routine flue cleaning; upon direct replacement of connected appliance with one of similar type, input rating, and efficiency.
LEVEL II INSPECTION
Scope: All subjects of a Level I inspection; proper construction and condition of accessible chimney structure and flue; proper clearances from combustibles in accessible locations; size and suitability of flues for connected appliances.
Access required: All accessible portions of chimney exterior and interior, including accessible areas of attics, crawl spaces and basements; accessible portions of appliances and chimney connections; includes flue inspection by video scanning or other means.
Circumstances: Upon removal of one or more connected appliances and replacement with one of dissimilar type, input rating, or efficiency; prior to relining or replacement of flue lining; upon sale or transfer of the property; after operating appliance malfunction or external event, e.g. earthquake, severe weather event, likely to have caused chimney damage.
LEVEL III INSPECTION
Scope: All subjects of Level I and Level II inspections; proper construction and condition of concealed portions of chimney structure and enclosed flues; proper clearances from combustibles.
Access required: Internal and external portion of chimney structure including concealed areas of the building or chimney; includes removal of components of the building or chimney where necessary, but only as necessary to gain access to areas that are the subject of the inspection.
Circumstances: When necessary for the investigation of an incident that has caused damage to the chimney or building; where a hazard detected or suspected as the result of a Level I or II inspection cannot be fully evaluated without access to concealed areas.
Chimney Limitation and Information Statements
Limited visibility/accessibility to interior, consult specialist: Visibility and accessibility of the chimney interior is limited. No determination of the interior condition, lining, or its ability to function safely and properly can be made. Consult a chimney specialist for a comprehensive evaluation prior to closing as needed.
Limited visibility/accessibility to crown, upper structure, consult specialist: Visibility and accessibility of the chimney’s crown and upper structure is limited. No determination of its condition or its ability to function safely and properly can be made. Consult a chimney specialist for a comprehensive evaluation prior to closing as needed.
Near/at end useful life, budget for replacement: The chimney is near or at the end of its useful life. We recommend establishing a budget to replace the chimney.
Past end useful life, budget for replacement: The chimney is past the end of its useful life. We recommend establishing a budget to replace the chimney.
Flue abandoned/capped: The chimney flue is abandoned; the flue is capped. Hire a contractor to prepare the flue for use.
No clean-out door below point at which heating plant’s exhaust vent enters flue, possibility of debris: The chimney flue lacks a clean-out door below the point at which the heating plant’s exhaust vent enters the flue. There is a possibility of debris in the flue building up to the point at which a blockage prevents combustion gases from rising up the chimney properly. This condition, referred to as a “dead-head flue,” is common in older properties. Although modification can be difficult in some older chimneys, we recommend installing an access door in the flue below the vent connection. In lieu of a door, we recommend removing and checking the vent connector regularly.
Full scope of chimney’s condition not included in report: The full scope of the chimney’s condition is not included in this report due to an independent specialist’s evaluation. Refer to the specialist’s report(s) for more information and required actions. Any observations made are as a courtesy only.
No rain cap/spark arrestor, consider installation: The chimney(s) does not have a rain cap/spark arrestor installed. Although they are not always required by local standards, they address the potential safety concerns of spark and ember discharge, as well as water and animal intrusion. Consider hiring a contractor to install a rain cap/spark arrestor as needed.
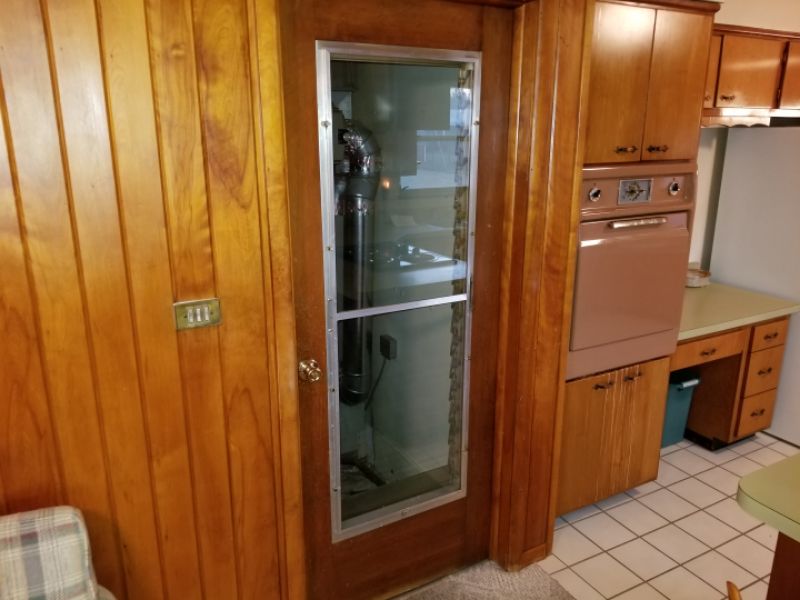
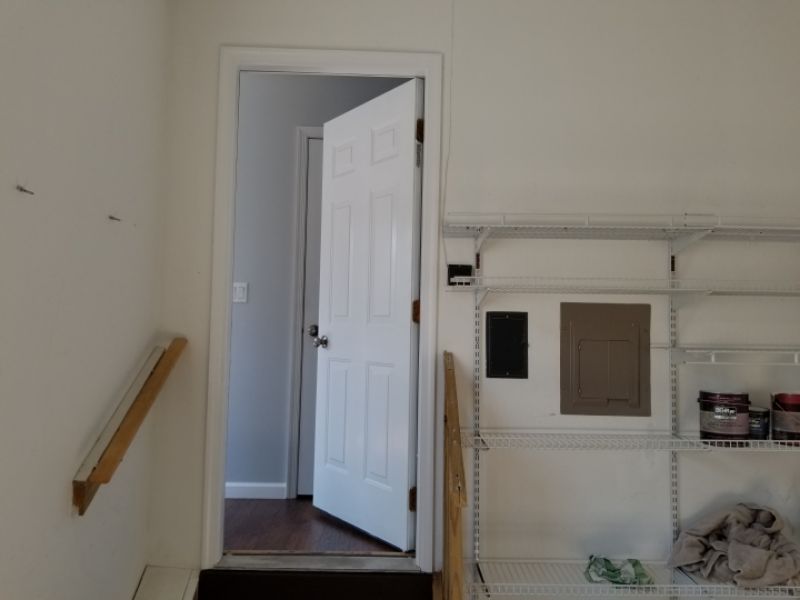
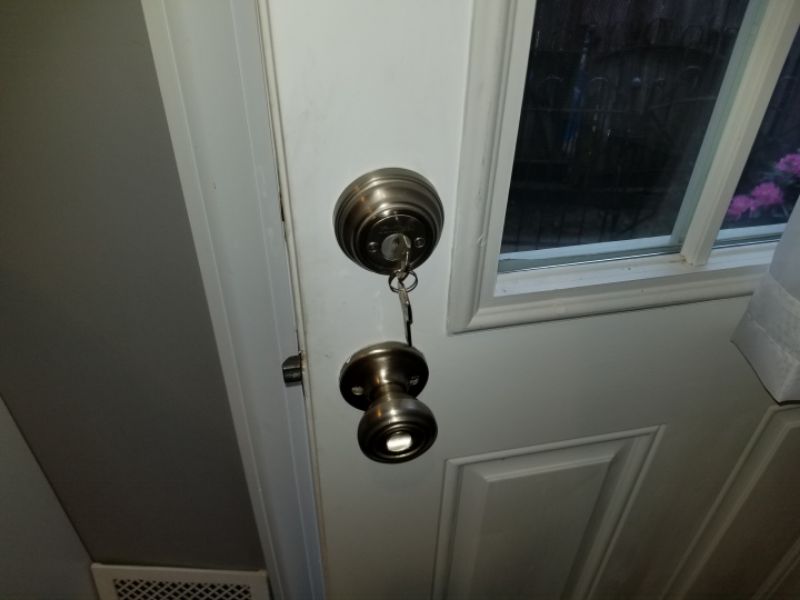
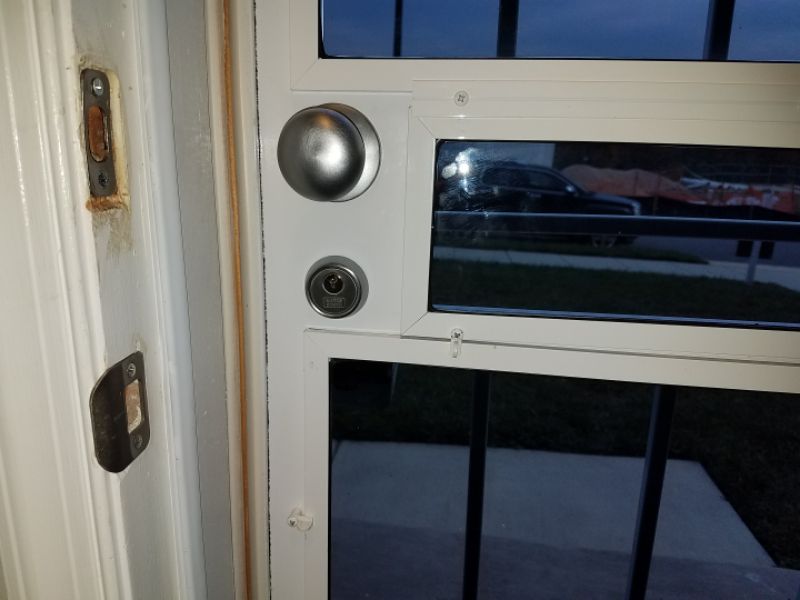
Doors
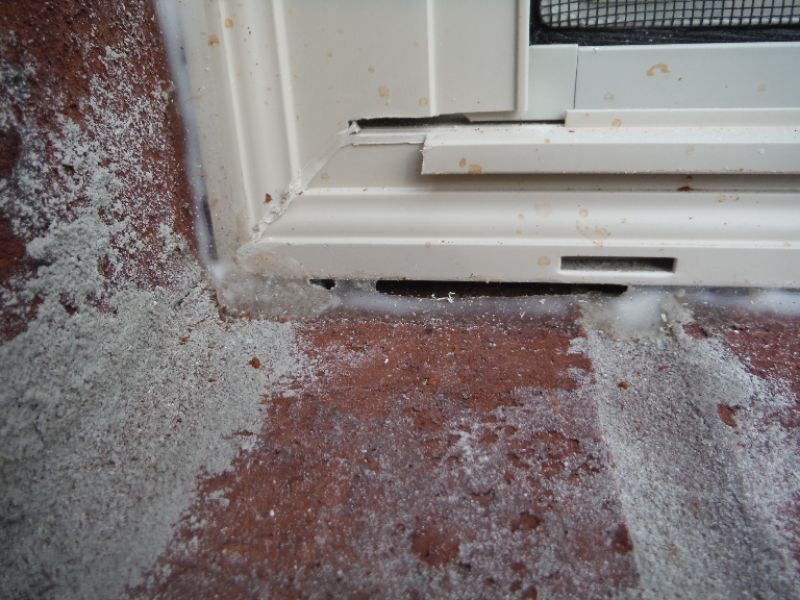
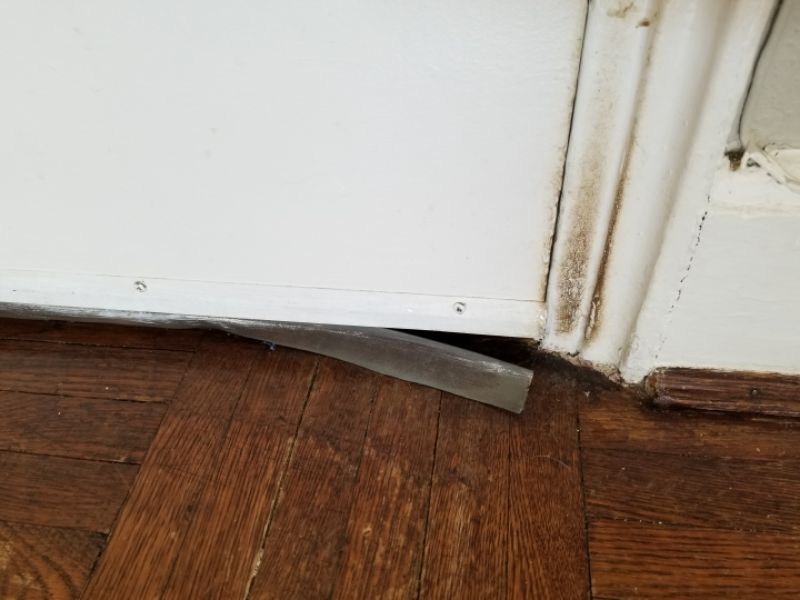
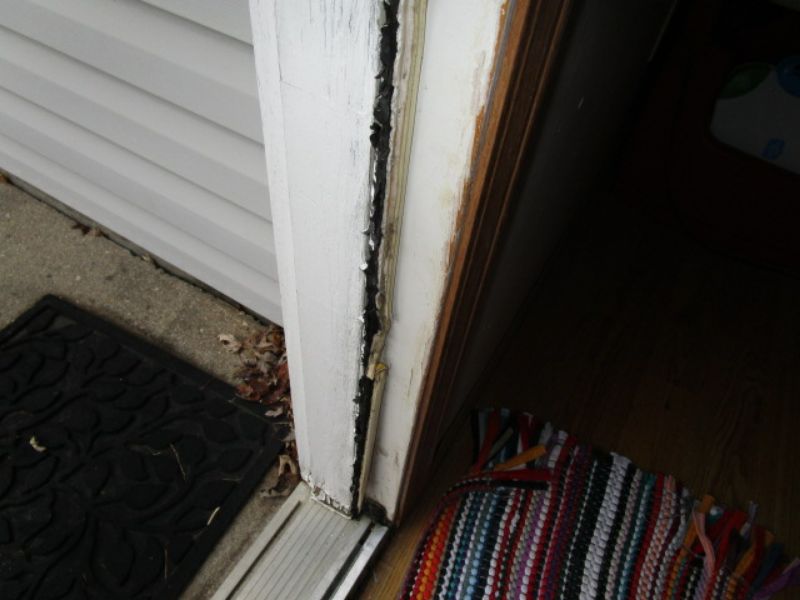
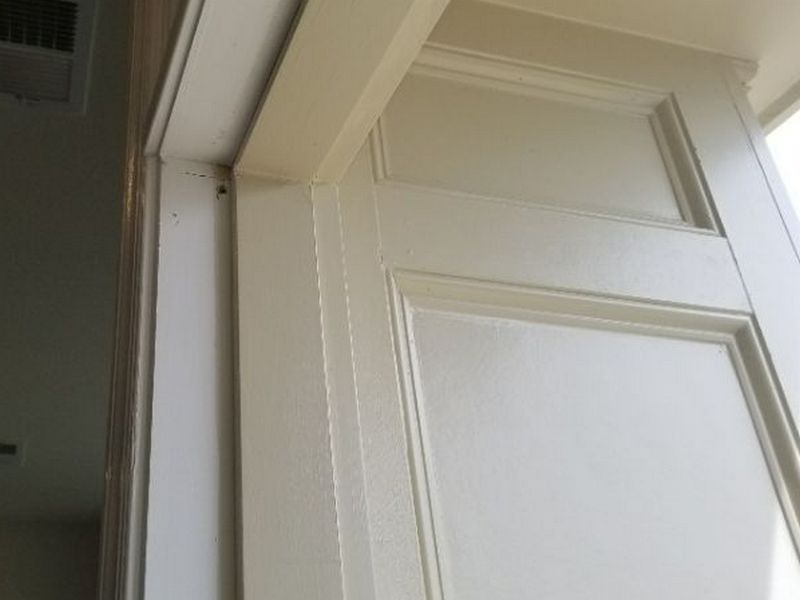
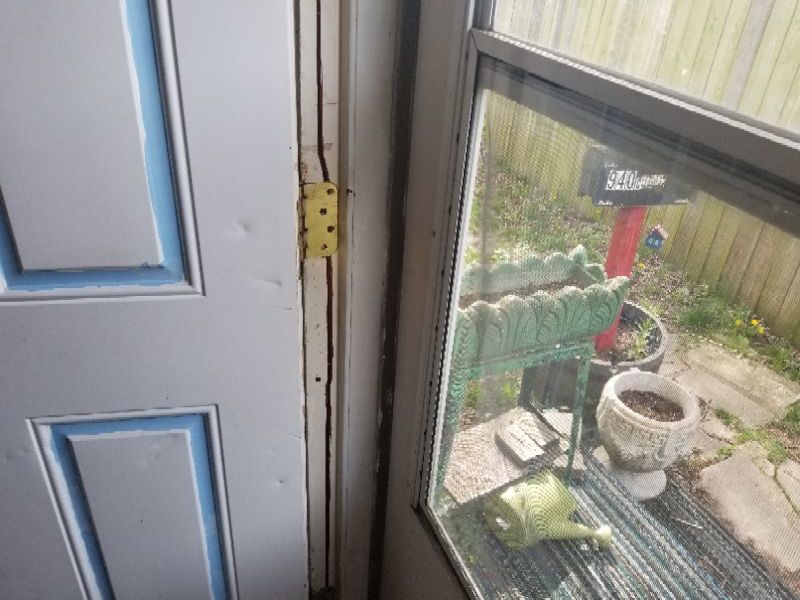
Inspect exterior doors for acceptable condition and operation. They should be free of any significant damage or deterioration, and should be an exterior-grade product. Any screens present should be intact. A door should open and close without excess binding, and should seal tightly to the opening. Weather stripping should be present, in good condition, and provide a reasonable seal against air infiltration. Thresholds should not be loose and should be free of damage or deterioration.
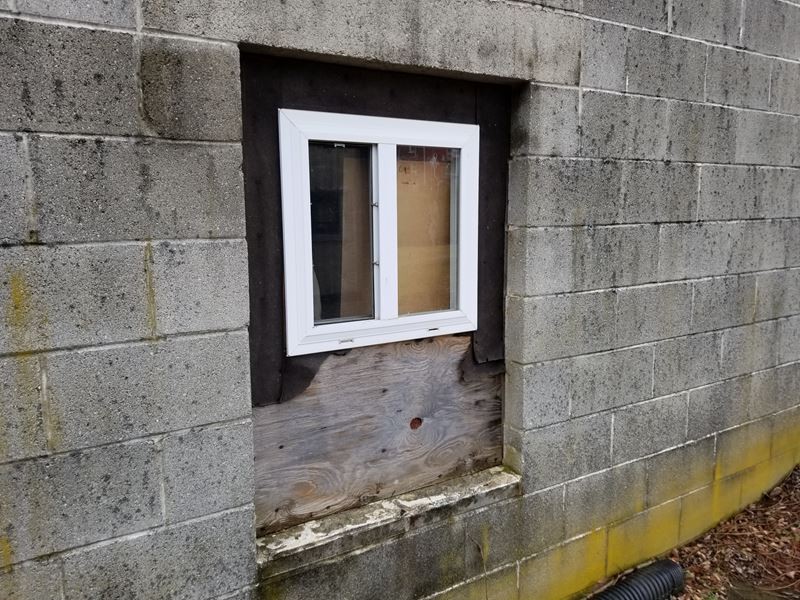
The door does not fit and seal properly within frame. This permits energy loss and moisture intrusion. Repair or replace the door.

The weather stripping is deteriorated. This permits energy loss. Replace the weather stripping.
The weather stripping is missing. This permits energy loss. Install weather stripping.
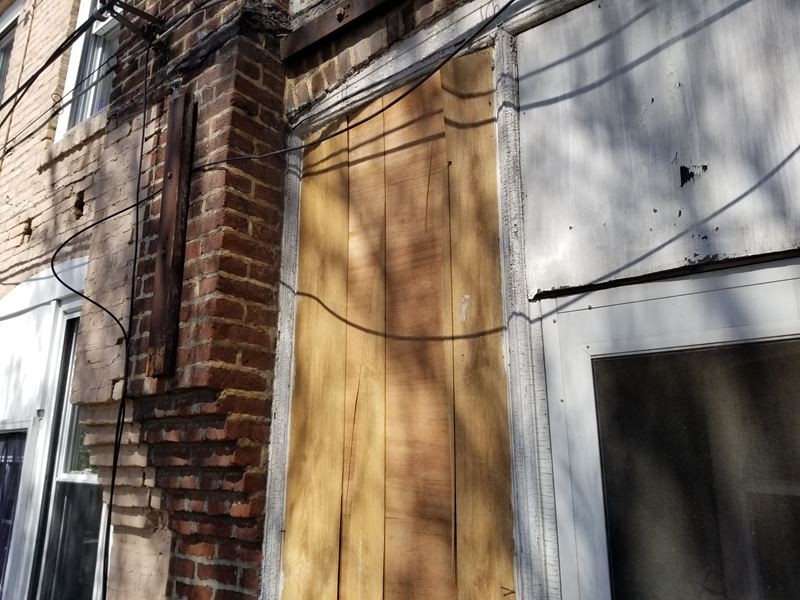
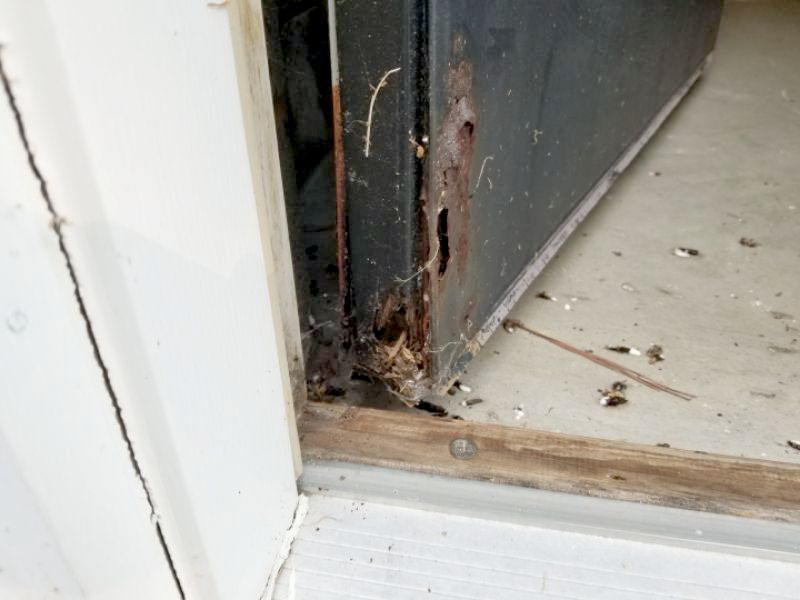
The door frame is damaged. This affects proper function and will allow further damage. Repair or replace the frame.
The door is deteriorated. This affects proper function and will allow further deterioration. Replace the door.
The Bilco door at the basement entry is deteriorated. This affects proper function and will allow further damage. Repair or replace the door as needed.
The door has a window with a failed insulated glass seal. This permits condensation stains to develop on the inside of the glass and will increasingly affect visibility and appearance. Replace the insulated glass unit or the window as needed.
The door glass is broken. This is a safety concern. Replace the glass.
The door does not appear to have safety glass installed. There is no manufacturer’s mark visible. Although this may not have been required at the time of installation, it is a safety concern. Replace the door’s window with safety glass.
The threshold below the door is loose. This is a tripping hazard, and can allow water penetration and energy loss. Repair or replace the threshold.
The threshold for the exterior basement stairwell door is too low. It should be a minimum height of 4″ to limit water entry if the stairwell drain is clogged. Raise the threshold.
The door opens above stairs. No landing is present at the top where the door swings over the steps. This is a safety hazard. Add a landing.
The door’s screen is damaged. This affects proper function. Replace the screen.

The door between the garage and the home’s interior has a pet opening installed. This defeats the door’s fire rating. Replace the door with a fire-rated model.
The door between the living space and the garage is not fire-rated. This is a safety hazard. Replace the door with a fire-rated door.
The door between the living space and the garage does not have a self-closer. This is a safety hazard. Add a self-closer to the door.
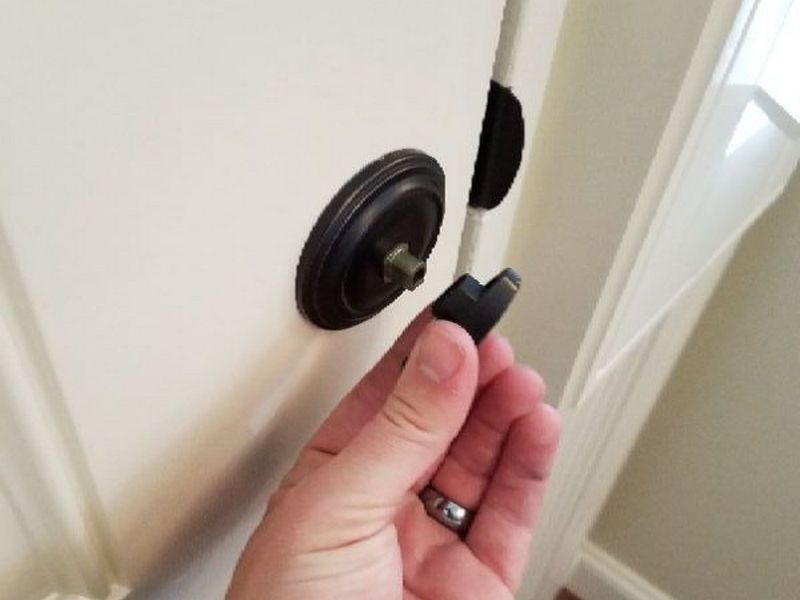
There is a double-keyed deadbolt lock at the door. This is a safety concern if the key is damaged or missing during an emergency. Replace the door hardware with a single key locking mechanism.
The door hardware is damaged or inoperative. This affect proper operation. Repair or replace the door hardware.
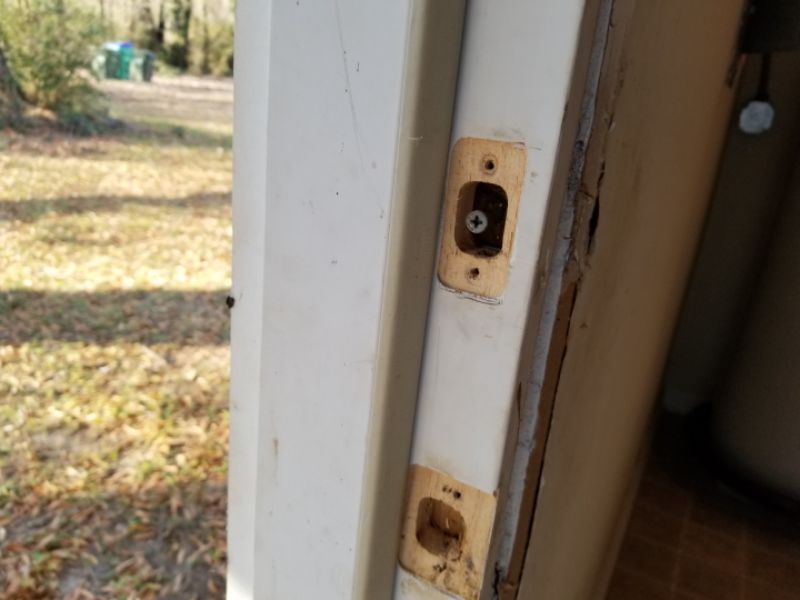
The door’s lock hardware is missing. This is a home security concern. Install lock hardware.
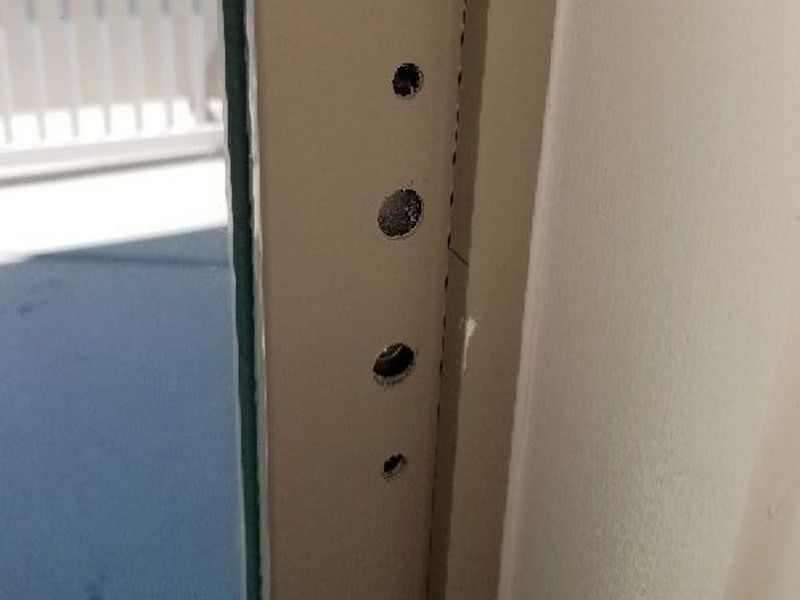
The door’s lock strike hardware is missing. This affects proper function and is a home security concern. Install door strike hardware as needed.
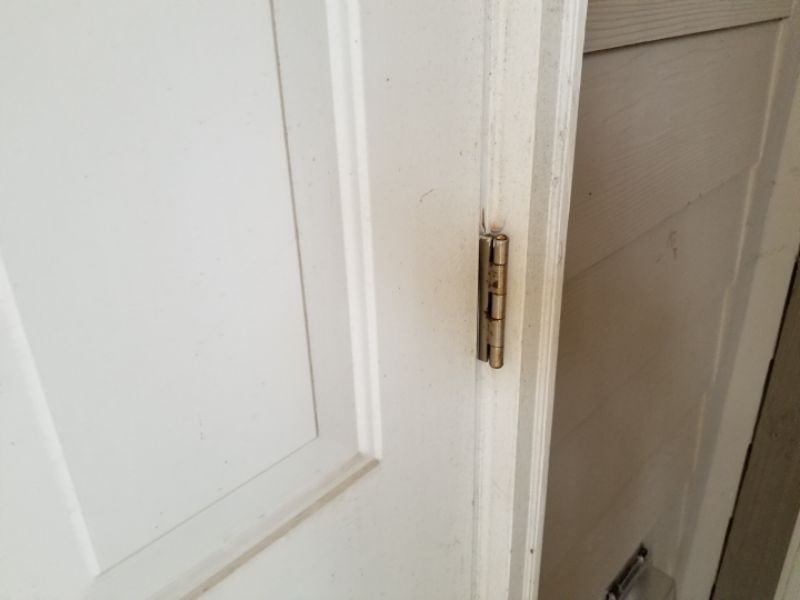
The door is installed backwards; the hinges are on the outside and are vulnerable to removal. This can allow unauthorized access. Reinstall the door as needed.
Doors Limitation and Information Statements
Locked, not operated/tested: The door is locked and, therefore, is not operated or tested.
Blocked, not operated/tested: The door is blocked and, therefore, is not operated or tested.
Double-keyed deadbolt can impede emergency egress, consider replacing with single key deadbolt: The door has a double-keyed deadbolt which can impede emergency egress from the building if the key is not readily available. Consider replacing the deadbolt with a single-keyed deadbolt.
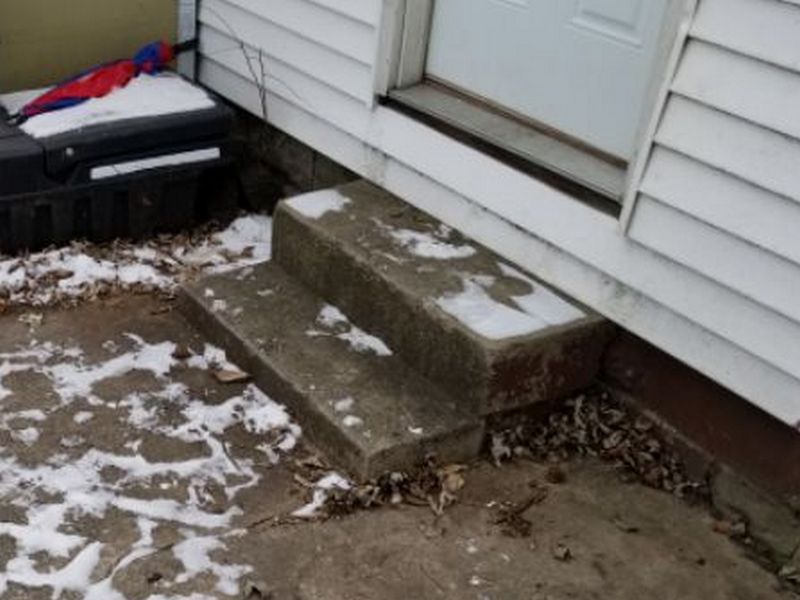
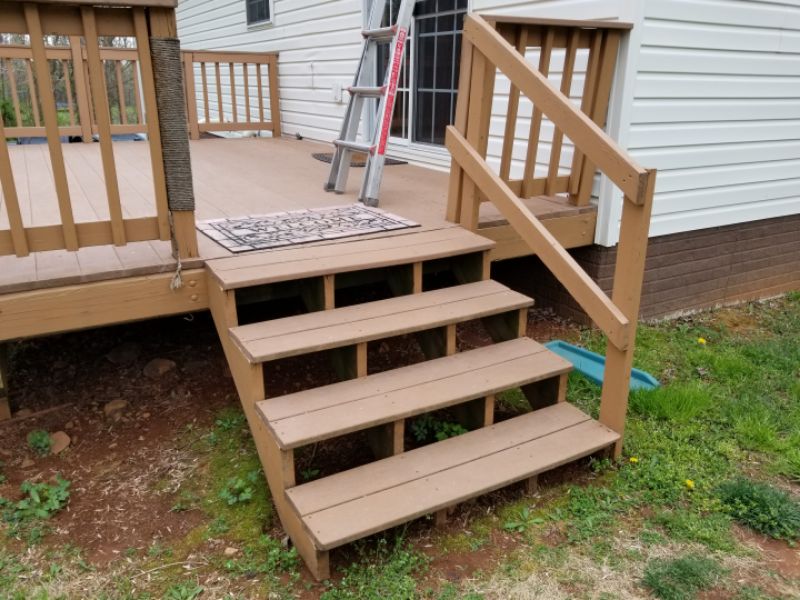
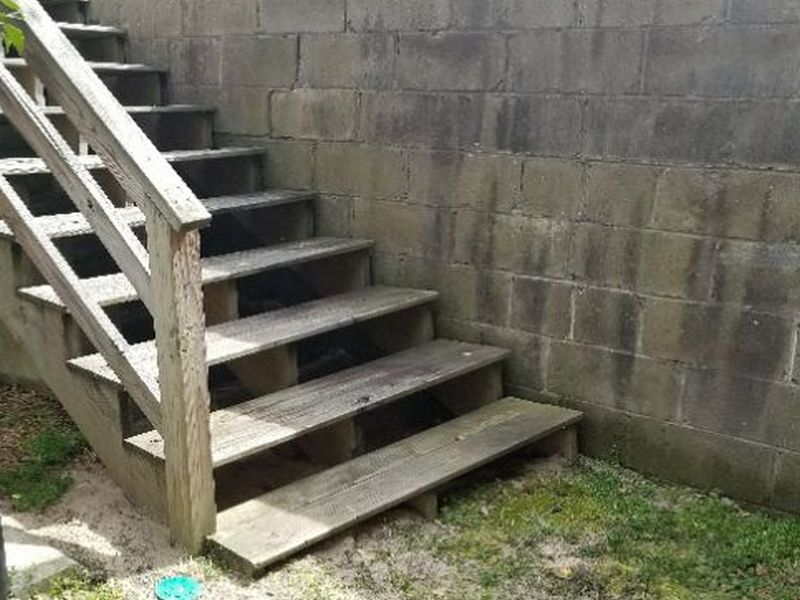
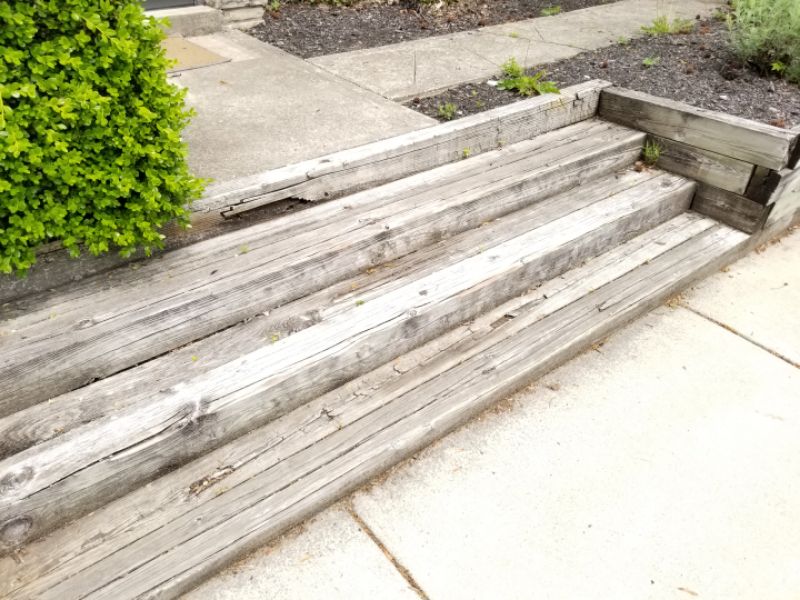
Stairs/Steps
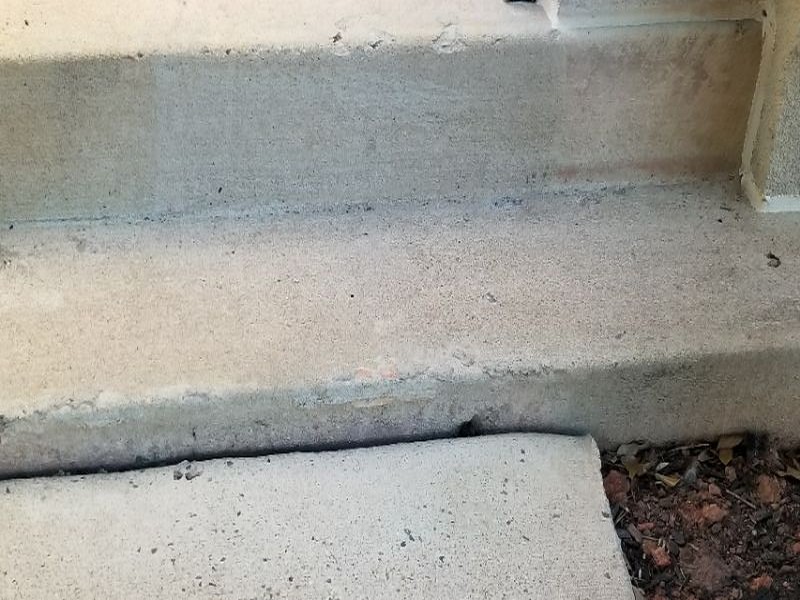
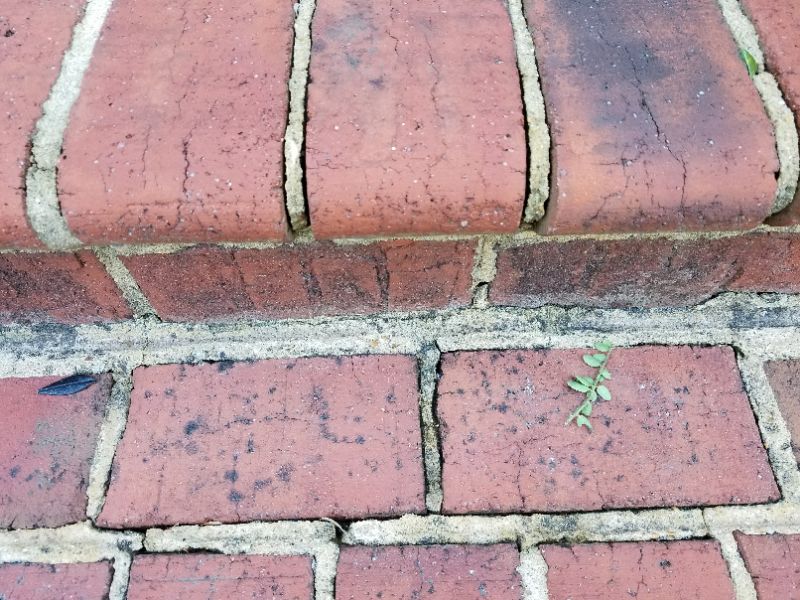
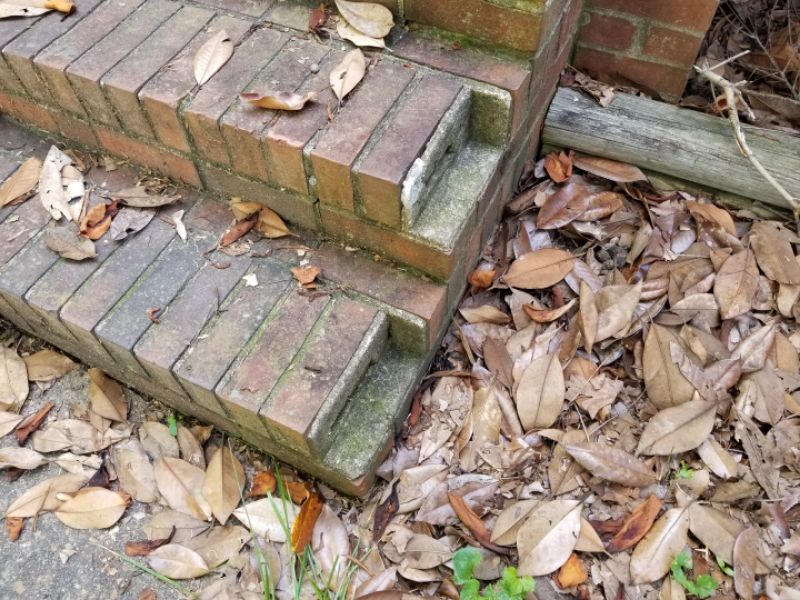
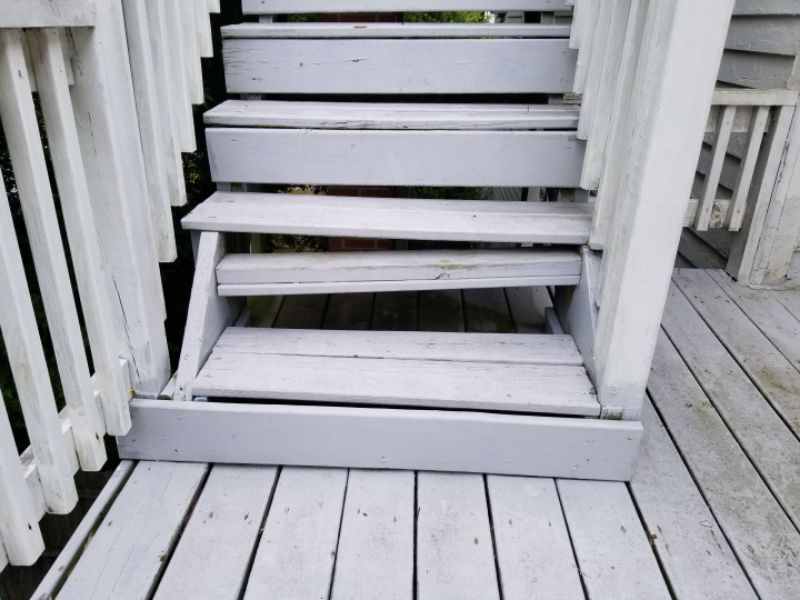
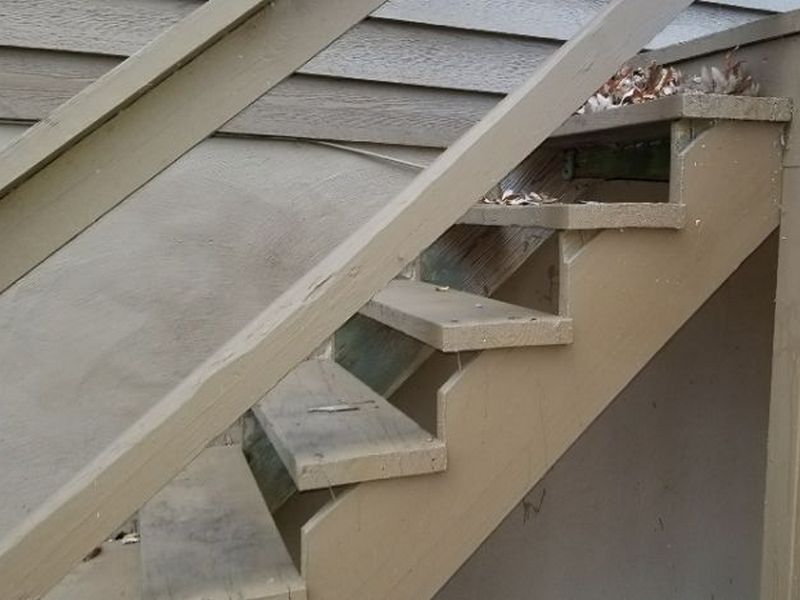
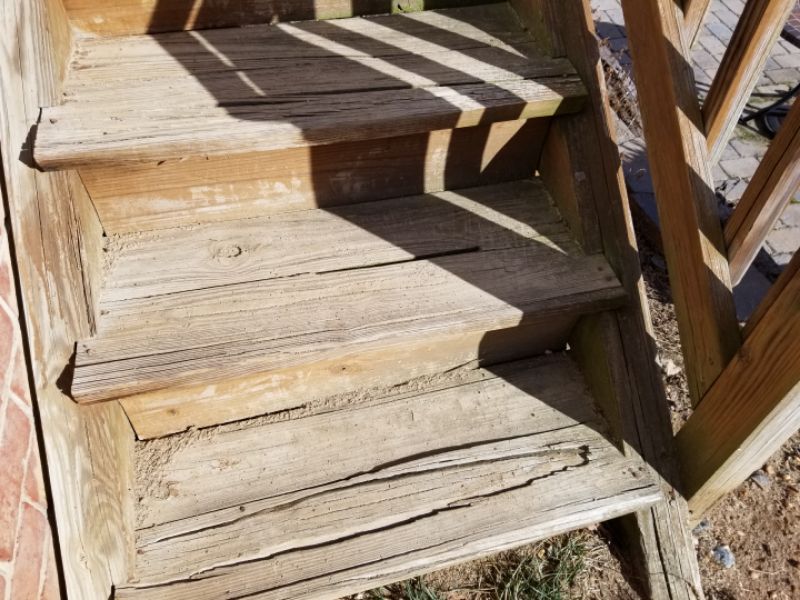
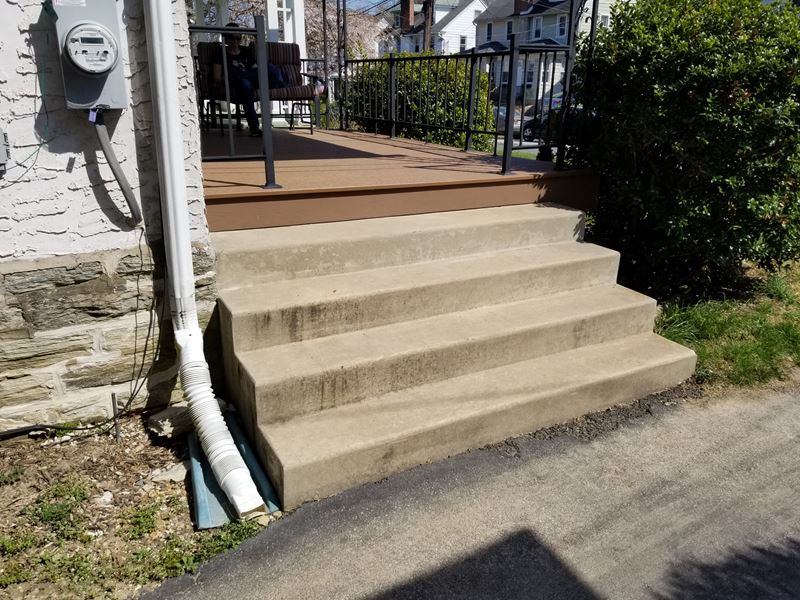
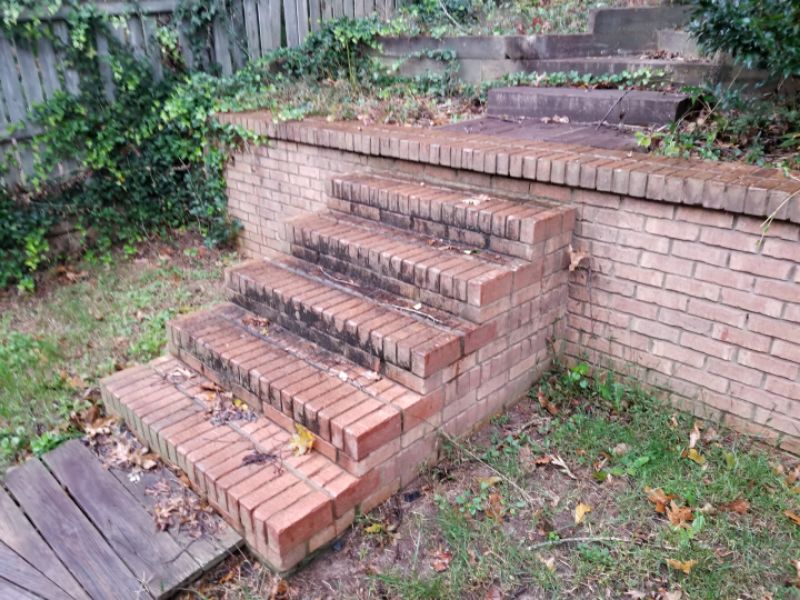
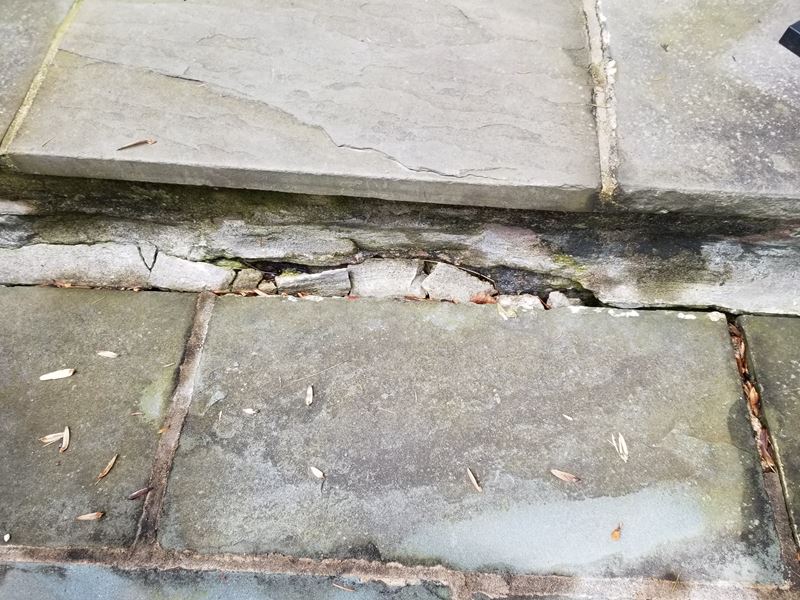
Stairs and steps have implications for safety, water control, and can affect the home. They must be inspected both at a distance and in detail. Inspect from a distance to determine if they are level, or if there are signs of settlement. This should be done from the front and sides. Stairs and steps should not be pulling away significantly from their landing or stoop. Treads should be flat and level, both side-to-side and front-to-rear; a very slight rear-to-front slope on treads and landings is desirable to allow for drainage. They should appear consistent in rise, and any suspected inconsistencies should be checked when close.
Inspect up close, looking for any signs of deterioration. The treads’ run and rise should be checked for consistency, minimum tread run, and maximum tread height. Steps should be solid underfoot with no movement or instability. Stairs other than concrete or masonry should not bear directly on the grade. Don’t overlook exterior doors where steps are missing or a exit should be secured to prevent a fall.
There are missing steps at an exterior door. This is a safety hazard. Install steps as needed or secure the door to prevent an exit and fall.
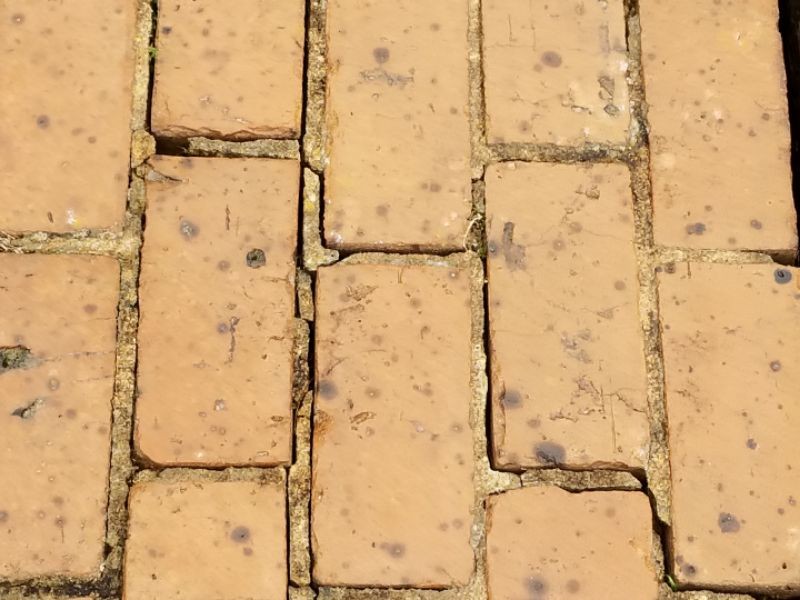
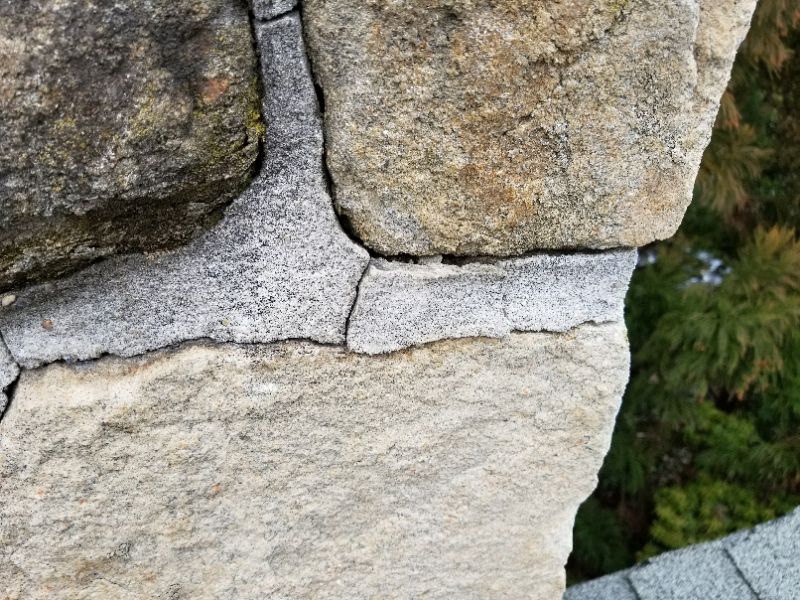
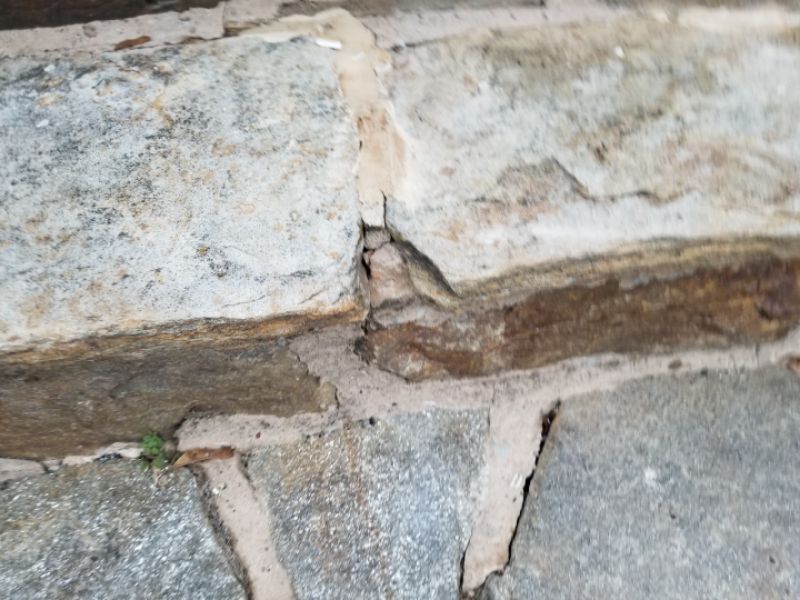
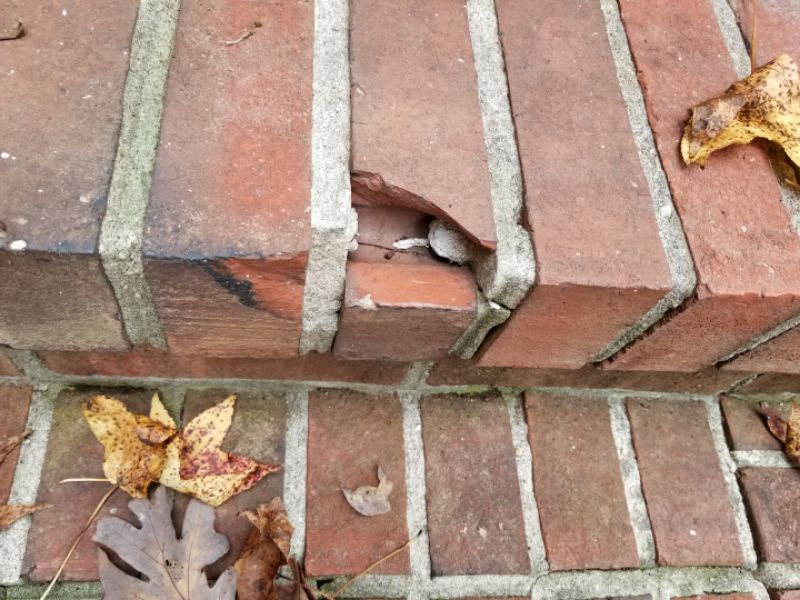
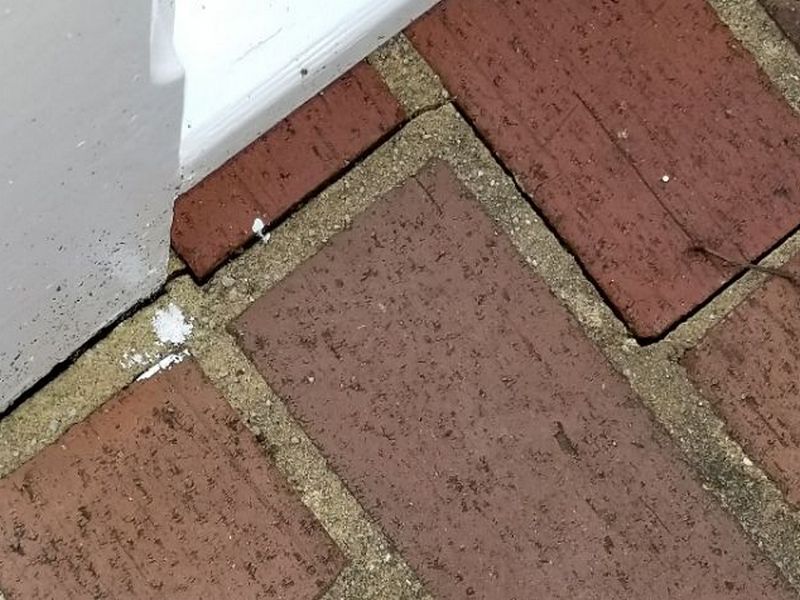
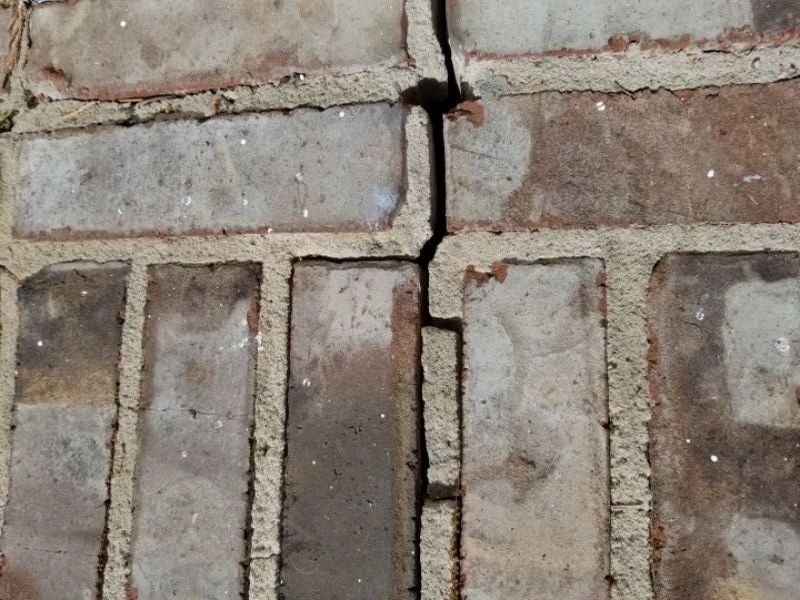
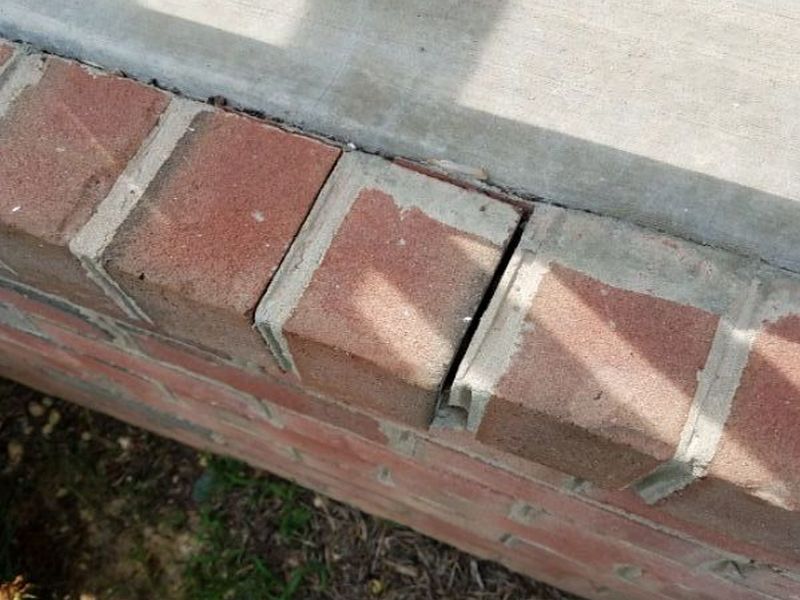
Bricks and blocks must be intact with no signs of looseness. Deteriorated, cracked, or damaged masonry units or concrete should be reported. All joints should be properly pointed. Any separations, including those between the walking surfaces and surrounding structures, must be noted due to water penetration concerns. Any adhered or inlayed tiles or pavers must be secure. Glazed surfaces or those that may be significantly slippery when wet should be noted.
The step’s riser height is uneven. This is a trip hazard. Current standards call for a maximum variation of no more than 3/8″ between steps. Repair or replace the steps to ensure a consistent riser height.
There are cracked steps. This permits water penetration and will lead to further damage. Repair or replace the steps as needed.
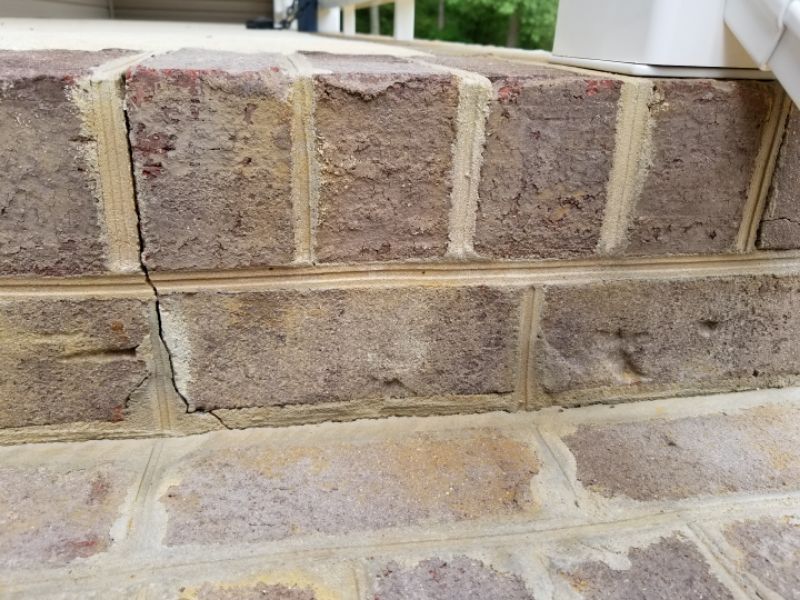
There are deteriorated mortar joints at the steps. This allows water penetration to cause further damage, loose sections, and a safety hazard. Repair the mortar as needed.
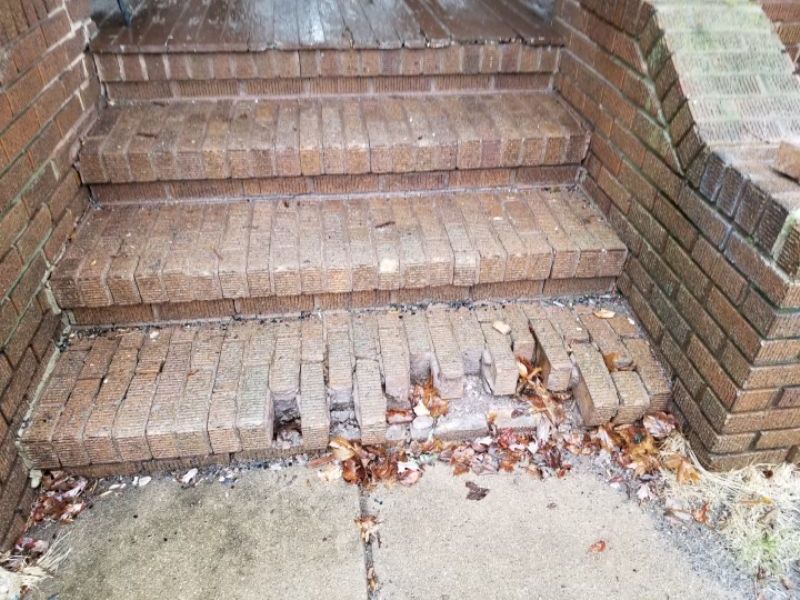
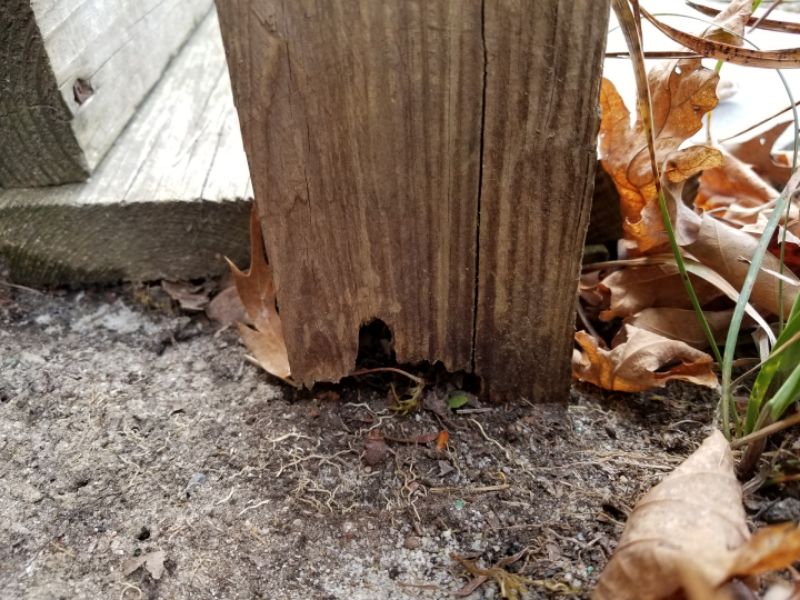
The steps are damaged or are missing bricks. This is a safety hazard, and will allow further deterioration. Repair the steps.
The steps are deteriorated. This is a safety hazard, and can permit water penetration into the structure, and will lead to further damage. Replace the steps.

There are settled steps. A gap has formed between the steps and the building or stoop. This permits water penetration and will lead to further damage. Repair and stabilize the steps to prevent further settlement. Repair and seal any gaps to prevent moisture intrusion.
Wood surfaces should be inspected for deterioration, cracking, splitting, significant splintering, nail pops, or loose boards. Stringers and support posts should be observed for damage, improper or failing connections, or inadequate supports. Wood steps should not bear directly on the grade. A footing or substantial concrete or masonry landing should be provided.
The stairs terminate on the ground instead of on footings. This will not provide long-term support, and will allow the stairs to settle. Install appropriate footings under the stairs where they terminate at the grade.

There is excessive settlement at the steps. This is a safety issue; it implies inadequate support. The inspector can’t determine if the movement is ongoing. Repair and stabilize the steps to prevent further settlement.
The step’s riser height is uneven. This is a trip hazard. Current standards call for a maximum variation of no more than 3/8″ between steps. Repair or replace the steps.
The step are damaged. This is a safety hazard, and will lead to further deterioration. Repair or replace the steps as needed.
The steps are deteriorated. This is a safety hazard, and will lead to further damage. Replace the steps as needed.
The step’s support is inadequate. This is a safety hazard which may allow a failure. Repair or replace the steps as needed.
There are settled steps. A gap has formed between the steps and the stoop or building. This is a safety hazard which may allow a failure. Repair or replace the steps as needed.
Metal steps should be inspected for rust, corrosion, deterioration, or damage. Signs of deferred maintenance should be reported. All composite materials must be inspected for signs of deterioration. Some composite products are defective and prone to premature failure.
The metal steps are corroded or show signs of deferred maintenance. This is a potential safety hazard that can allow further deterioration. Repair or replace the steps as needed.
The metal step’s support is deteriorated. This is a safety hazard which may allow a failure. Repair or replace the supports as needed.
The step’s composite boards are deteriorated. Some composite materials are subject to a recall due to premature failure. Hire a contractor to evaluate the steps and provide repairs or replacements as needed.
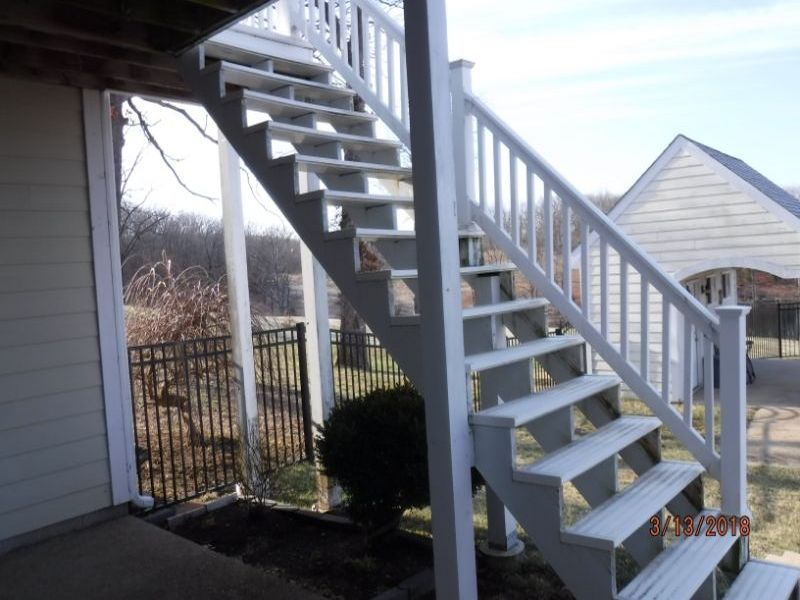
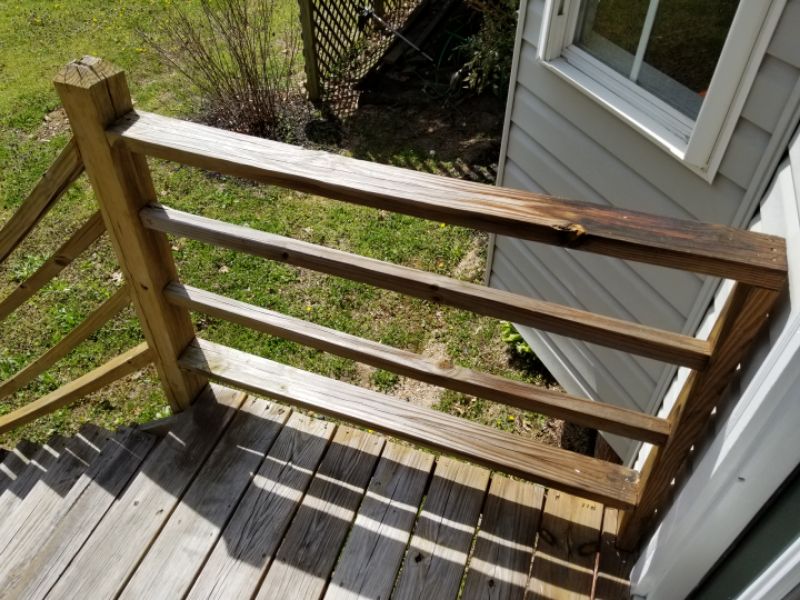
All stairs with more than 3 -4 “lifts of the foot” should have a handrail. Note that local requirements differ, as do FHA and VA standards. Common sense must be used. When in doubt, a handrail should be present. This does not normally apply to “yard steps” that have very long runs and are more like landings than stairs.
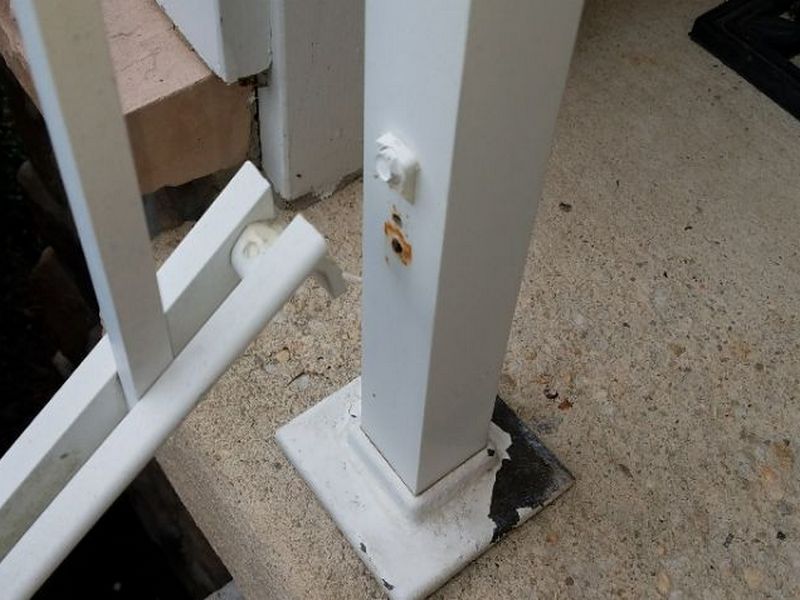
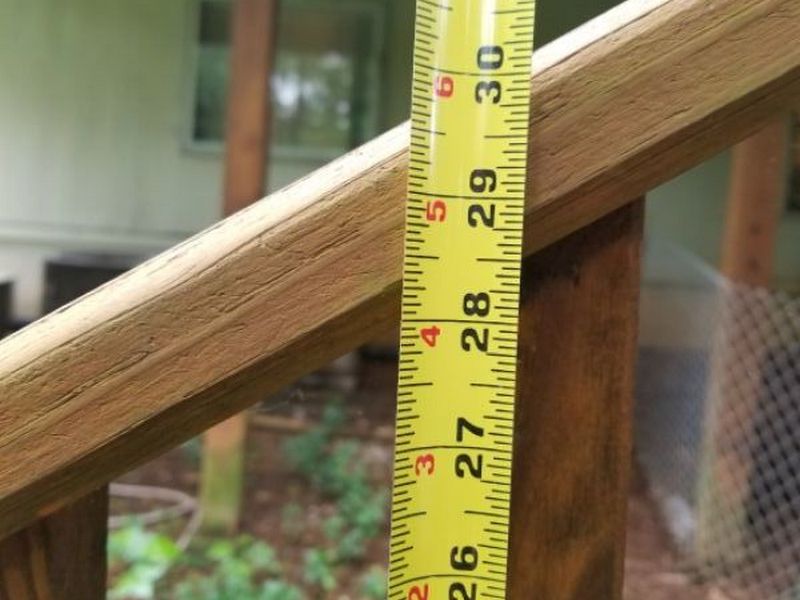
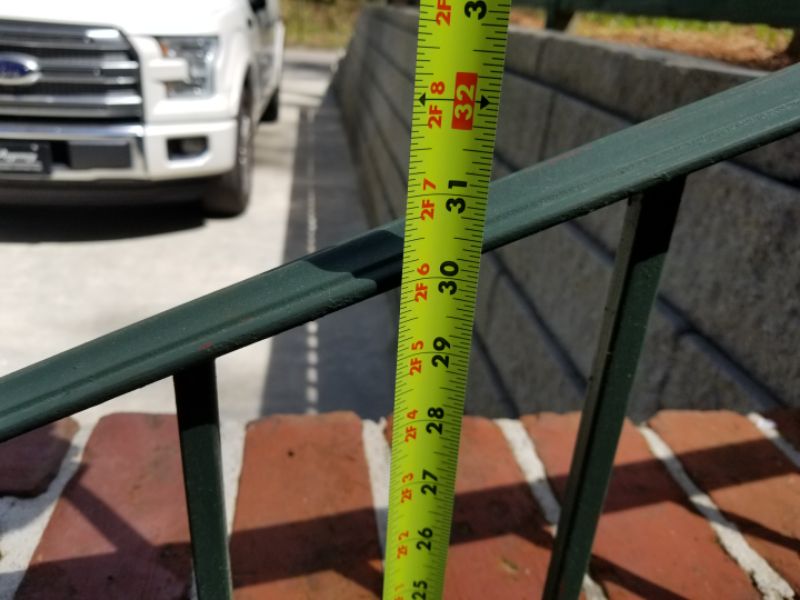
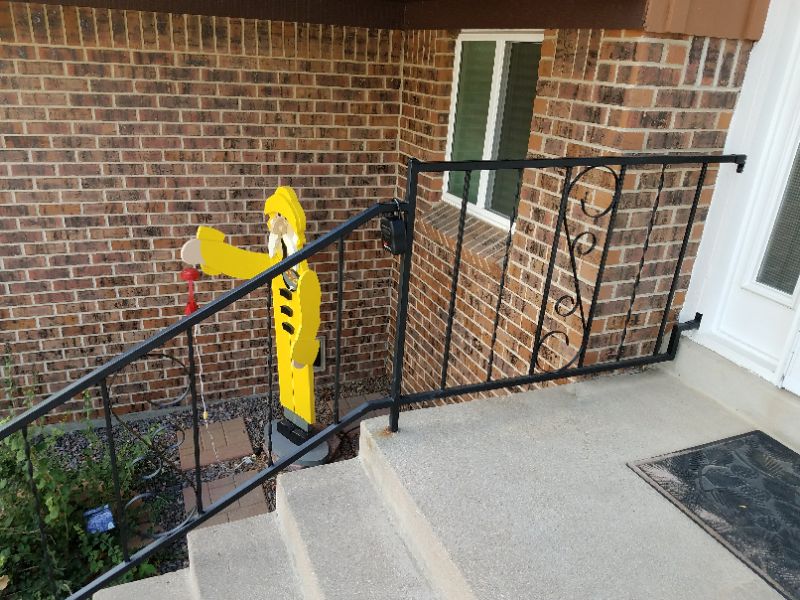
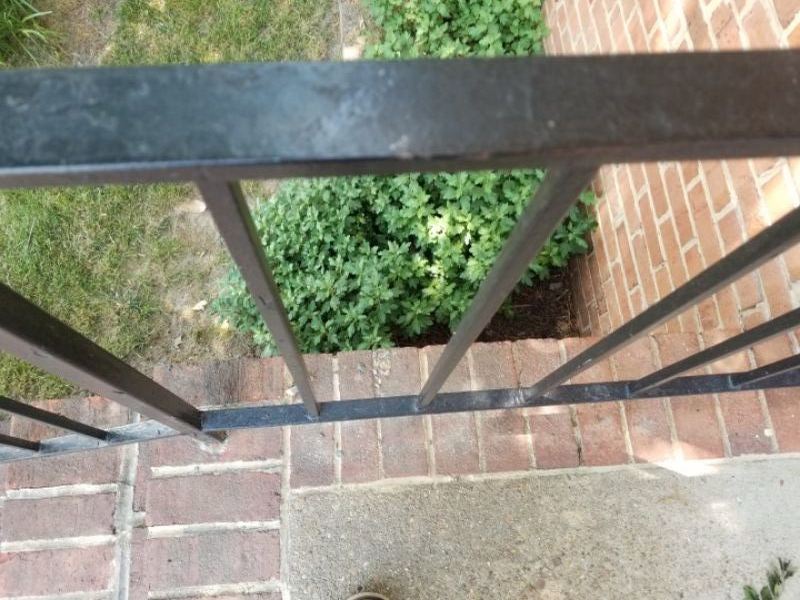
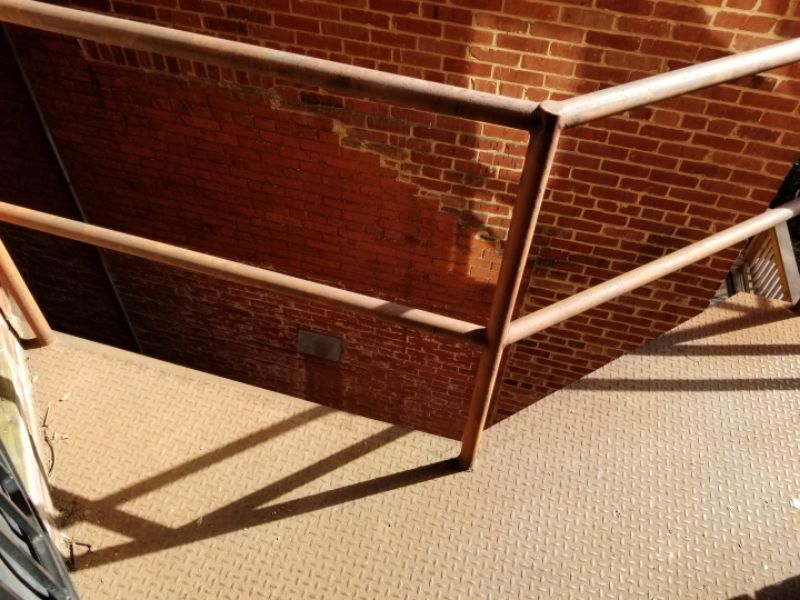
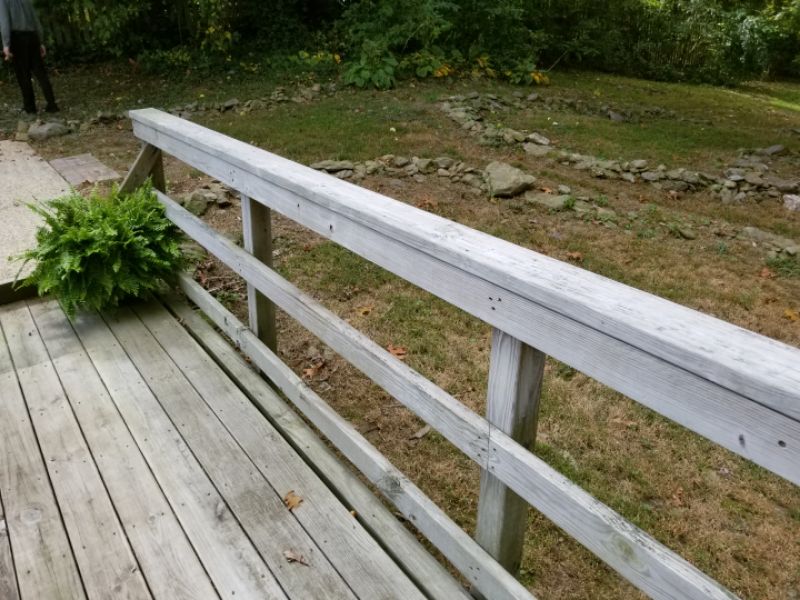
Inspect handrails and guardrails for deterioration. They should be secure, stable, and provide good support without movement. Rails should be 34” – 38” high above the nosing. Ideally, the rail’s profile should be “graspable”, but this may not apply in Grandfathered situations. The openings between balusters should be no more than 4”. All balusters should be present and intact. Guardrails with climbable horizontal balusters should be reported.
The handrail is missing. This is a safety hazard. Replace the handrail.
The handrail is loose. This is a safety hazard. Repair or replace the handrail.
The handrail is damaged or deteriorated. This is a safety hazard. Repair or replace the handrail.
The handrail is too low. This is a safety hazard. Install a handrail that is 34″ to 38″ high measured from the leading edge of tread.
The handrail is missing balusters. This is a safety hazard. Replace the balusters.
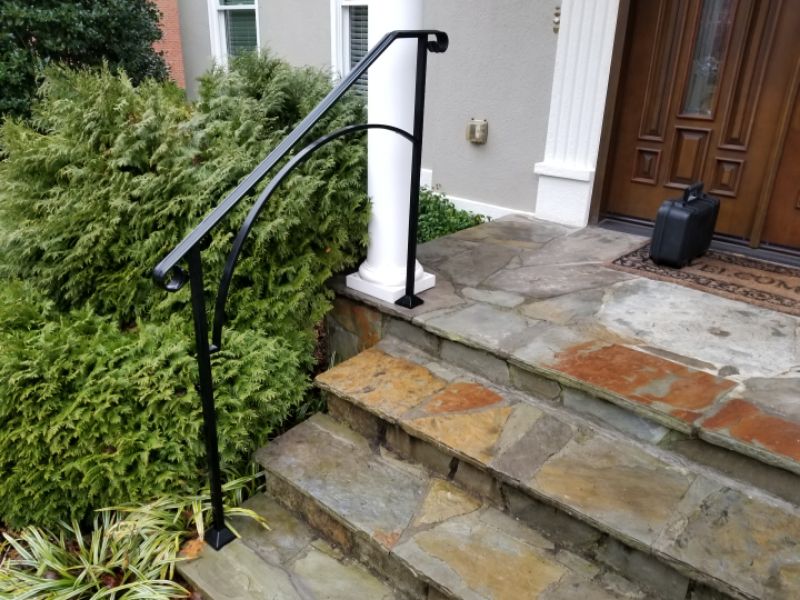
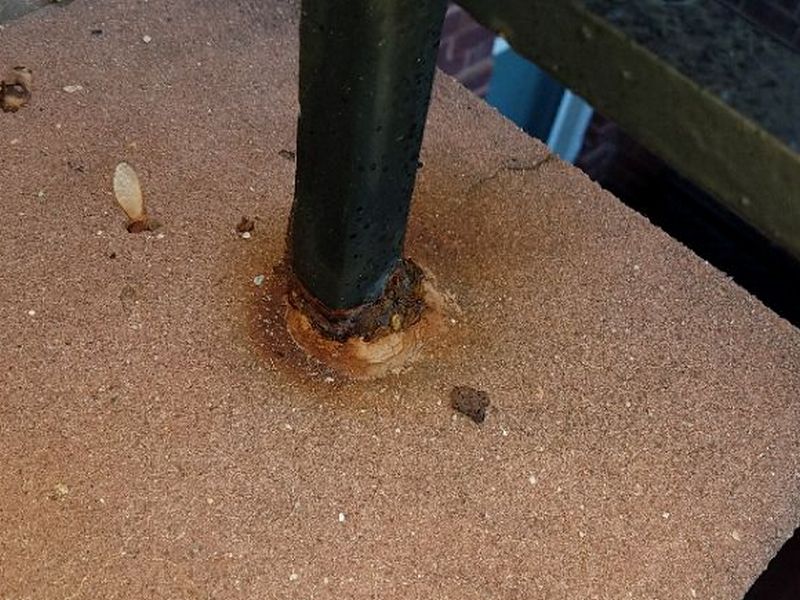
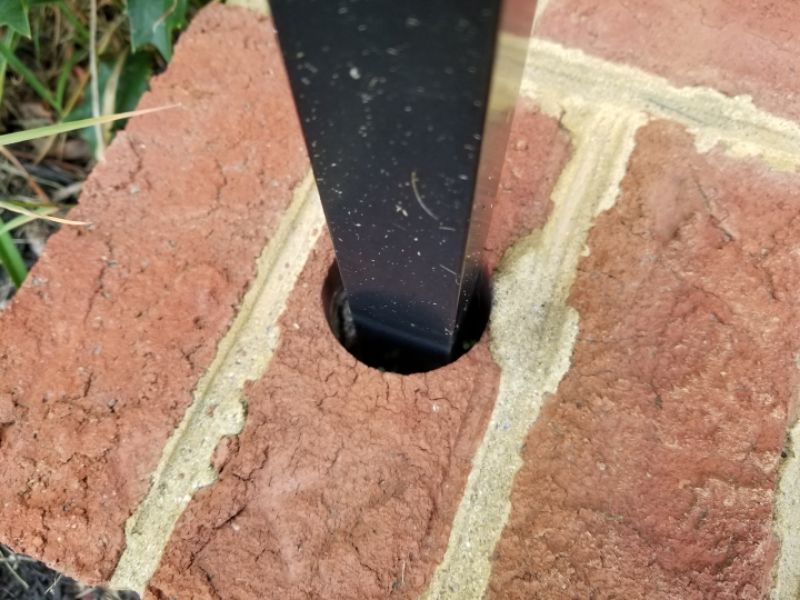
The handrail’s post is set into an open hole in the masonry. This will allow water to collect and corrode the post base. Fill and crown the hole with an appropriate masonry repair material.
The balusters are improperly spaced at the guardrail. The opening between balusters should not exceed 4″. Repair or replace the balusters.
The balusters are horizontal at the guardrail. This is a safety hazard. Horizontal balusters can be used by children to climb onto the rail. Repair or replace the balusters.

The guardrail is missing. This is a safety hazard. Replace the guardrail.
Stairs/Steps Limitation and Information Statements
Covering material, limited access: The stairs/steps cannot be properly inspected because a covering material (e.g., carpet, rug or other material) prevents unobstructed access. Therefore, the inspection is limited.
Near/at end useful life, budget for replacement: The stairs/steps are near or at the end of their useful lives. We recommend establishing a budget to replace the stairs/steps.
Past end useful life, budget for replacement: The stairs/steps are past the end of their useful lives. We recommend establishing a budget to replace the stairs/steps.
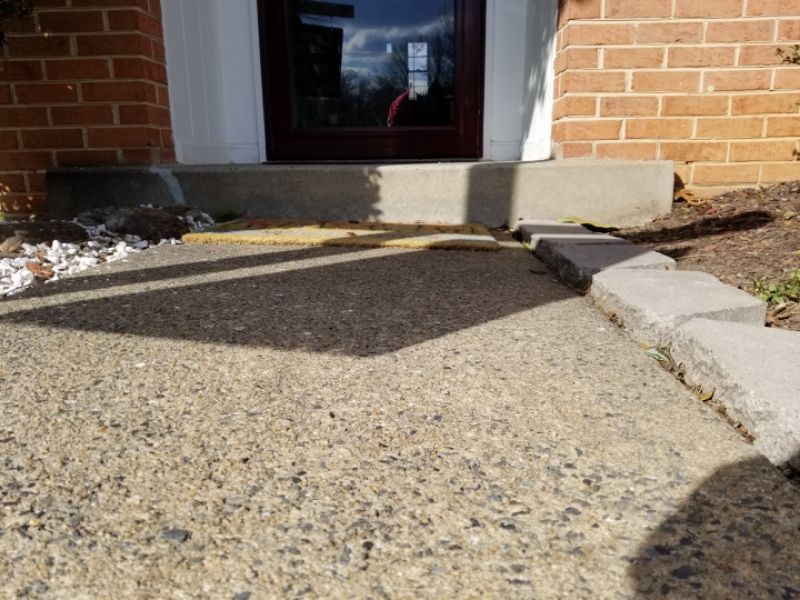
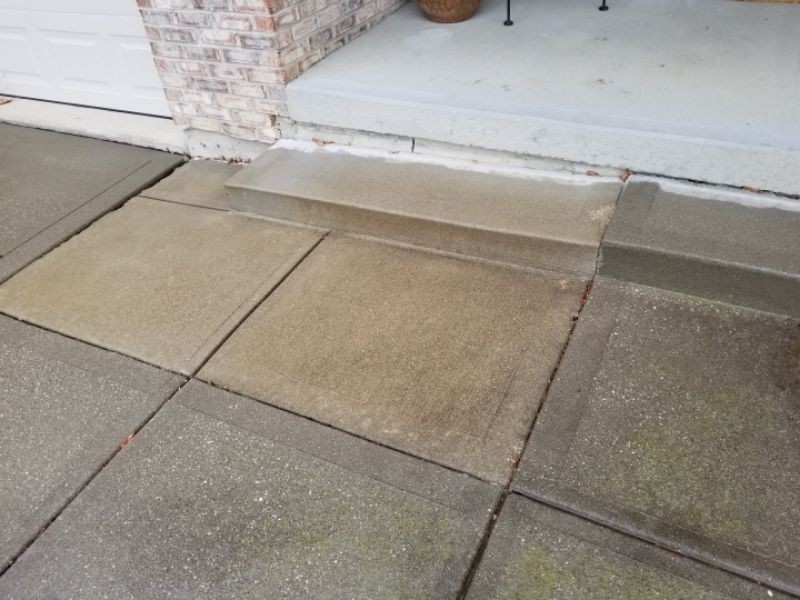
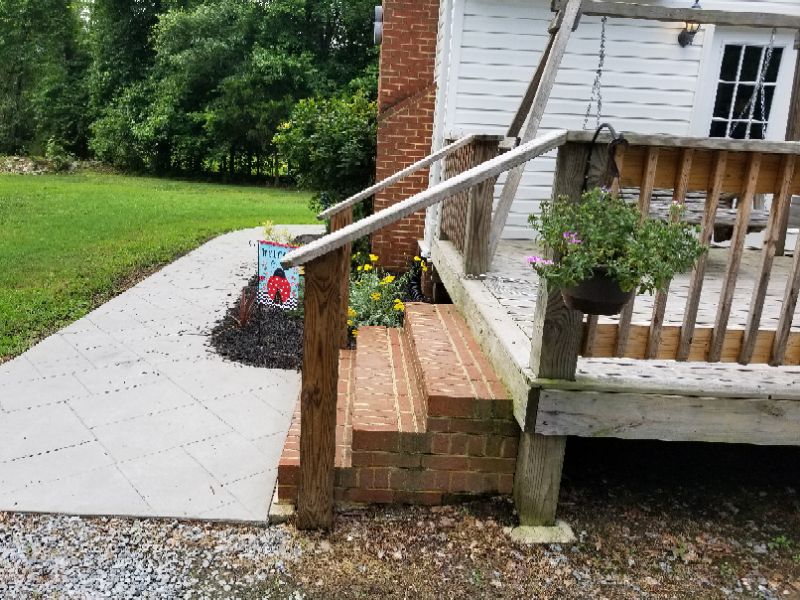
Stoop
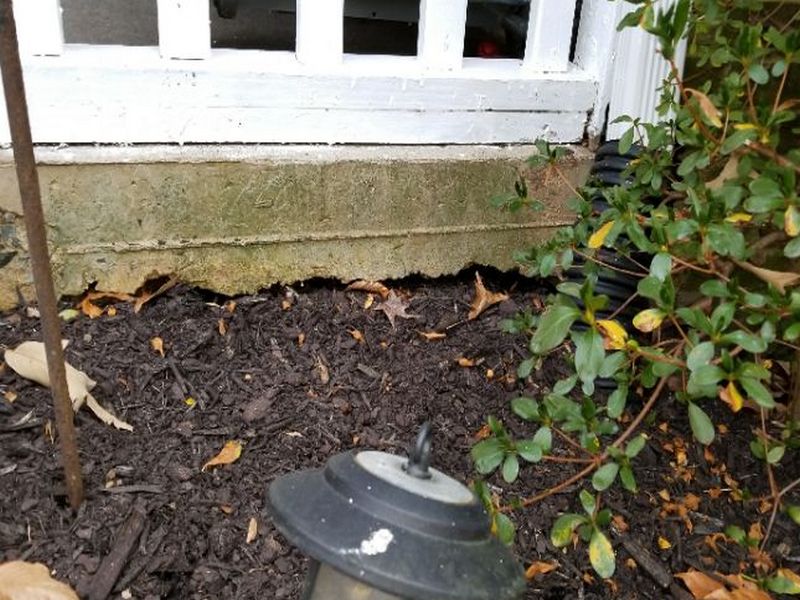
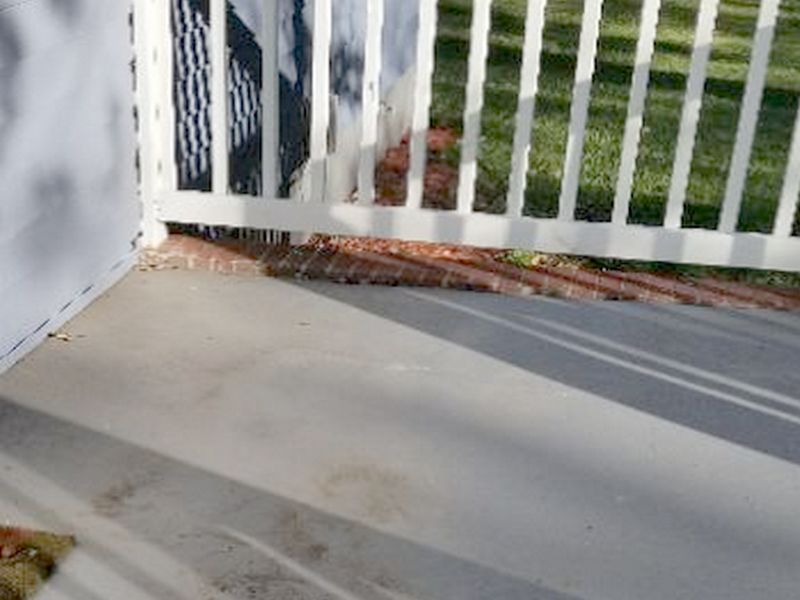
Stoops have implications for safety, water control, and can affect the home. They must be inspected both at a distance and in detail. Inspect stoops from a distance to determine if they are level, or if there are signs of settlement. This should be done from the front and sides. There should not be any rearward slope that would cause water to drain towards the home. A very slight rear-to-front slope is desirable to allow for drainage. Stoops should not be pulling away significantly from the structure. Any gaps at the junction to the house should be sealed or flashed against water penetration. Any signs of undermining by uncontrolled run-off should be reported.
Inspect up close, looking for any signs of deterioration. Stoops should be solid underfoot with no signs of movement or instability, or floor deck deterioration. Junctions at dissimilar materials, e.g. on a Brick and Concrete stoop, should be well-sealed against water penetration. Framed stoops should have a properly-installed and intact flashing at the home.
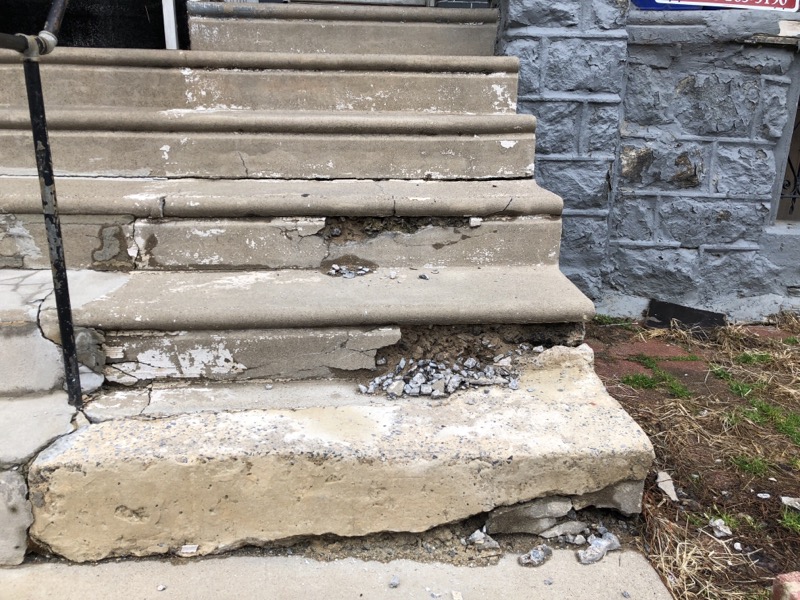
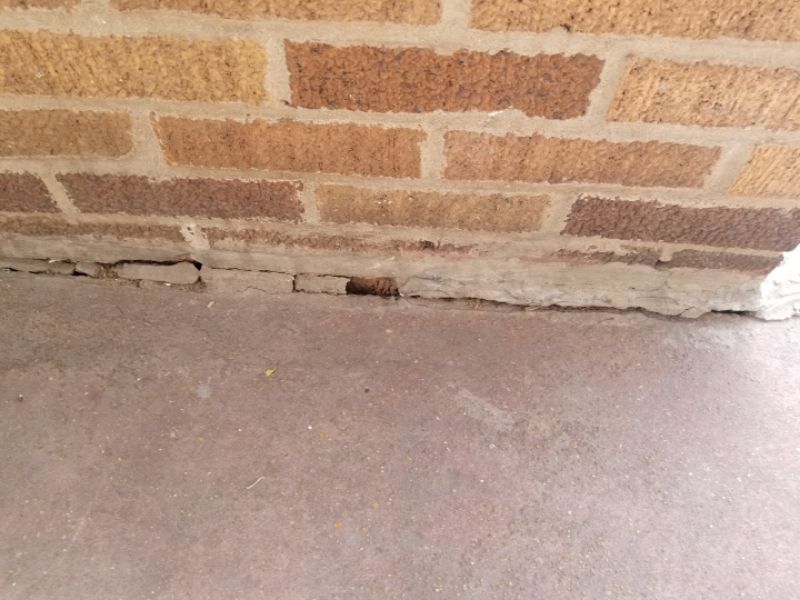
The mortar joints are deteriorated. This permits water penetration into the structure and will lead to further damage. Repair the mortar joints.
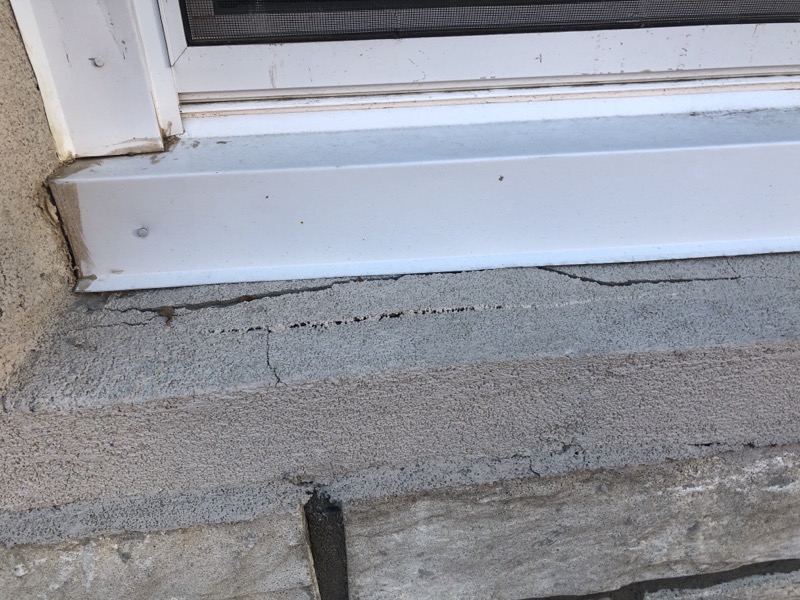
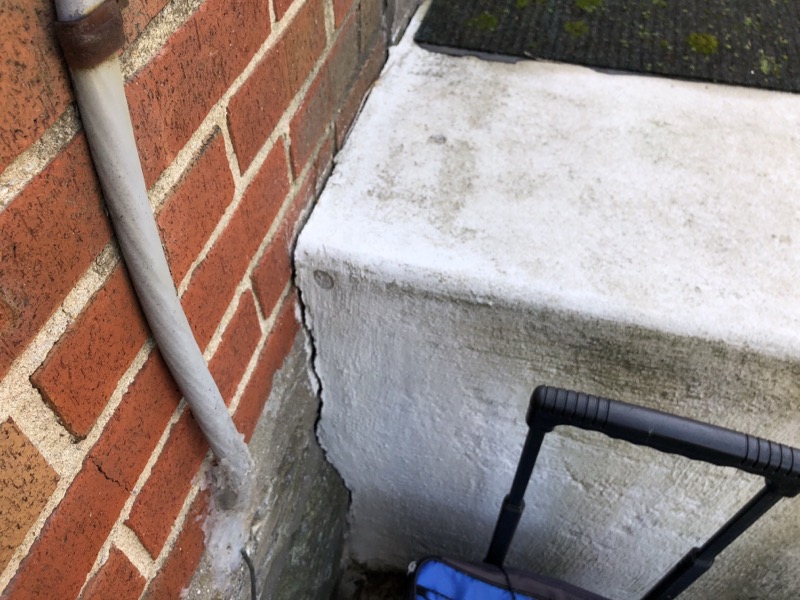
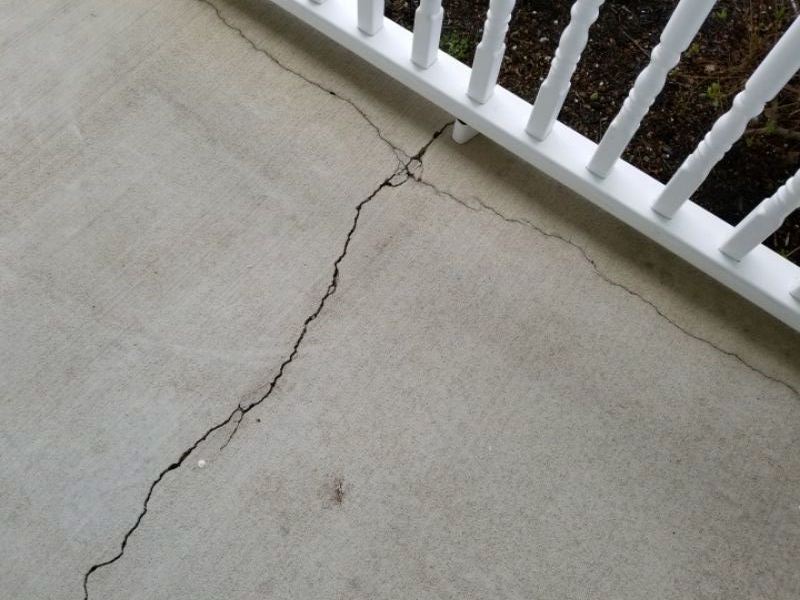
The stoop is cracked. This permits water penetration into the structure and will lead to further damage. Repair and seal any gaps to prevent moisture intrusion.
Portions of the stoop are undermined. This will lead to further erosion of the soil, and may cause settlement or failure of the stoop. Repair and stabilize the stoop to prevent further settlement. Repair and seal any gaps to prevent moisture intrusion.
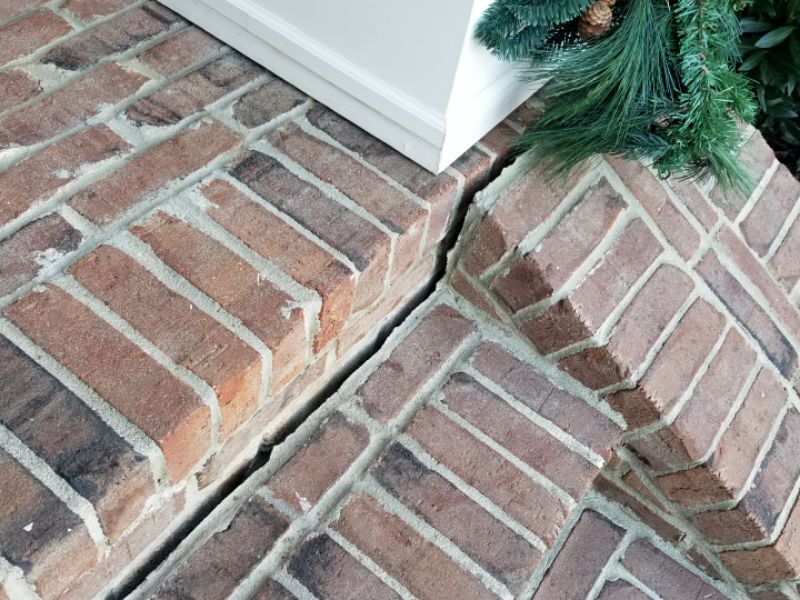
The stoop is settled. A gap has formed between the stoop and the building. This permits water penetration into the structure and will lead to further damage. Repair and stabilize the stoop to prevent further settlement. Repair and seal any gaps to prevent moisture intrusion.
The stoop is settled and is sloping towards the house. This permits water penetration into the structure and will lead to further damage. Repair and stabilize the stoop to prevent further settlement. Repair and seal any gaps to prevent moisture intrusion.
There is excessive settlement at the stoop. This is a safety issue and a potential water penetration concern. It implies inadequate support. The inspector can’t determine if the movement is ongoing. Repair and stabilize the stoop to prevent further settlement. Repair and seal any gaps to prevent moisture intrusion.
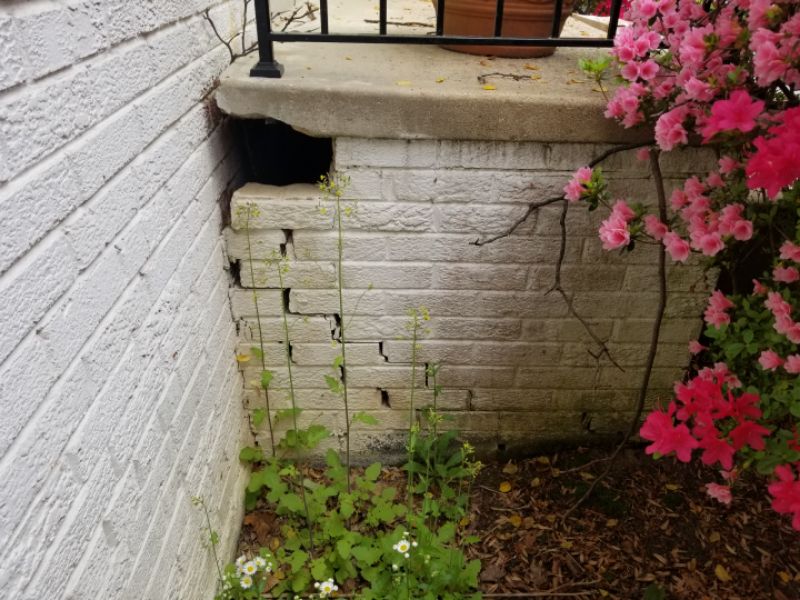
The stoop is deteriorated. This permits water penetration into the structure and will lead to further damage. Replace the stoop.
The stoop is settled and is sloping towards the house. This permits water penetration into the structure and will lead to further damage. Repair and stabilize the stoop to prevent further settlement. Repair and seal any gaps to prevent moisture intrusion.
The stoop is not properly secured to the house. This is a safety issue. Hire a contractor for repairs as needed.
Flashing is missing at the stoop ledger attachment. This can allow water behind the cladding system. Install flashing as needed.
The hanger hardware at the stoop is deteriorated. This is a safety hazard that can allow a failure. Replace the hardware.
The stoop is deteriorated. This is a safety hazard, and can permit water penetration into the structure and further damage. Replace the stoop.
The stoop is corroded. This can allow further damage and affect the stoop’s stability and safety. Hire a contractor for repairs as needed.
The stoop’s composite boards are deteriorated. Some composite materials are subject to a recall due to premature failure. Hire a contractor to evaluate the stoop and provide repairs or replacements as needed.
Stoops that are 30” or more above grade should have a guardrail installed. Note that older codes called for a guardrail when the stoop is 36” above grade. Inspect guardrails for deterioration. They should be secure, stable, and provide good support without movement. Rails should be 34” – 38” high above the stoop surface. The openings between balusters should be no more than 4”. All balusters should be present and intact. Guardrails with climbable horizontal balusters should be reported.
The guardrail is missing. This is a safety hazard. Replace the guardrail.
The guardrail is loose. This is a safety hazard. Repair or replace the guardrail.
The guardrail is damaged or deteriorated. This is a safety hazard. Repair or replace the guardrail.
The guardrail is too low. This is a safety hazard. Guardrails should be at least 36″ high. Raise the height of the guardrail.
The balusters are improperly spaced at the handrail. The opening between balusters should not exceed 4″. Repair or replace the balusters.
The balusters are horizontal at the guardrail. This is a safety hazard. Horizontal balusters can be used by children to climb onto the rail. Repair or replace the balusters.
Stoop Limitation and Information Statements
Covering material, limited access: The stoop cannot be properly inspected because a covering material (e.g., carpet, rug or other material) prevents unobstructed access. Therefore, the inspection is limited.
Near/at end useful life, budget for replacement: The stoop is near or at the end of its useful life. We recommend establishing a budget to replace the stoop.
Past end useful life, budget for replacement: The stoop is past the end of its useful life. We recommend establishing a budget to replace the stoop.
Minor cracks, no differential movement, seal cracks: The stoop has minor cracks with no differential movement. Seal the cracks to prevent water intrusion.
Spalling, cosmetic issue: The stoop is spalling, which is the separation of the surface layer, and is the result of improper finishing or weathering. Spalling is a cosmetic issue and generally does not affect the functionality of the stoop. Repairing spalled concrete is specialty work and will fail if not performed properly.
Joint between concrete surface/surrounding masonry should remain sealed: The joint between the stoop’s concrete surface and the surrounding masonry should remain sealed. Regular maintenance will prevent water penetration into the gaps. We also recommend sealing the concrete surface.
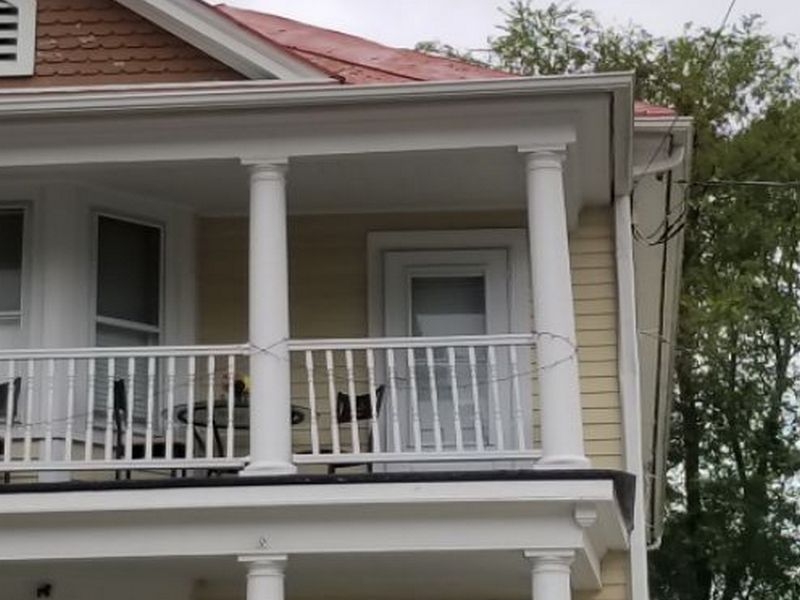
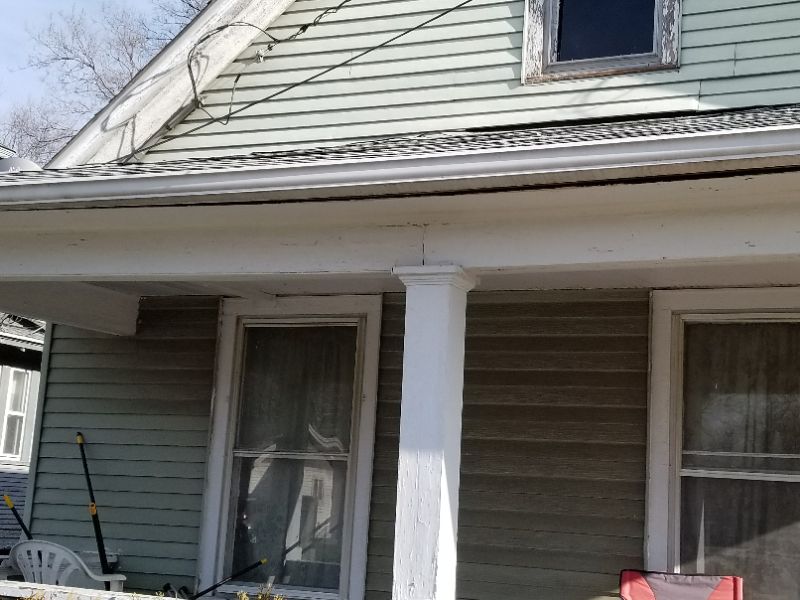
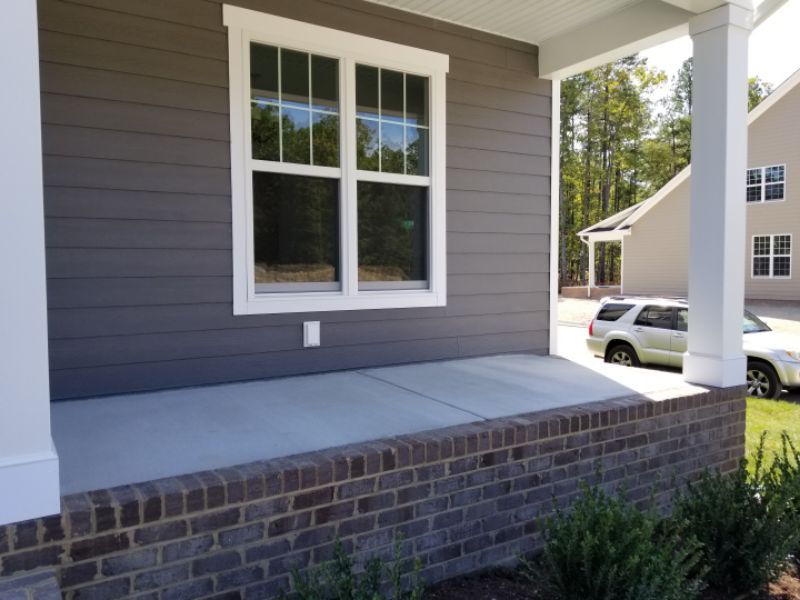
Porch
Porches are essentially large stoops that extend along a home’s exterior well past the actual entry area. They also commonly have the added feature of a roof, and sometimes a screened or solid-wall enclosure. As such, they must be inspected for many of the same defects and concerns as a Stoop. The different porch materials should be inspected for any defects or concerns specific to the construction. Enclosed or partially enclosed porches should have the solid wall exteriors inspected as a siding or trim component, and reported in the “Exterior – Siding” or “Exterior – Trim” section.
There are loose and and cracked mortar joints. This allows water penetration and further damage. Repair the porch as needed.
The porch slab is cracked. This allows water penetration and further damage. Repair and seal the cracks.
Portions of the porch are undermined. This will lead to further erosion of the soil, and may cause settlement or failure of the porch. Repair and stabilize the soil to prevent further settlement. Repair and seal any gaps to prevent moisture intrusion.
The porch is settled. A gap has formed between the porch and the building. This permits water penetration into the structure. Repair and stabilize the porch to prevent further settlement. Repair and seal any gaps to prevent moisture intrusion.
The porch slab is settled and is sloping towards the house. This permits water penetration into the structure. Repair and stabilize the porch to prevent further settlement.
The porch shows evidence of settling with subsequent repairs. It is not known if the repairs are adequate or if the settlement is ongoing. Hire a contractor for an evaluation and repairs as needed.
The porch slab is deteriorated. This permits water penetration into the structure and will lead to further damage. Replace the porch slab.
There are damaged or deteriorated floor boards. This is a safety hazard. Replace the boards.

The porch floor is an interior-grade product and is deteriorated. This will allow further water penetration and damage. Replace the flooring with an exterior-rated material.
The porch joists are installed without proper hanger hardware. This is unreliable and may allow a failure. Install joist hangers as needed.
The porch ledger board is not properly bolted to the building. This is a safety hazard. Install bolts as needed.
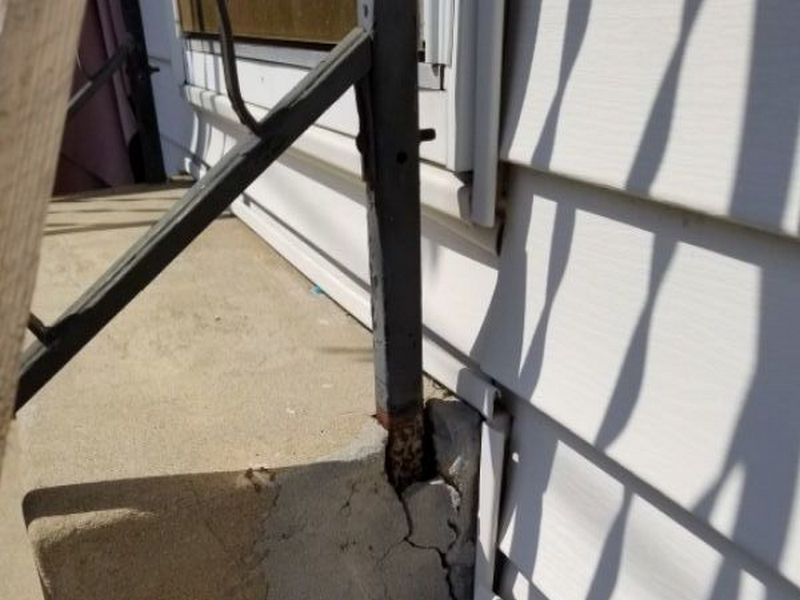
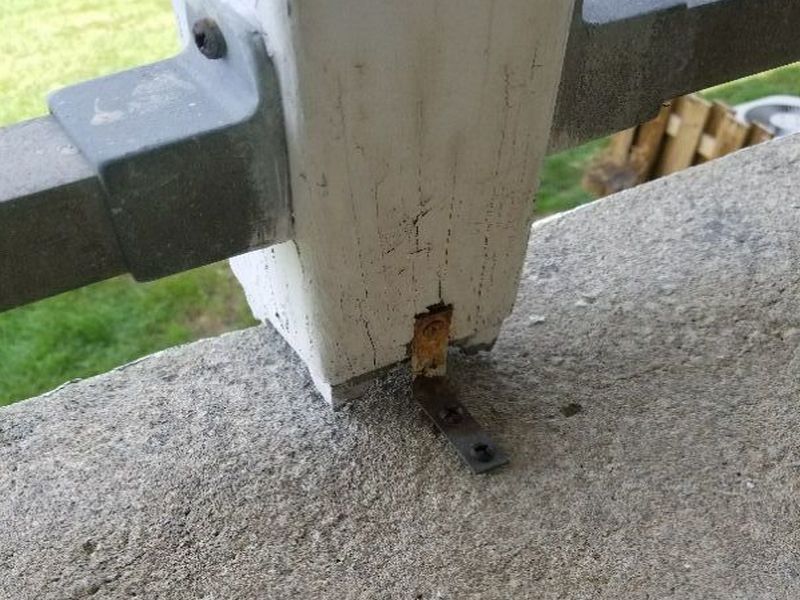
The porch support post or pier is damaged. This is a safety hazard that affects the porch’s stability. Repair or replace the pier.
The porch beam is damaged. this is a safety hazard and can allow the porch to fail. Replace the beam.
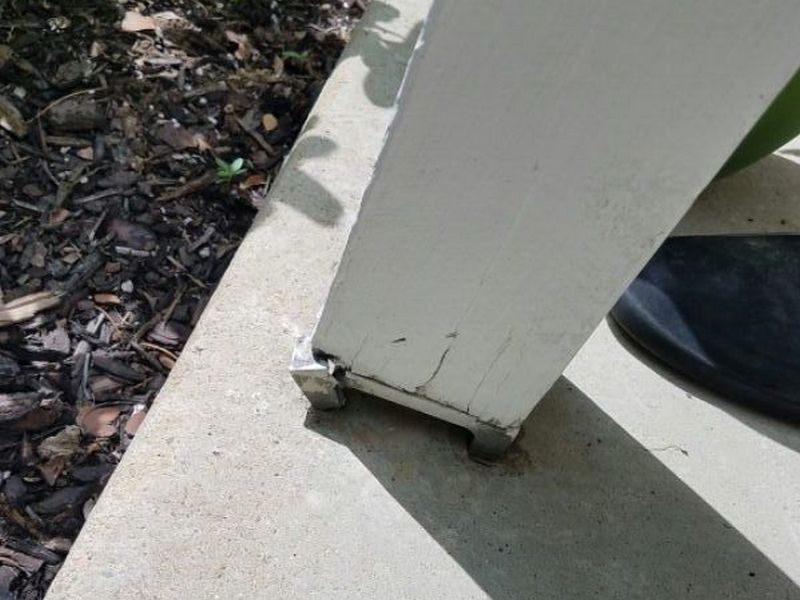
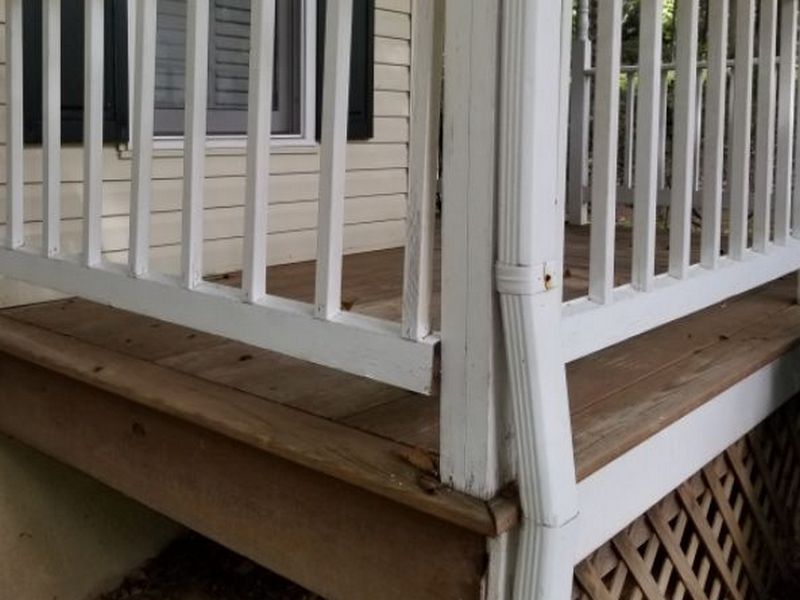
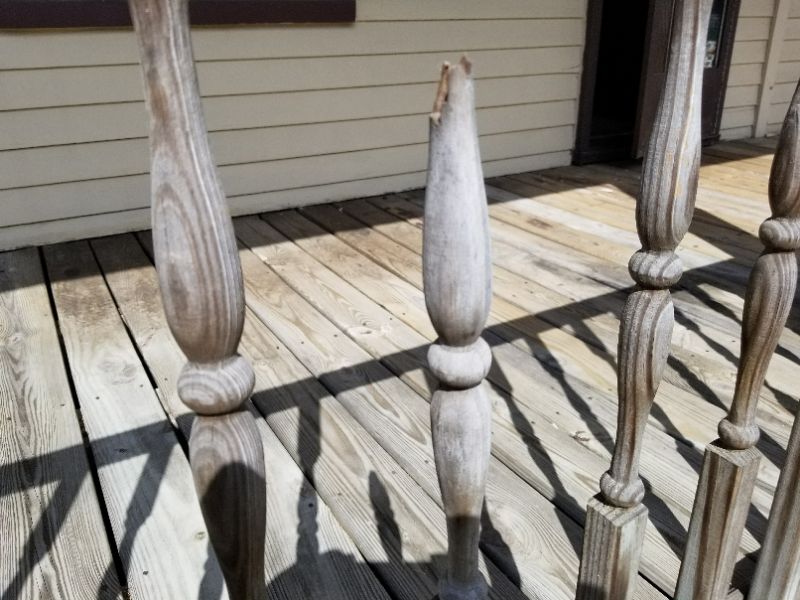
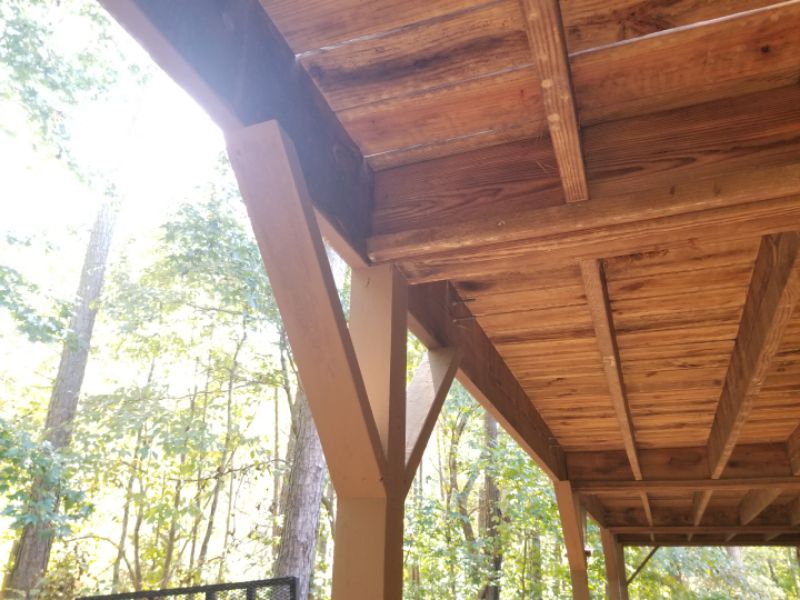
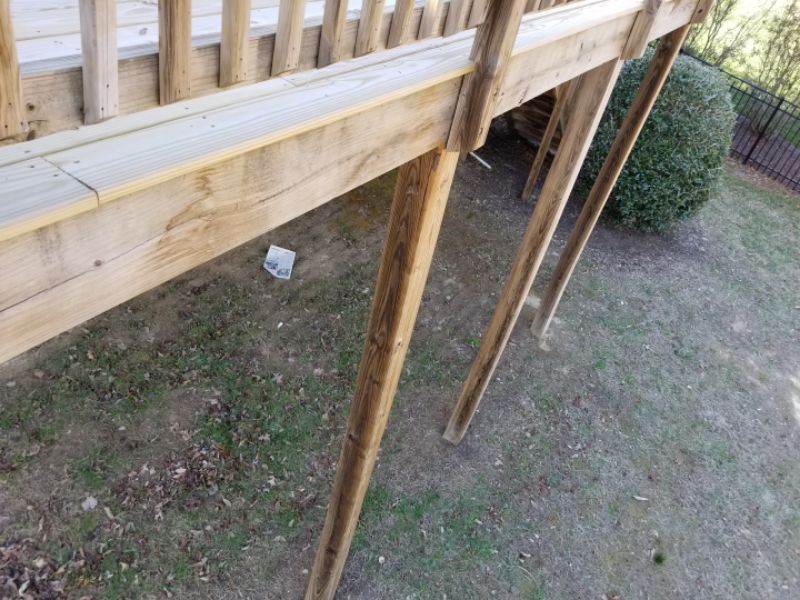
The exact number, size, and placement of posts or columns for a given porch roof is a matter of code: home inspectors do not perform load calculations. You must rely on a visual inspection. Inspect all columns or posts that support the roof. They must be observed for condition, plumb installation, and a full bearing at the top and bottom. There should be a post or column under each corner of the roof. Each support should, generally speaking, be directly over a footed pier. Inspect for any signs of sagging in the horizontal outer beam of the roof, or in the horizontal outer beam of the porch floor system. Piers should be plumb and in good condition. There should be no evidence that the porch roof is pulling away from the home.
Inspect large “old-style” columns for their specific concerns. These hollow columns are built like a barrel, using multiple vertical staves. There should not be any significant separations between the staves. A wooden column’s base pieces (plinth, torus, and scotia) are NOT decorative trim: they are load bearing. Deterioration must be reported appropriately. Modern fiberglass columns are different, and the base frequently is only trim.
| There are deteriorated porch support posts or columns. This is a safety concern. Repair or replace the supports.
|
The metal post base is damaged. this affects the post’s stability and safety. Hire a contractor for repairs as needed.
The column is leaning. This is a safety and structural stability concern. Hire a contractor for repairs as needed.
The porch has missing footings. The base supports for the posts or columns must extend below the frost line to prevent heaving that can damage the structure. Add footings for the posts or columns as needed.
The porch roof is sagging. This is a safety concern that indicates inadequate structural support. Repair and stabilize the porch.

Open or screened porches that are 30” or more above grade should have a guardrail installed. Note that older codes called for a guardrail when the porch is 36” above grade. Inspect guardrails for deterioration. They should be secure, stable, and provide good support without movement. Rails should be 34” – 38” high above the porch surface. The openings between balusters should be no more than 4”. All balusters should be present and intact. Guardrails with climbable horizontal balusters should be reported.
The guardrail is missing. This is a safety hazard. Replace the guardrail.
The guardrail is loose. This is a safety hazard. Repair the guardrail.
The guardrail is too low. This is a safety hazard. Guardrails should be at least 36″ high. Raise the height of the guardrail.
The balusters are damaged or deteriorated at the guardrail. This is a safety hazard. Repair or replace the balusters.
The balusters are horizontal at the guardrail. This is a safety hazard. Horizontal balusters can be used by children to climb onto the rail. Repair or replace the balusters.

Porch Limitation and Information Statements
Covering material, limited access: The porch cannot be properly inspected because a covering material (e.g., carpet, rug or other material) prevents unobstructed access. Therefore, the inspection is limited.
Near/at end useful life, budget for replacement: The porch is near or at the end of its useful life. We recommend establishing a budget to replace the porch.
Past end useful life, budget for replacement: The porch is past the end of its useful life. We recommend establishing a budget to replace the porch.
Joint between concrete surface/surrounding masonry should remain sealed: The joint between the porch’s concrete surface and the surrounding masonry should remain sealed. Regular maintenance will prevent water penetration into the gaps. We also recommend sealing the concrete surface.
Minor cracks, no differential movement, seal cracks: The porch has minor cracks with no differential movement. Seal the cracks to prevent water intrusion.
Spalling, cosmetic issue: The porch is spalling, which is the separation of the surface layer, and is the result of improper finishing or weathering. Spalling is a cosmetic issue and generally does not affect the functionality of the porch. Repairing spalled concrete is specialty work and will fail if not performed properly.
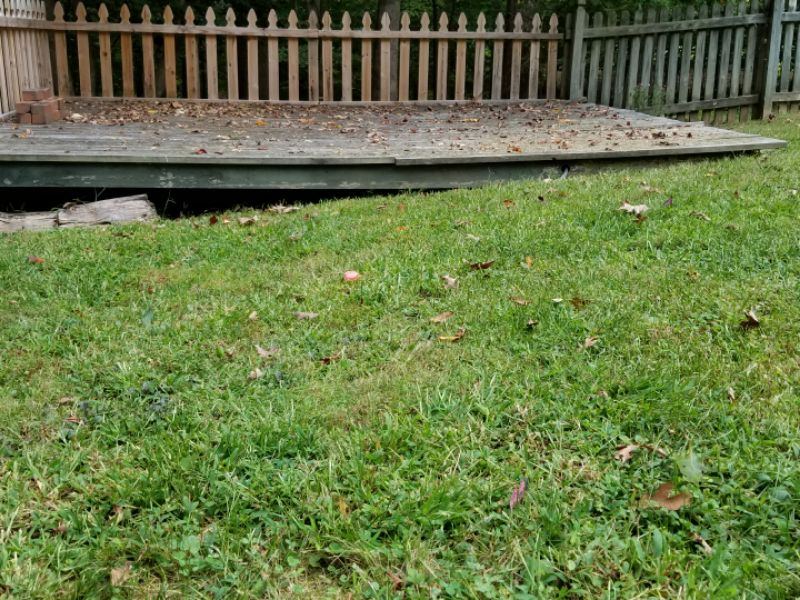
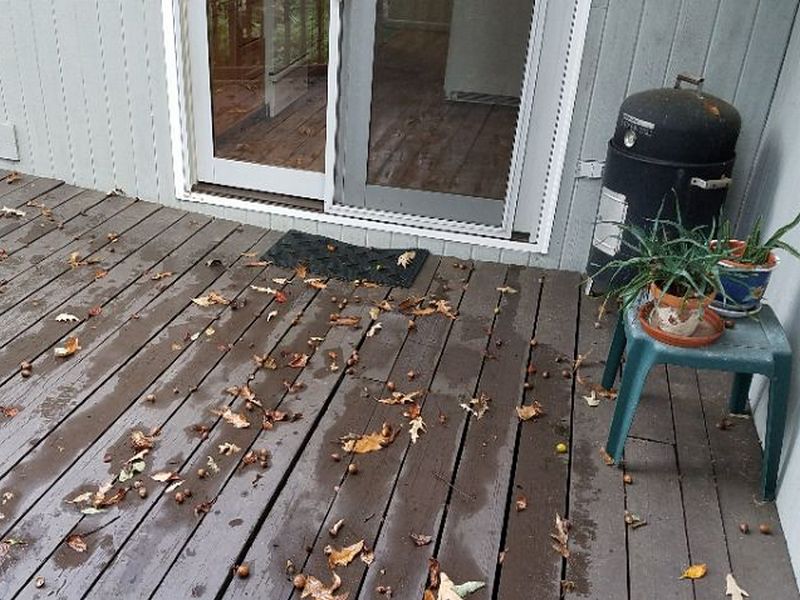
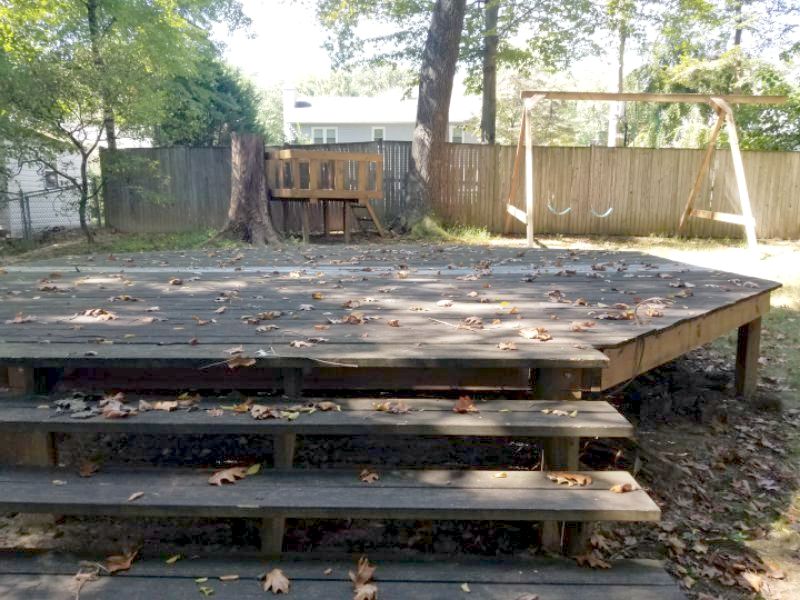
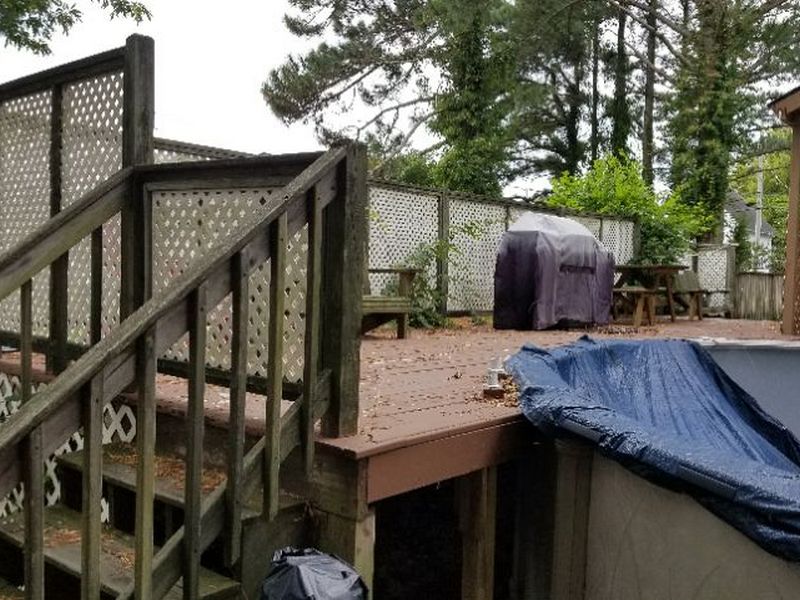
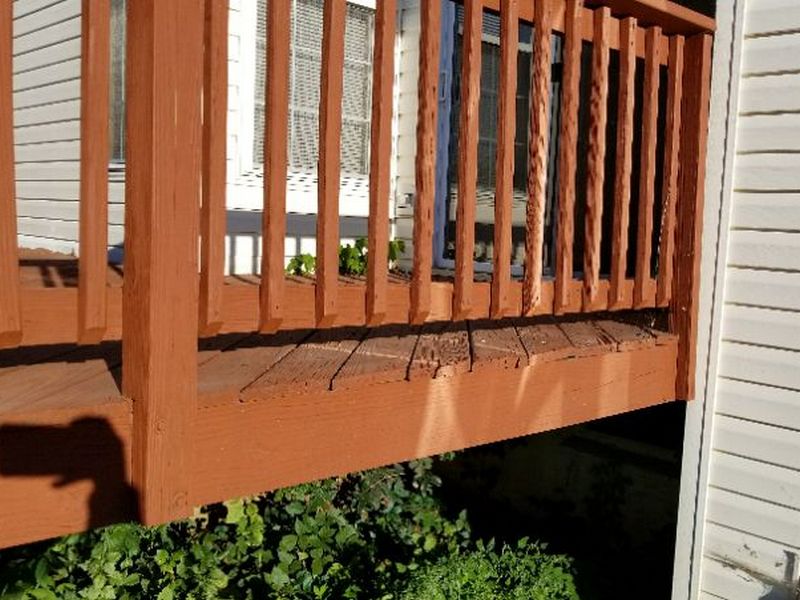
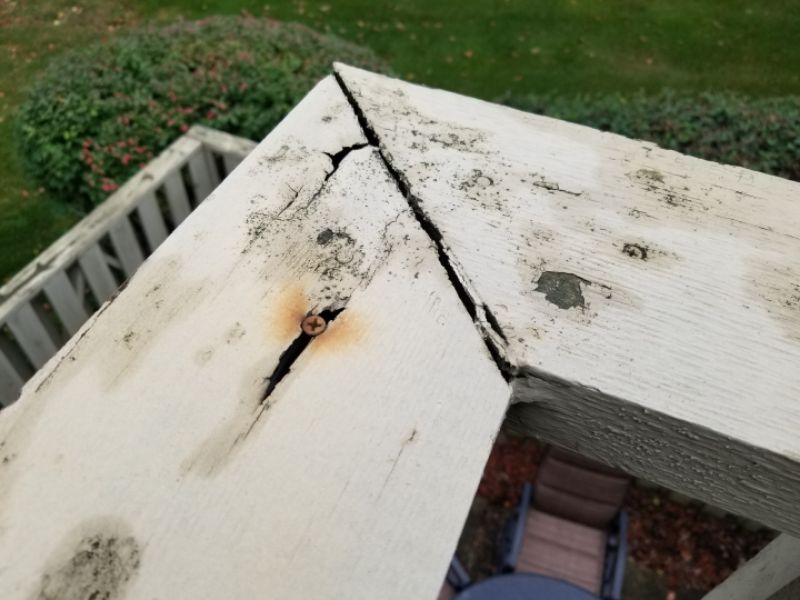
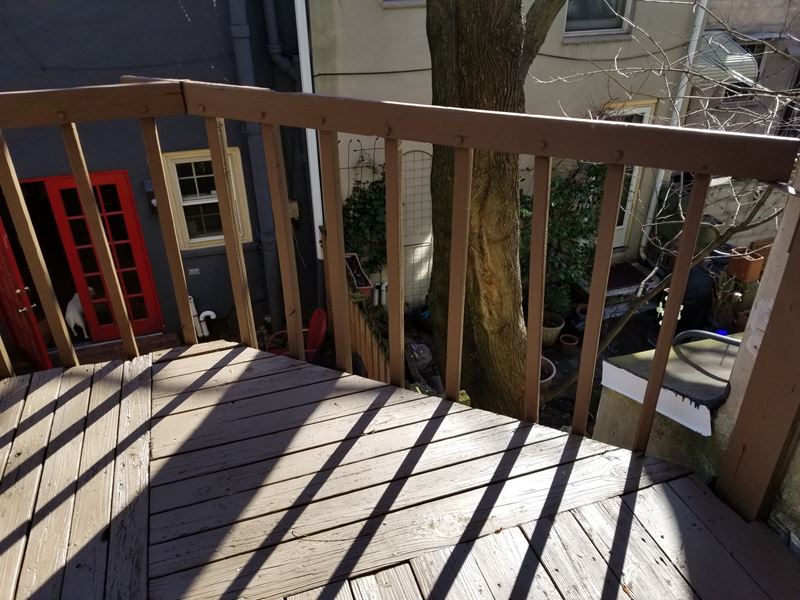
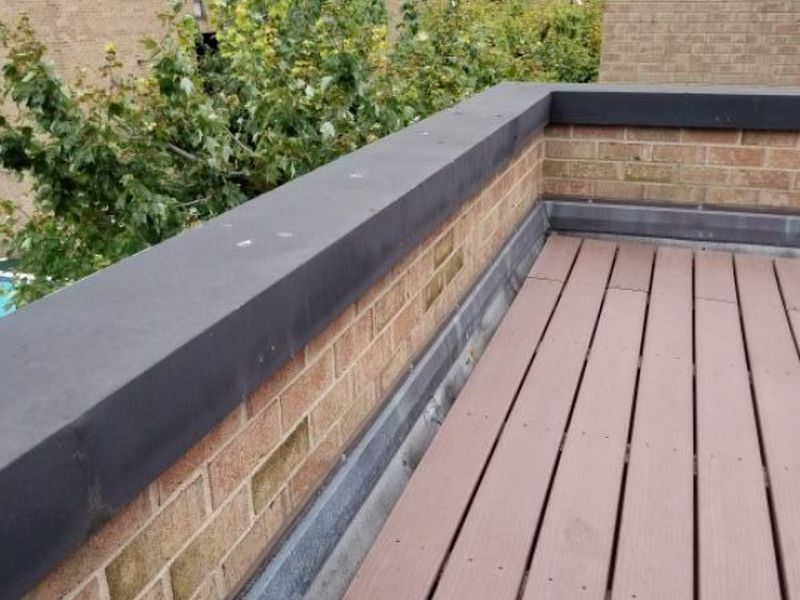
Deck/Balcony
Decks and balconies are only visually inspected unless an in-depth deck evaluation by a certified specialist has been ordered. Load calculations and framing measurements are not a part of a Home Inspection for properties with decks.
Inspect decks and balconies from a distance to determine if they are level, or if there are signs of sagging or settlement. This should be done from the front and sides. There should not be any rearward slope that would cause water to drain towards the home. A very slight rear-to-front slope is desirable to allow for drainage. Deck and balcony surfaces should not be at the same level as an exterior entry threshold. There should not be any pulling away from the home. Any gaps at the junction to the home should be sealed or flashed against water penetration. Any signs of undermining by uncontrolled run-off should be reported.
The deck/balcony has deteriorated floor boards. This is a safety hazard. Replace the boards.
The deck/balcony surface is cracked. This will allow water penetration and further damage. Repair and seal the cracks.
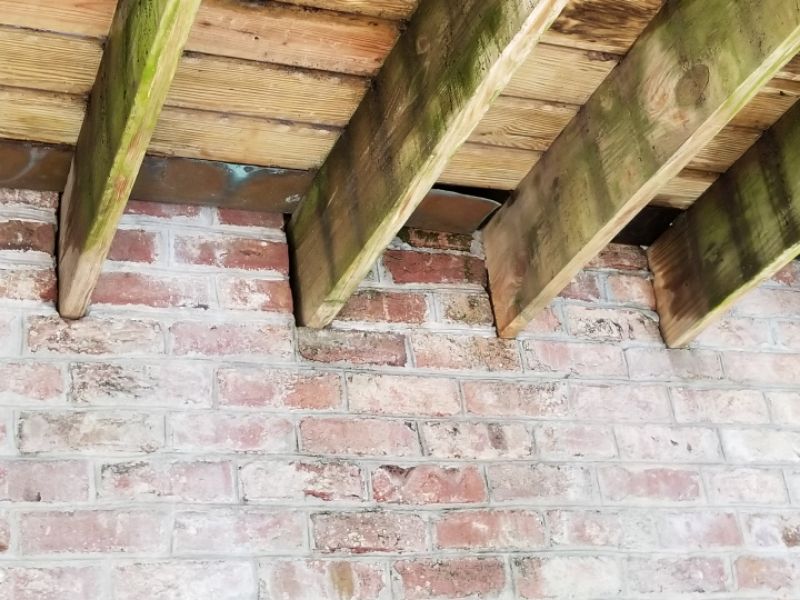
Inspect to ensure the presence of ledgers that are bolted to the home. Nails alone are not acceptable. Ledger attachments not at the structural framing (band joists) or on brick veneer, must be reported. Ledger boards must have intact flashing to prevent water penetration into the structure and deterioration.
The flashing is missing or damaged at the deck/balcony’s ledger. This will allow water penetration and deterioration. Replace the flashing and repair any damage which may be revealed.
The deck/balcony ledger is not properly bolted to the building. This is a safety hazard. Secure the deck/balcony to the structure.
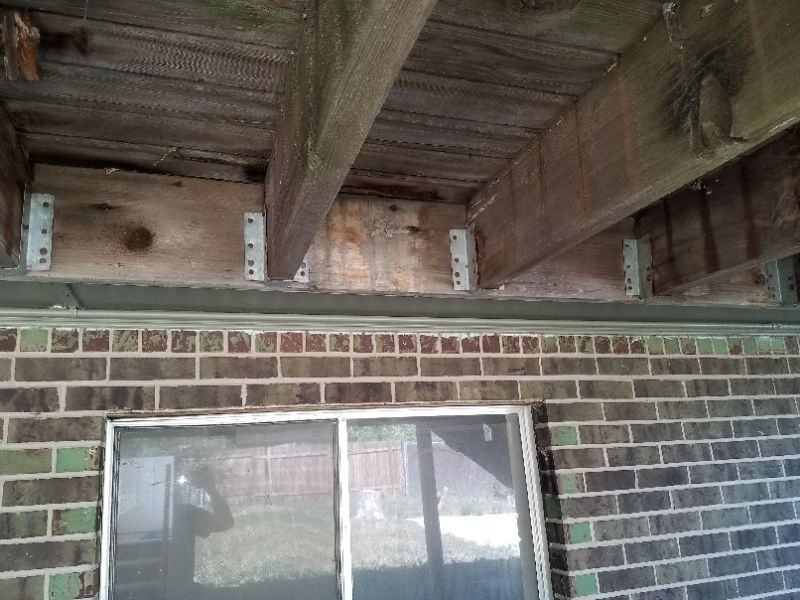
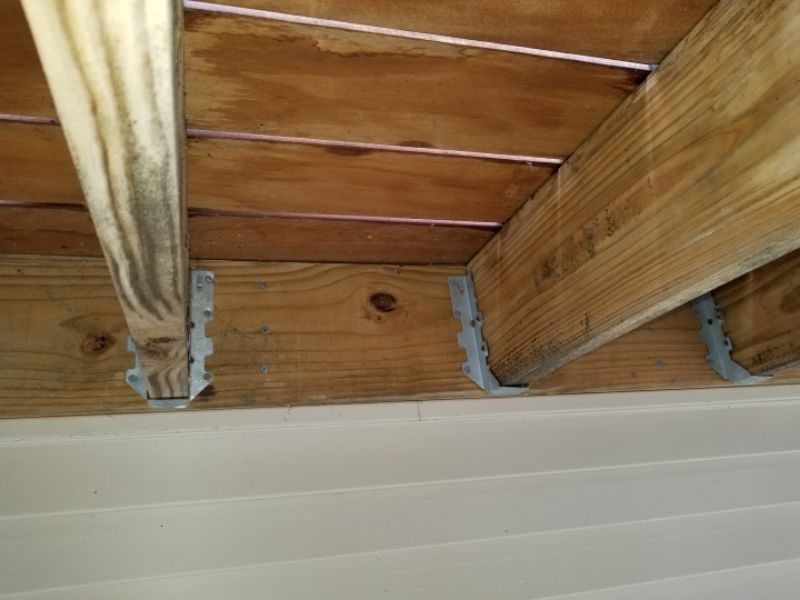
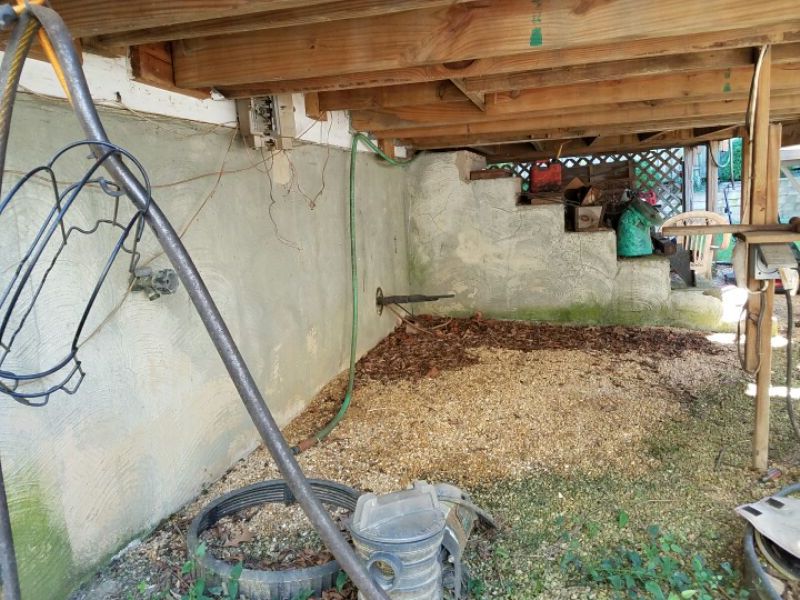
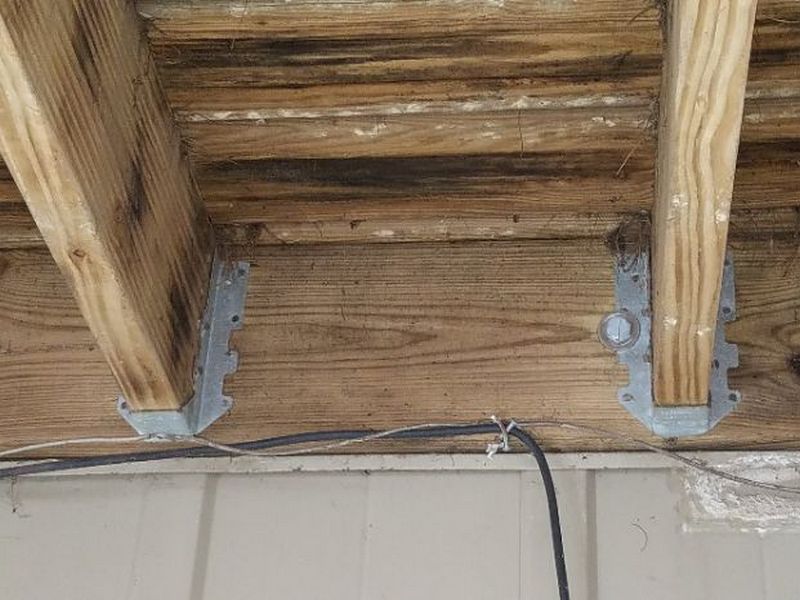
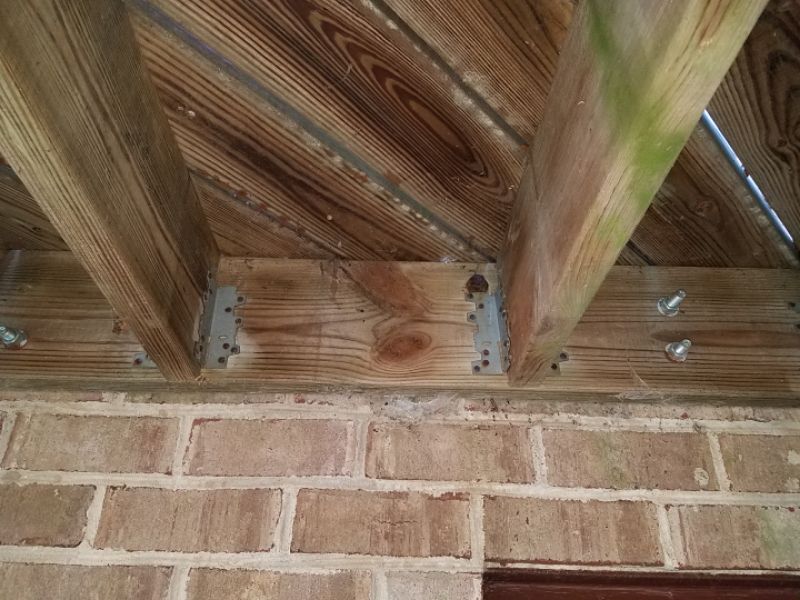
Inspect the understructure framing as accessible for damage, deterioration, improper cuts or notching, inadequate framing, or improper “sister” joists that do not have one end on a load-bearing support or are too short. Inspect to ensure that connector hardware is installed and fully attached with appropriate fasteners. Missing connectors, fasteners, or corroded hardware should be reported. Stairs should not be installed using nailed hanger blocks only. Bolted connections and/or hardware is required.
The floor joist is deteriorated. This is a safety hazard. Replace the joist.
The floor joists are not bearing on the beam. This affects proper support for the floor frame. Hire a contractor for repairs as needed.
The deck’s support members lack hanger hardware. This is a safety concern. Install hanger hardware.
The deck is sagging. This is a safety concern that indicates inadequate structural support. Hire a contractor or certified deck inspection specialist for an evaluation and repairs as needed.
The deck/balcony joists appear be sitting on the brick veneer siding. Brick veneer is not acceptable support. Hire a contractor for an evaluation and repairs as needed.
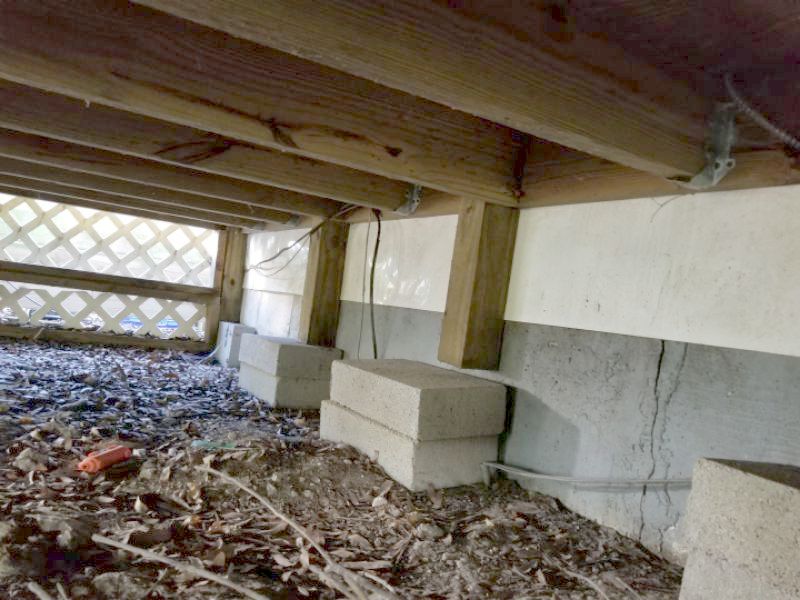
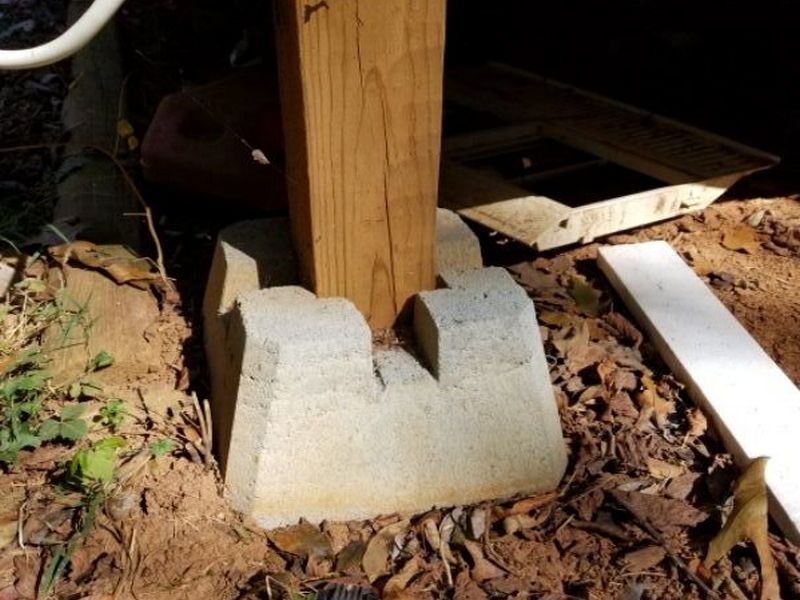
Inspect all accessible support posts. 4X4 posts over 6’ tall should have diagonal bracing. Run a probe down the base of the post into the grade to detect any deterioration. Ensure that all supports are set on a proper deep footing. Surface blocks are NOT acceptable for any deck that is attached to a structure; they are acceptable only if the deck is 100% free standing.
The deck/balcony’s posts are leaning. This is a safety concern. The cause for this should be identified. Hire a contractor or certified deck inspection specialist for an evaluation and repairs as needed.
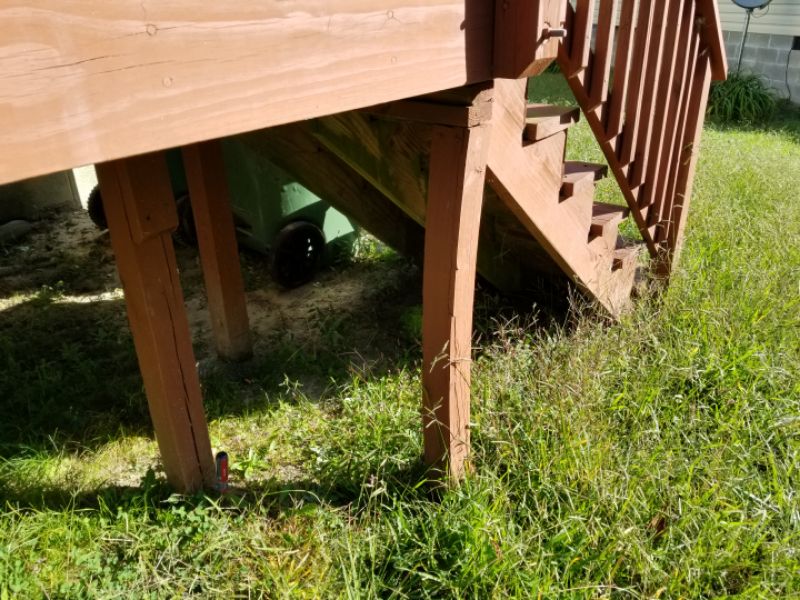
The deck/balcony has deteriorated support posts. This is a safety concern. Repair or replace the posts.
The deck/balcony has missing footings. The base supports for the posts or columns must extend below the frost line to prevent heaving that can damage the structure. Add footings for the posts or columns as needed.
The deck/balcony’s support members are connected with nails only. The lack of appropriate bolts and/or hanger hardware at certain locations is a safety hazard. Install bolts and/or hanger hardware as needed.
The deck/balcony’s cross-bracing is inadequate. Cross-bracing reduces lateral movement of the support components. This is a safety concern. Replace or install cross-bracing as needed.
Inspect guardrails for deterioration. They should be secure, stable, and provide good support without movement. Rails should be 34” – 38” high above the floor surface. The openings between balusters should be no more than 4”. All balusters should be present and intact. Guardrails with climbable horizontal balusters should be reported.
The guardrail is missing. This is a safety hazard. Replace the guardrail.
The guardrail is loose. This is a safety hazard. Repair or replace the guardrail.
The guardrail is damaged or deteriorated. This is a safety hazard. Repair or replace the guardrail.
The balusters are improperly spaced at the guardrail. The opening between balusters should not exceed 4″. Repair or replace the balusters.
The guardrail is too low. This is a safety hazard. Guardrails should be at least 36″ high. Raise the height of the guardrail.

The balusters are horizontal at the guardrail. This is a safety hazard. Horizontal balusters can be used by children to climb onto the rail. Repair or replace the balusters.

Deck/Balcony Limitation and Information Statements
Covering material, limited access: The deck cannot be properly inspected because a covering material (e.g., carpet, rug or other material) prevents unobstructed access. Therefore, the inspection is limited.
Low clearance above grade no access: The deck cannot be properly inspected because its low clearance above the grade prevents unobstructed access. Therefore, the inspection is limited.
Covering material, limited access: The balcony cannot be properly inspected because a covering material (e.g., carpet, rug or other material) prevents unobstructed access. Therefore, the inspection is limited.
Deck near/at end useful life, budget for replacement: The deck is near or at the end of its useful life. We recommend establishing a budget to replace the deck.
Deck past end useful life, budget for replacement: The deck is past the end of its useful life. We recommend establishing a budget to replace the deck.
Balcony near/at end useful life, budget for replacement: The balcony is near or at the end of its useful life. We recommend establishing a budget to replace the balcony.
Balcony past end useful life, budget for replacement: The balcony is past the end of its useful life. We recommend establishing a budget to replace the balcony.
Deck level with floor of house, no evidence of water, risk of water: The deck is level with the floor of the house. Although there is no visible evidence of water penetration, the configuration may permit wind-driven rain to enter the interior. The deck and/or entry doorway may need to be modified to prevent water penetration.
Wood decks require periodic maintenance: Wood decks, even if constructed of pressure-treated wood framing, require periodic maintenance. Wood decks generally need preservative applications regularly. If water does not bead on the deck, treat the deck with products that protect the wood from UV rays and water absorption.
Balcony level with floor of house, no evidence of water, risk of water: The balcony is level with the floor of the house. Although there is no visible evidence of water penetration, the configuration may permit wind-driven rain to enter the interior. The balcony and/or entry doorway may need to be modified to prevent water penetration.
Baluster spacing wider than acceptable by current safety standards, consider modifying: Baluster spacing is wider than is acceptable by current safety standards. Wider baluster spacing may have been permitted by the local building authority at the time of construction. Consider hiring a contractor to modify the balusters to conform to current industry standards.
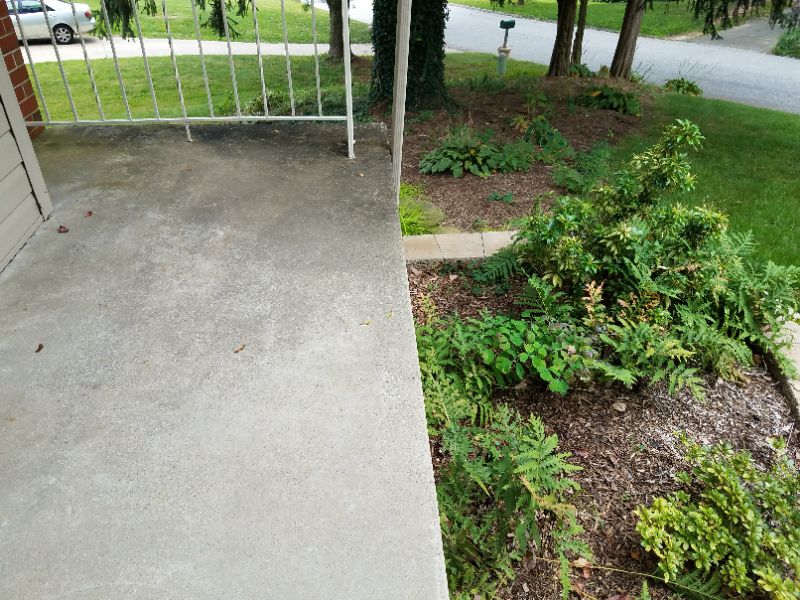
Patio
Patios are generally impervious surfaces. As such they must be inspected for the same water management concerns as other hardscape on the property, e.g. driveways and walks. They also present many of the same defects, including trip hazards.
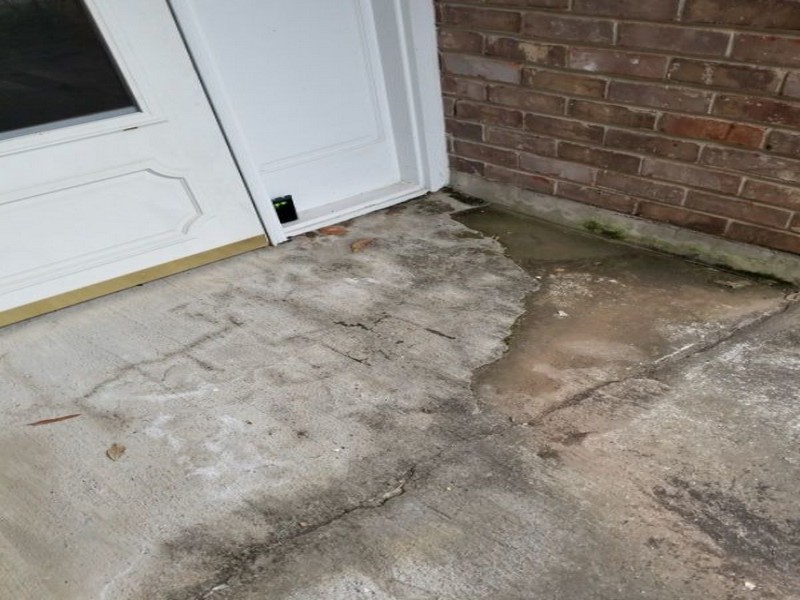
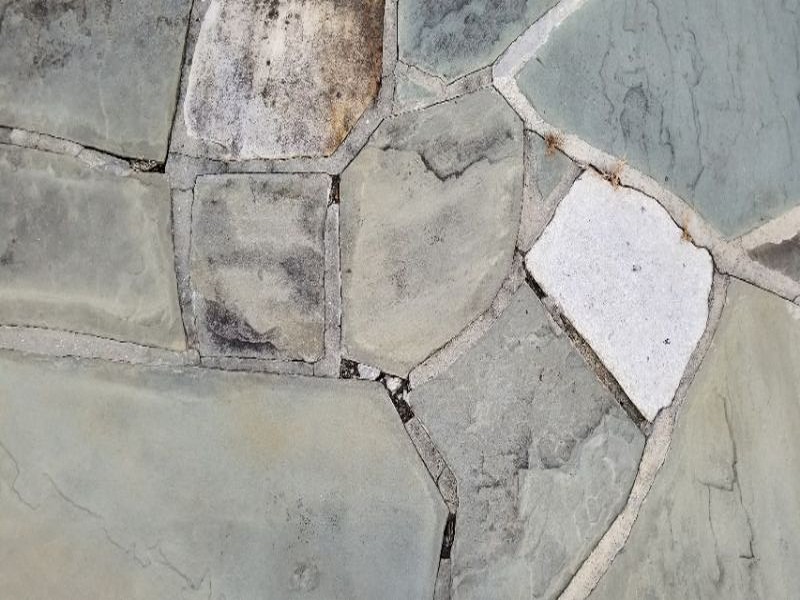
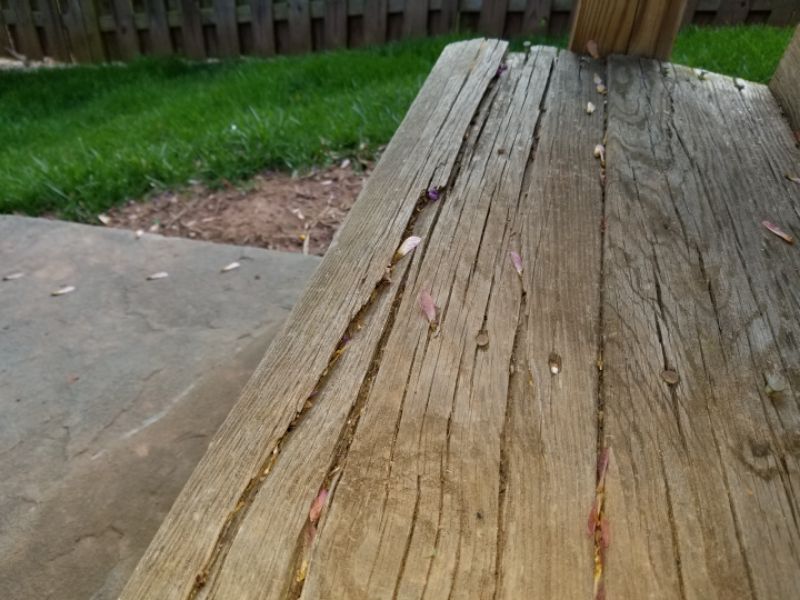
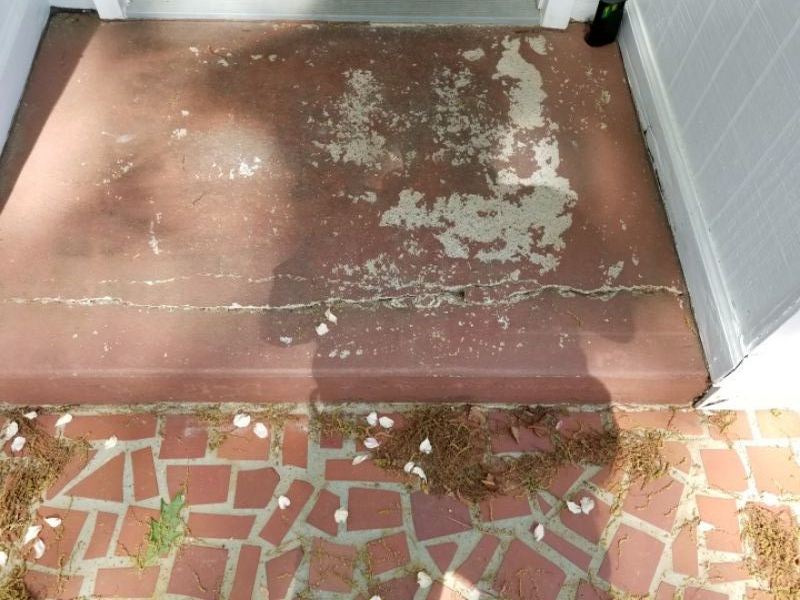
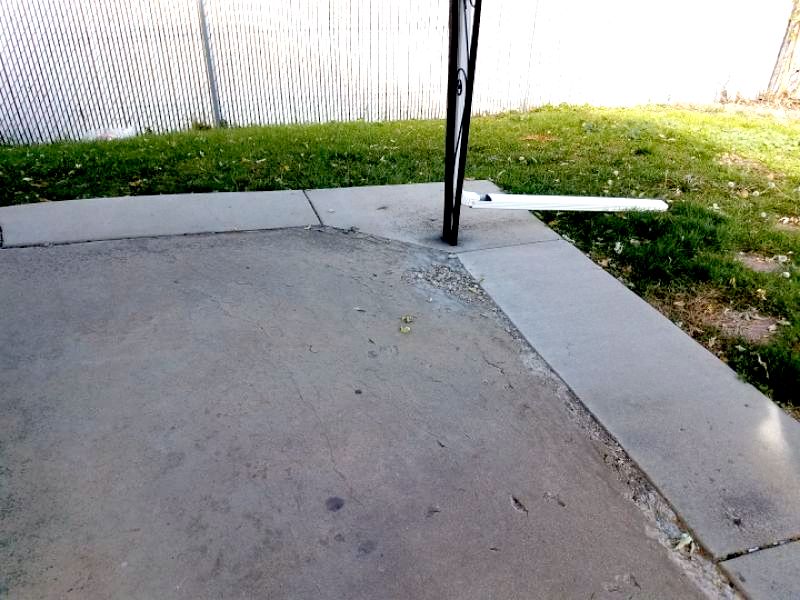
Inspect the overall lay of the patio, paying careful attention to slope and drainage. Patios must never be installed above the level of a sill plate or the exterior siding. They should be sufficiently below the threshold level of any exterior entry to avoid deterioration or water intrusion into the interior. Inspect for damage, deterioration, settlement and heaving, gaps (especially between the patio and the home), undermining, and deterioration of joints that will allow water penetration and ongoing damage. Special attention should be paid wherever a patio joins steps or stoops; this has implications for drainage and trip hazards due to settlement and heaving. Inspect any patio enclosures or covers for damage, deterioration, leaks, and instability.
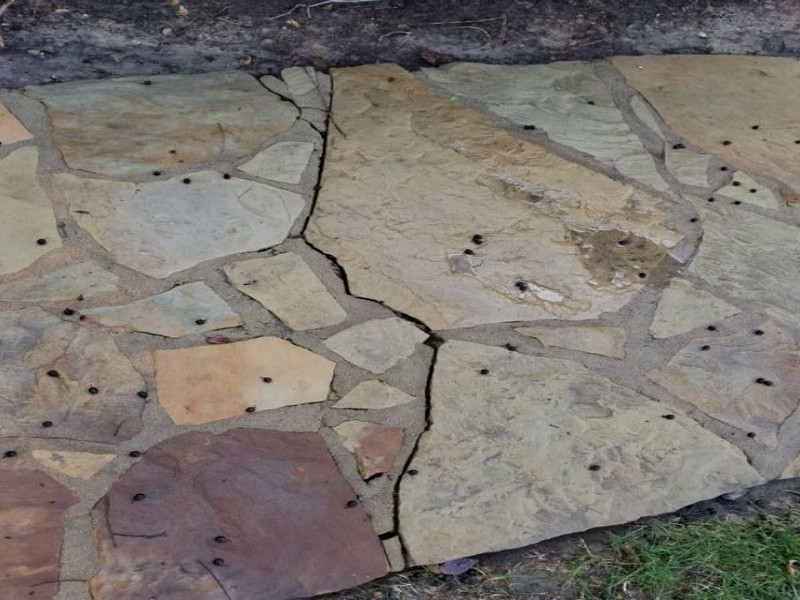
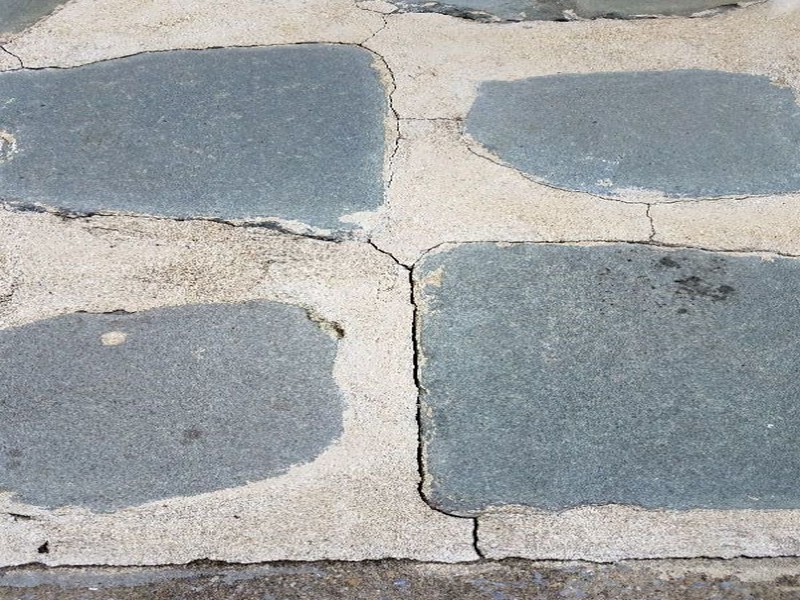
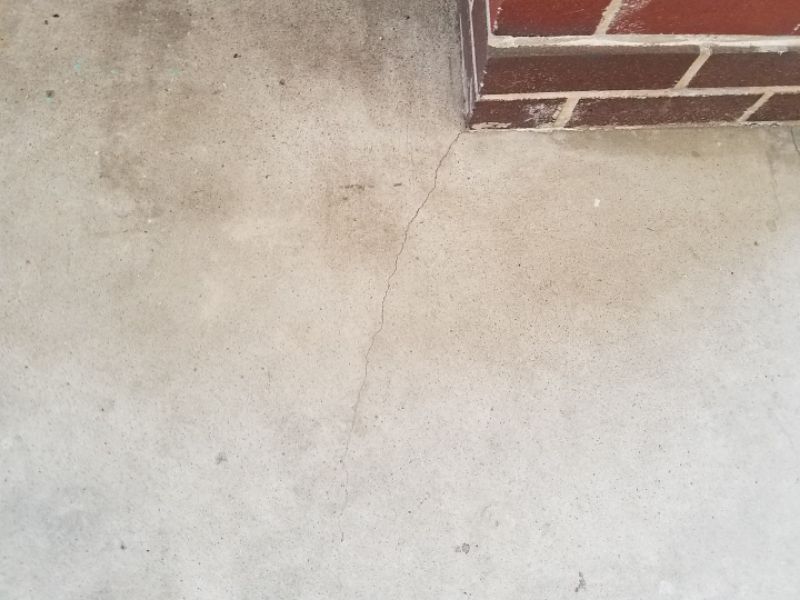
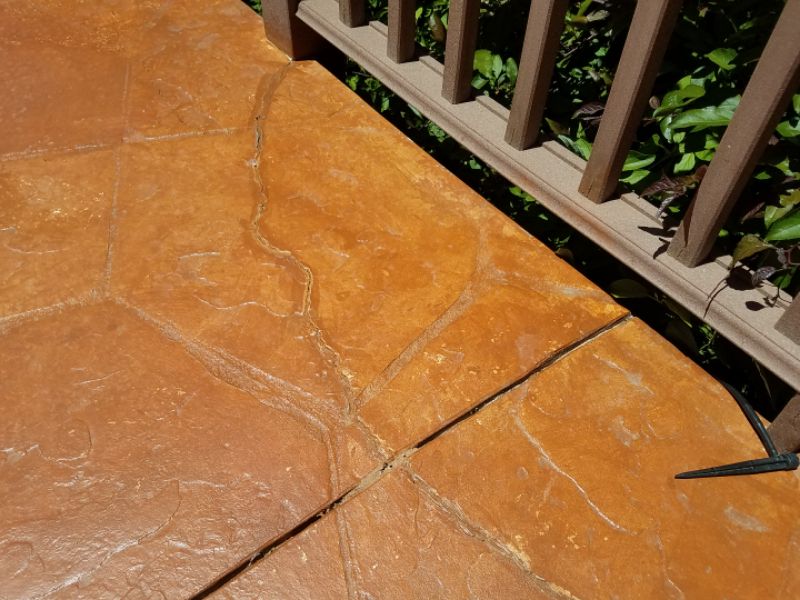
The patio has cracks. This permits water penetration and is conducive to further deterioration. Repair and seal the cracks.

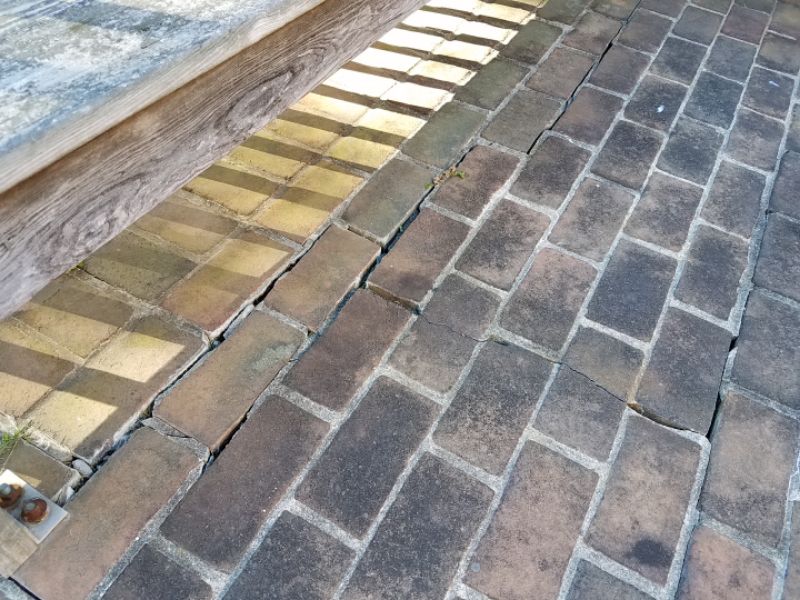
There are deteriorated mortar joints at the patio. This permits water penetration and will cause further damage. Repair the mortar joints.

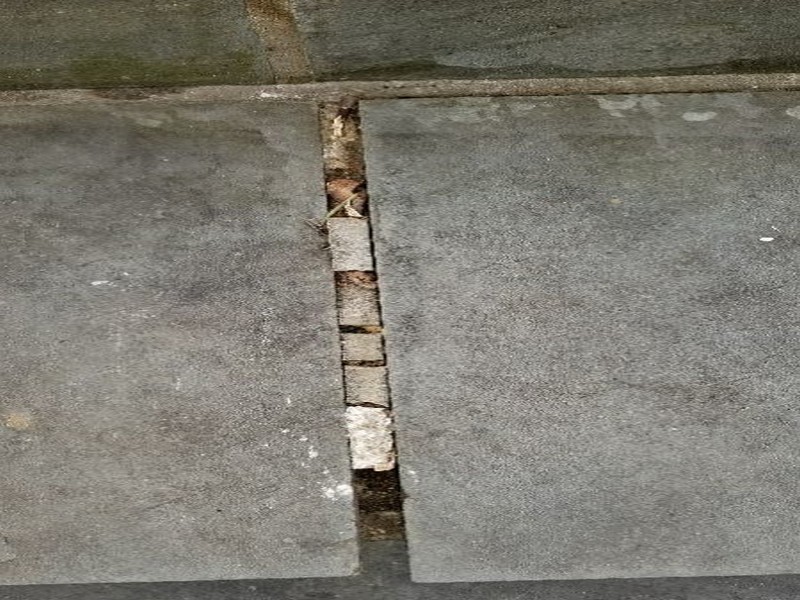
The wood spacers at the patio are heaved. This is a trip hazard. Replace the spacers.
![]()
There is damage to the patio. Without repairs, moisture penetration will cause further damage. Repair the damage.
The patio is settled and heaved. This is a trip hazard and permits water penetration, which is conducive to further deterioration. Repair and stabilize the patio to prevent further settlement. Repair and seal any gaps to prevent moisture intrusion.
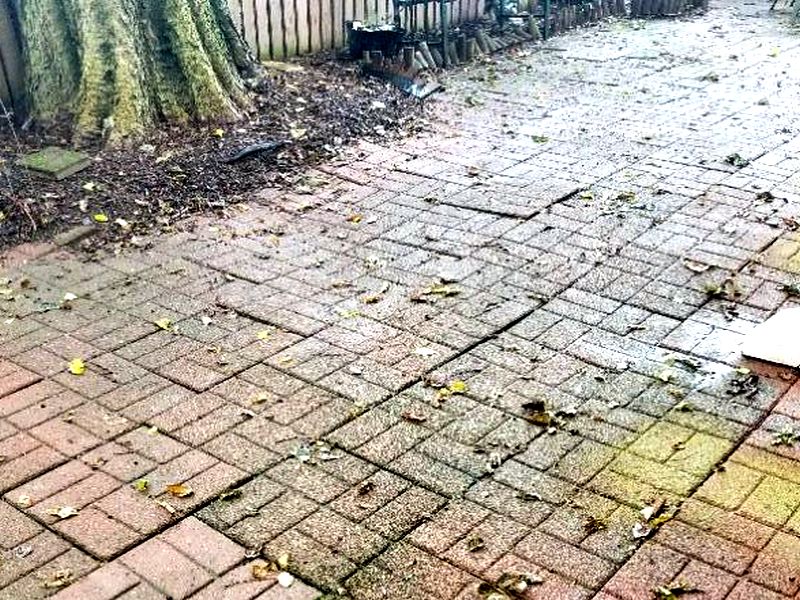

There is a gap between the patio and the foundation. This will allow water penetration into the structure. Repair and seal any gaps to prevent moisture intrusion.
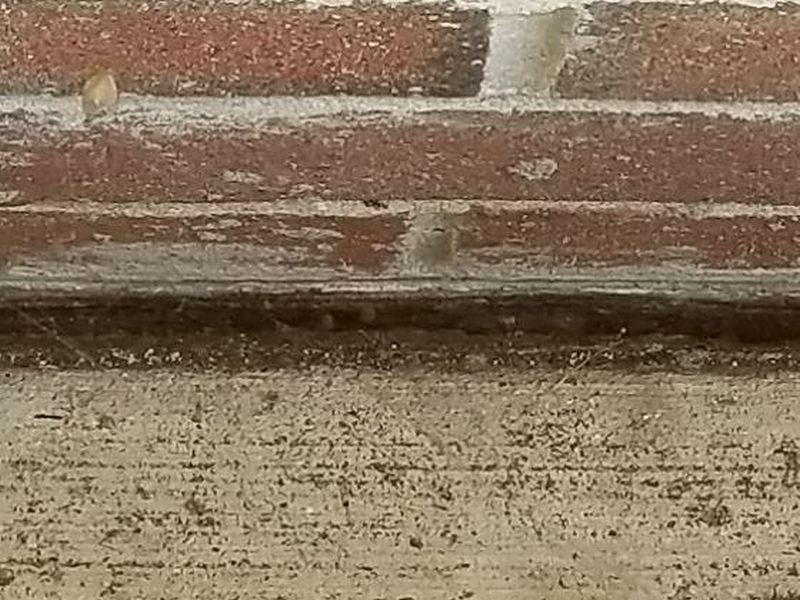
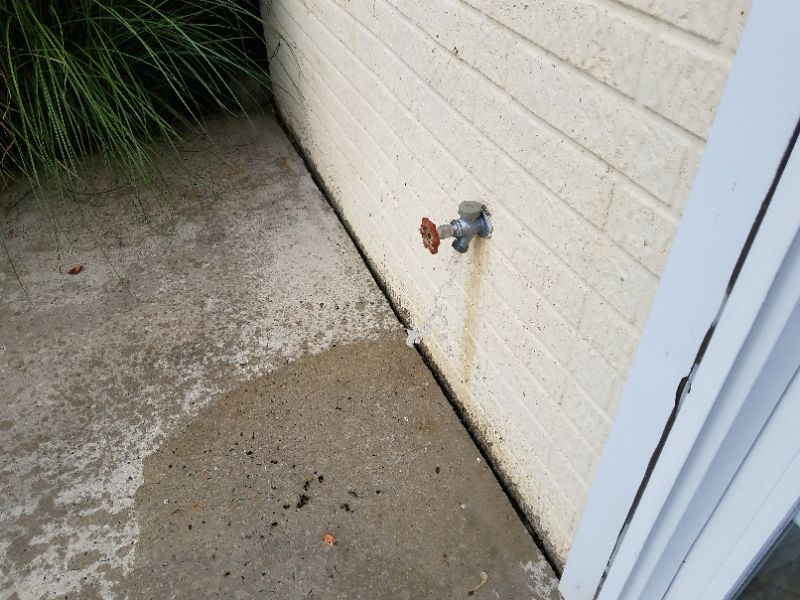
The patio’s surface water drainage is inadequate. This may cause standing water, premature wear of the surface, or water intrusion into the structure. Repair the patio to ensure that surface water is directed away.
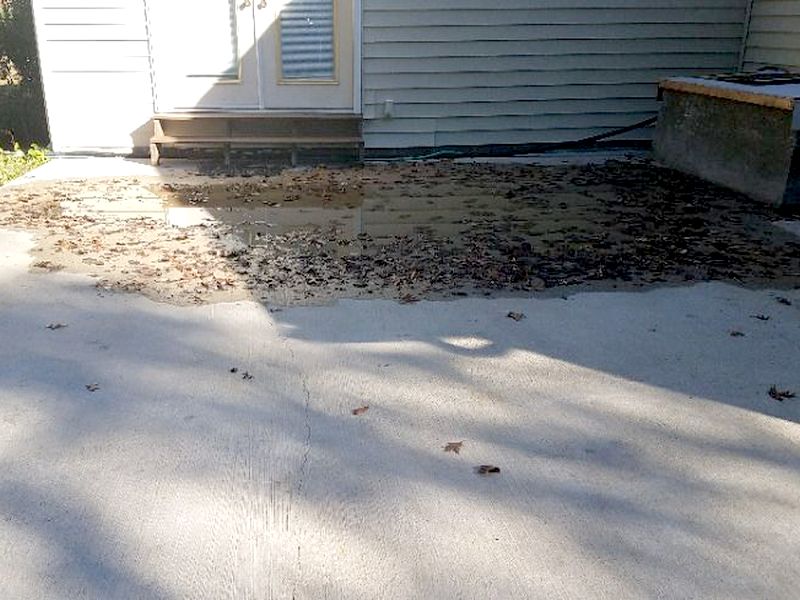
The patio has been installed above the siding materials. This will allow water penetration into the structure, and will cause deterioration of the siding materials and structural framing. Repair the patio to ensure that it is below the siding and framing, and that proper drainage directs surface water away from the siding and foundation.

The patio is sloping towards the foundation. This will allow water penetration into the structure. Repair the patio to ensure that surface water is directed away from the foundation.
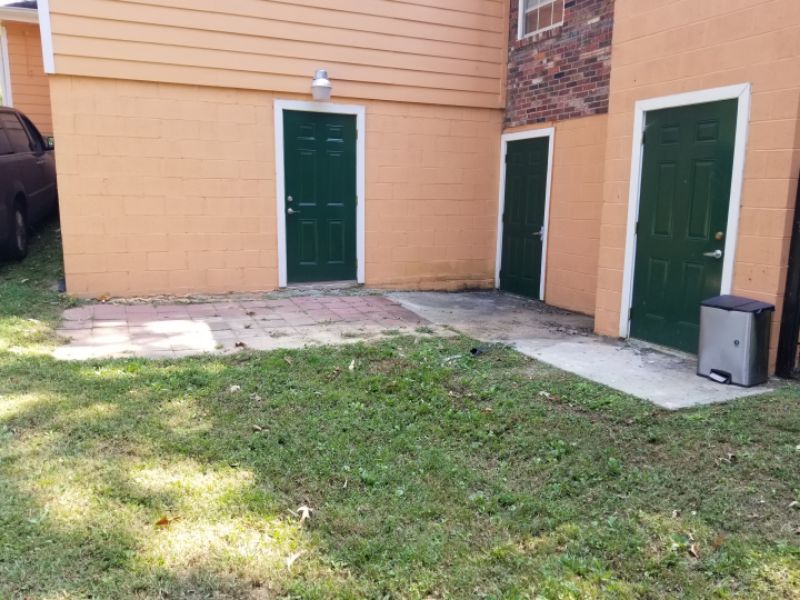
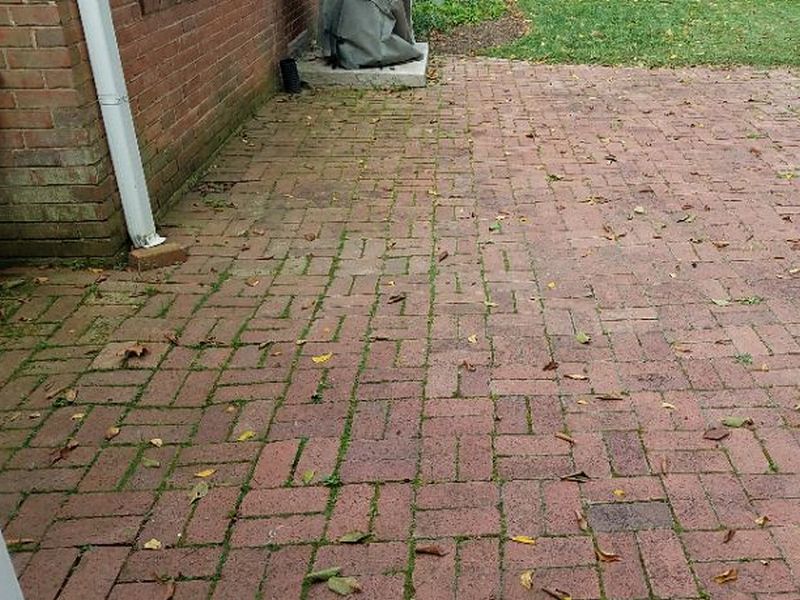
The patio is deteriorated. This permits water penetration and is conducive to further deterioration. Replace the patio.
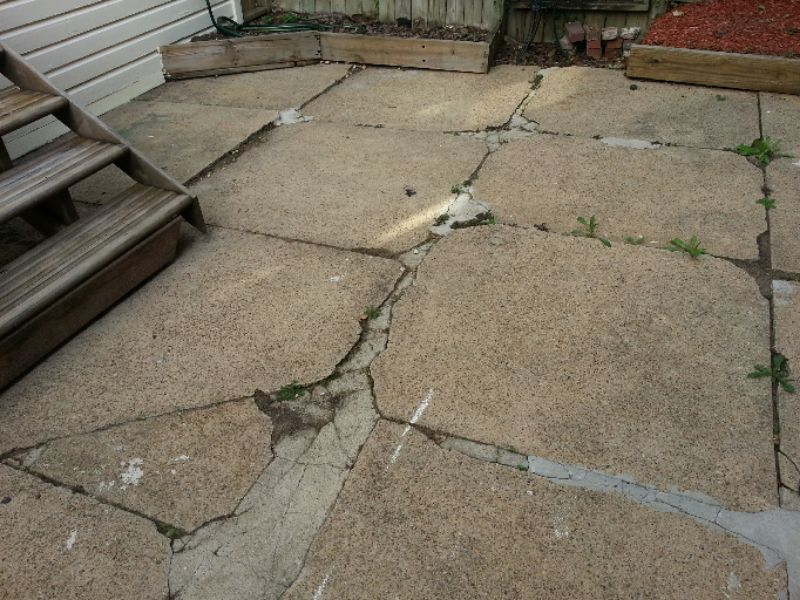
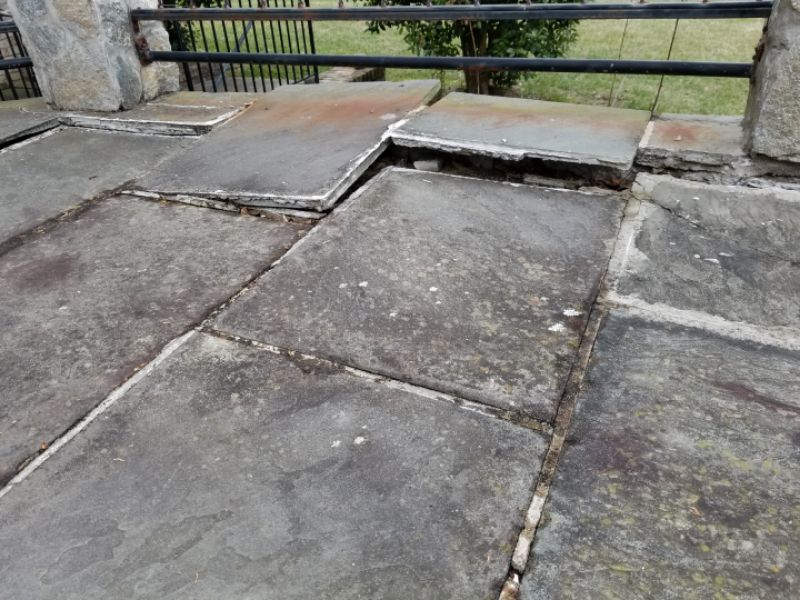
Portions of the patio are undermined. This will lead to further erosion of the soil, and may cause settlement or failure of the patio. Repair and stabilize the patio to prevent further settlement. Repair and seal any gaps to prevent moisture intrusion.
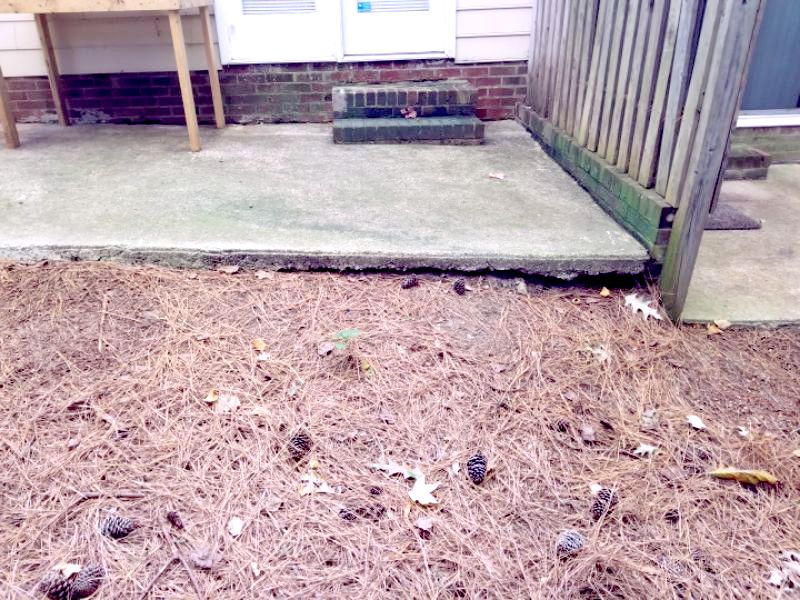
Tree roots are causing the patio to heave. The condition likely will worsen unless the roots or trees are removed. Remove the roots or the tree, and repair the patio as needed.
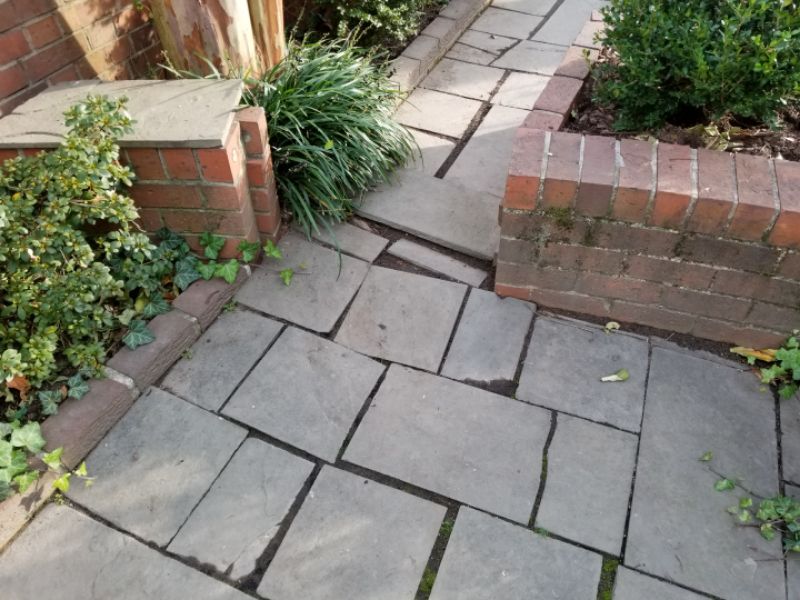
Inspect any patio enclosures or covers for damage, deterioration, leaks, and instability.
The support post for the patio cover is deteriorated. This is a safety hazard. Replace the support post.
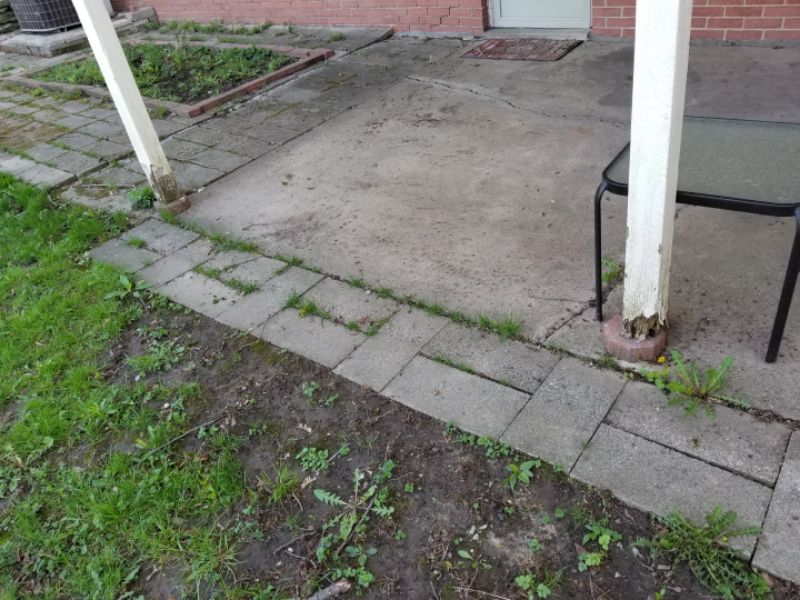
The support post for the patio cover is unsecured. This is a safety hazard. Secure the support post.
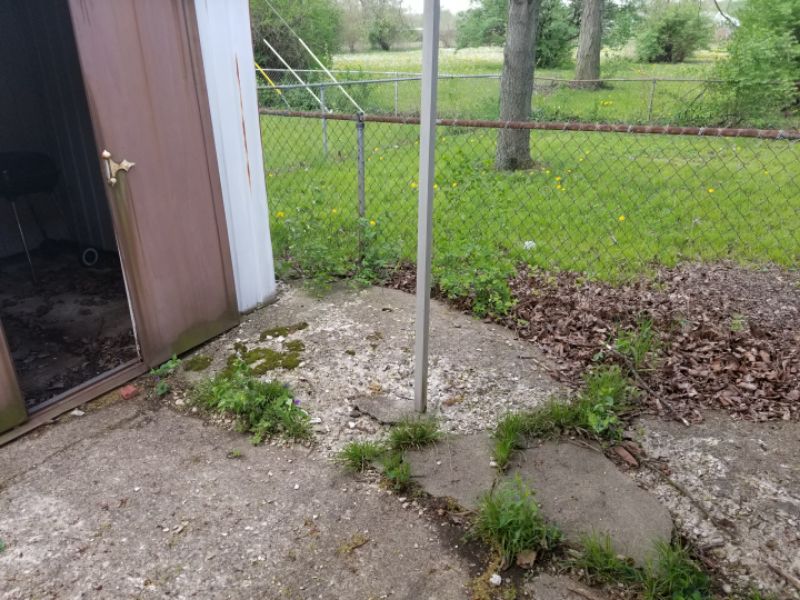
The patio cover is damaged. This will affect its function and can be a safety hazard. Repair or replace the patio cover.
The patio cover leaks. This will affect its function. Repair or replace the cover.
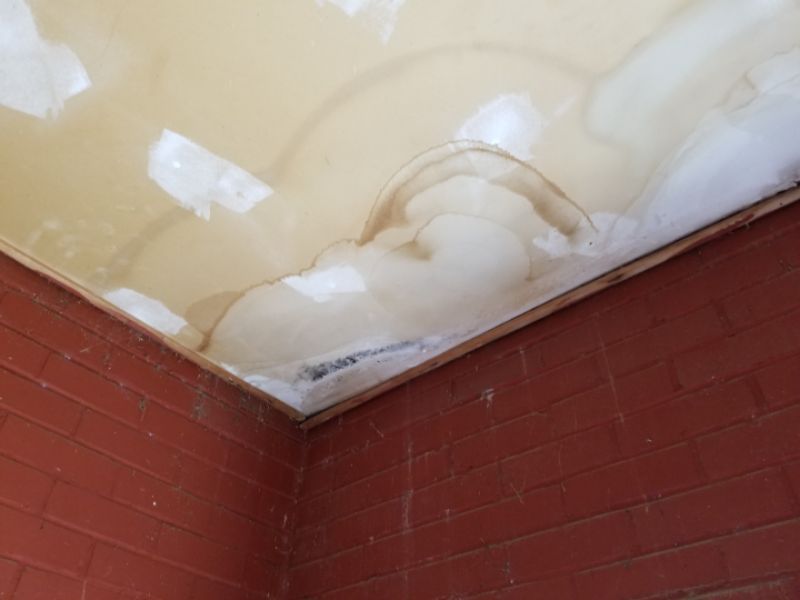
Patio Limitation and Information Statements
Covering material, limited access: The patio cannot be properly inspected because a covering material (e.g., carpet, rug or other material) prevents unobstructed access. Therefore, the inspection is limited.
Near/at end useful life, budget for replacement: The patio is near or at the end of its useful life. We recommend establishing a budget to replace the patio.
Past end useful life, budget for replacement: The patio is past the end of its useful life. We recommend establishing a budget to replace the patio.
Minor cracks, no differential movement, seal cracks: The patio has minor cracks with no differential movement. Seal the cracks to prevent water intrusion.
Spalling, cosmetic issue: The patio is spalling, which is the separation of the surface layer, and is the result of improper finishing or weathering. Spalling is a cosmetic issue and generally does not affect the functionality of the patio. Repairing spalled concrete is specialty work and will fail if not performed properly.
Fence
Inspect the fencing for damage, deterioration, leaning, missing sections, or areas where the intended purpose of the fence as a barrier is compromised. Posts should be secure in the ground.
If a swimming pool is present, a recommendation should be made to have a specialty Swimming Pool Inspection performed that includes the fence system. Pool fences have specific requirements beyond those of general fencing.
The fence is damaged. This will affect its function. Repair or replace the fence.
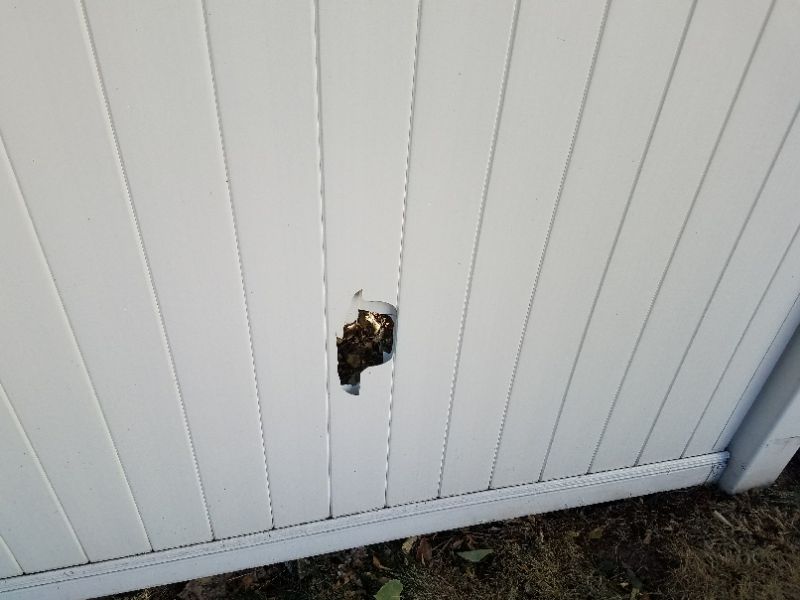
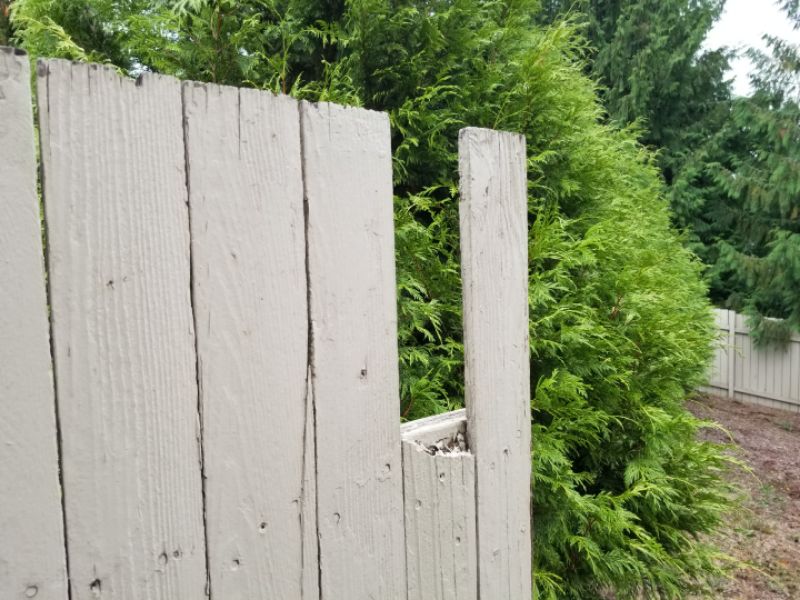
The fence is deteriorated. This will affect its function. Replace the fence.
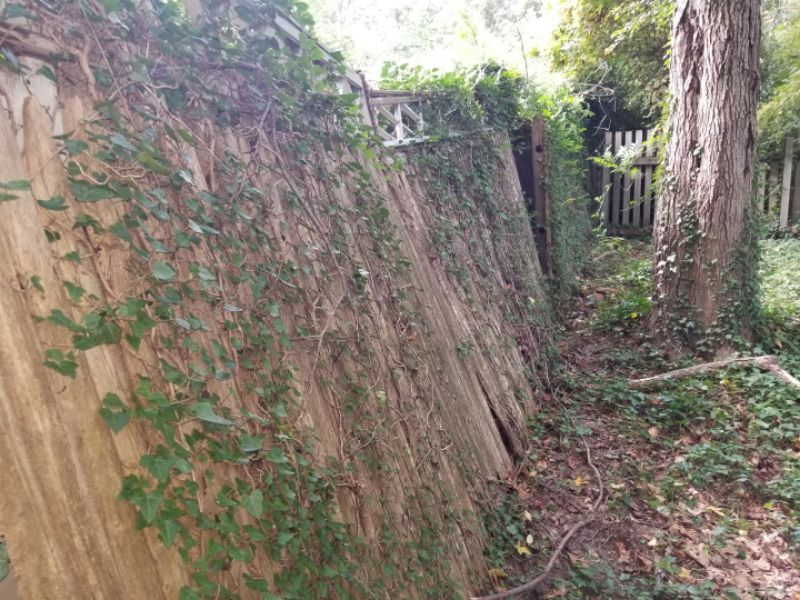
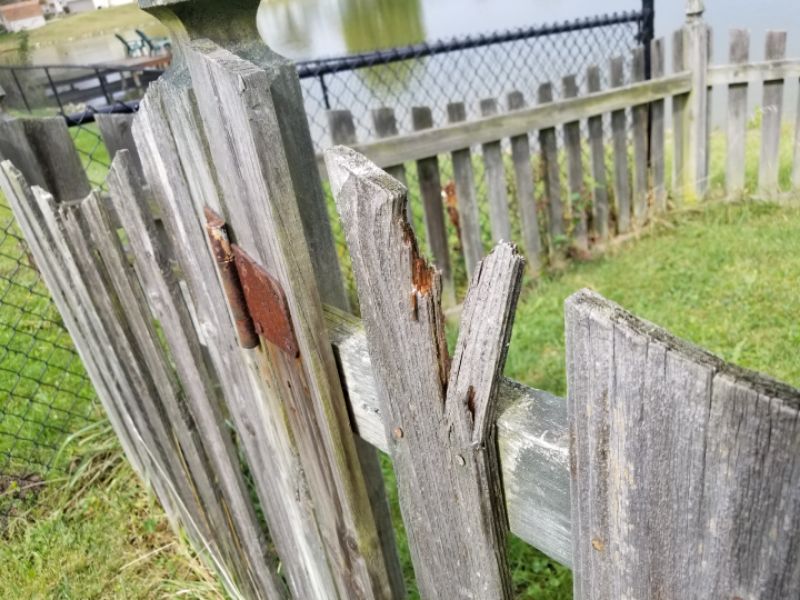
The fence and posts are leaning. This will affect its function. Repair or replace the posts or fence as needed.
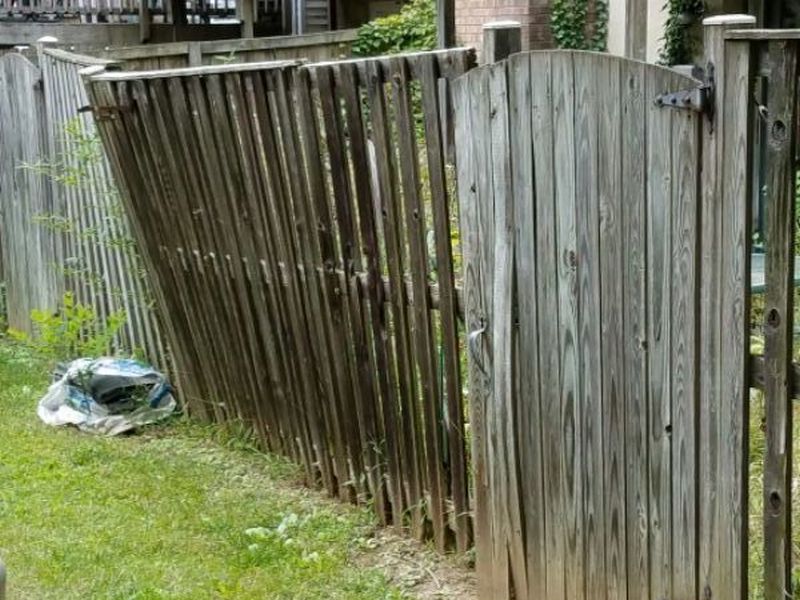

The fence is bare (not painted or stained). Unpainted or unstained materials will deteriorate more quickly than treated materials. Paint or stain the fence.
A section of the fence is loose. This will affect its function. Repair or replace the fence section.
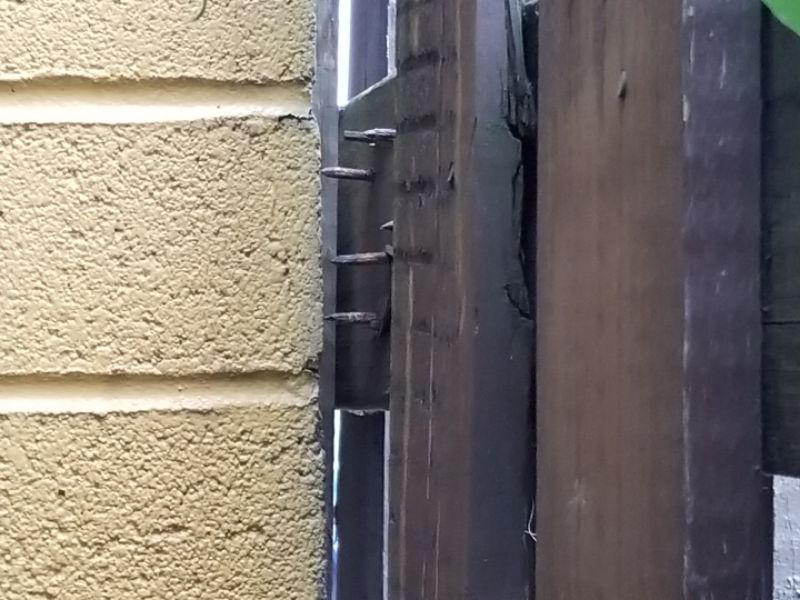
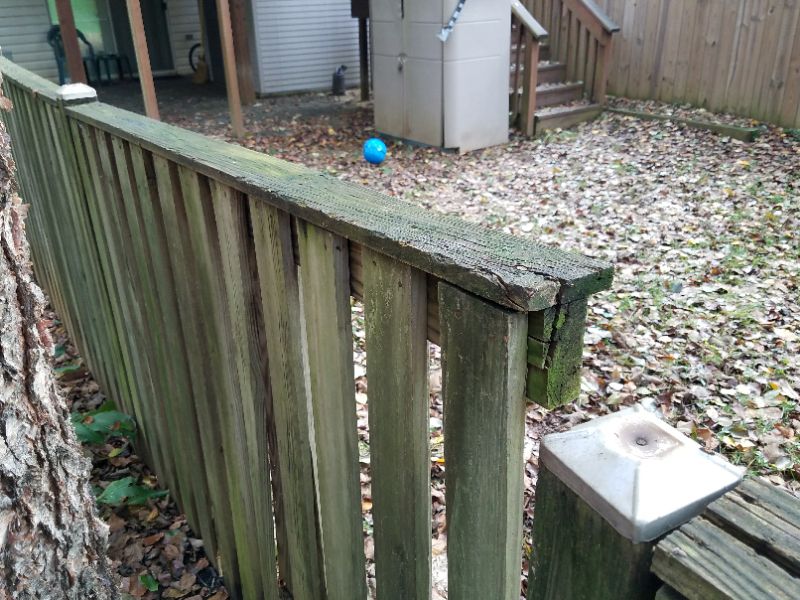
Fence rails are loose from the posts. This will affect its function. Secure the rails.
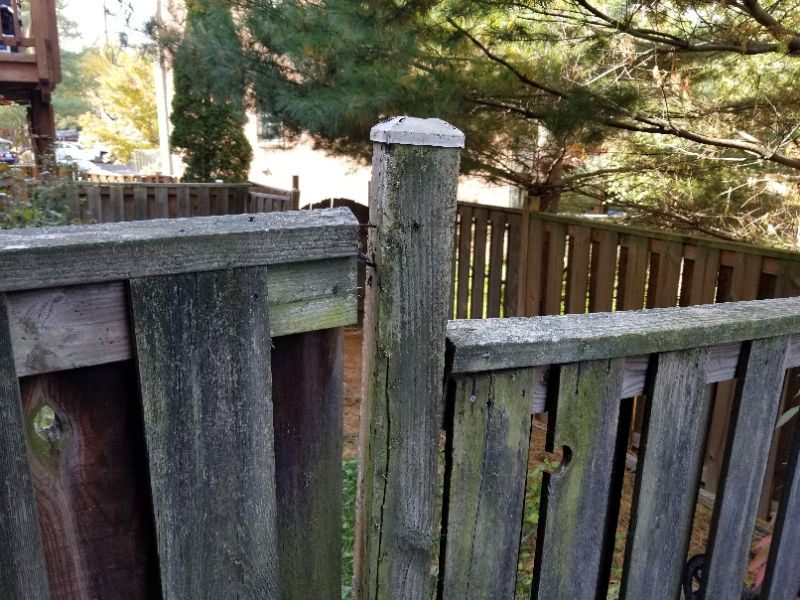
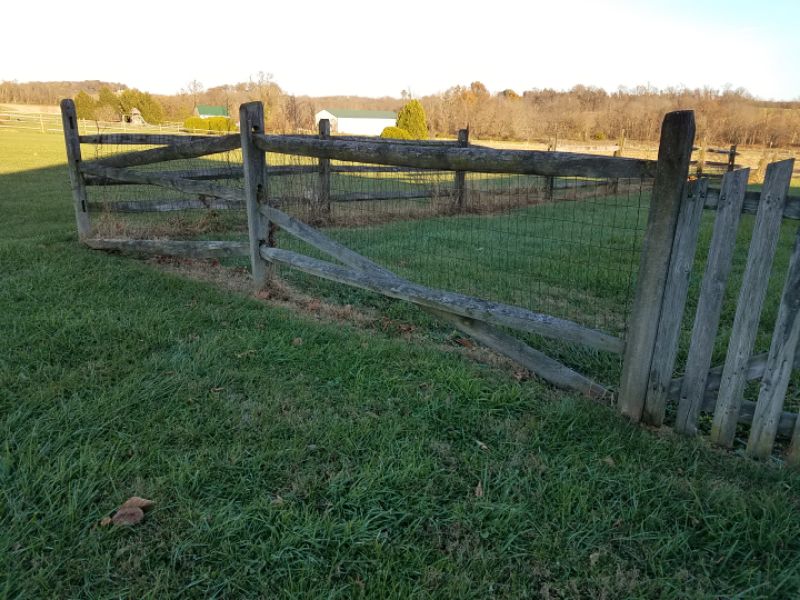
A section of the fence is missing. This will affect its function. Replace the section.
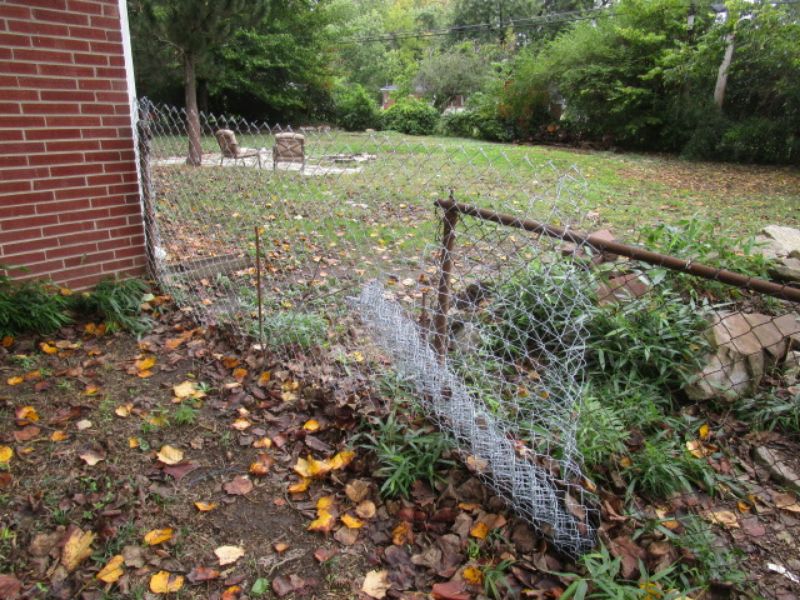
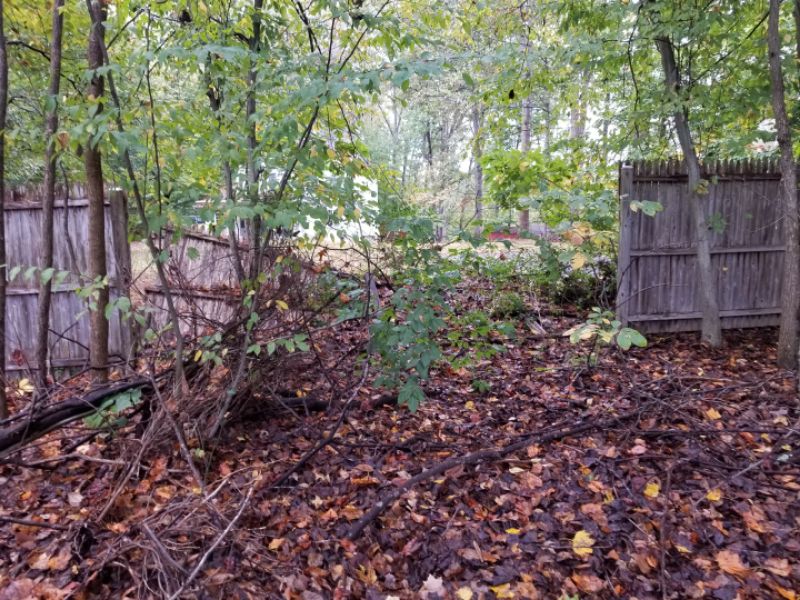
The fence posts are deteriorated. This will affect its function. Replace the posts.

Gates should operate freely without binding or dragging. All hardware should be intact and operative.
The fence gate latch is not operating properly. Repair or replace the latch.
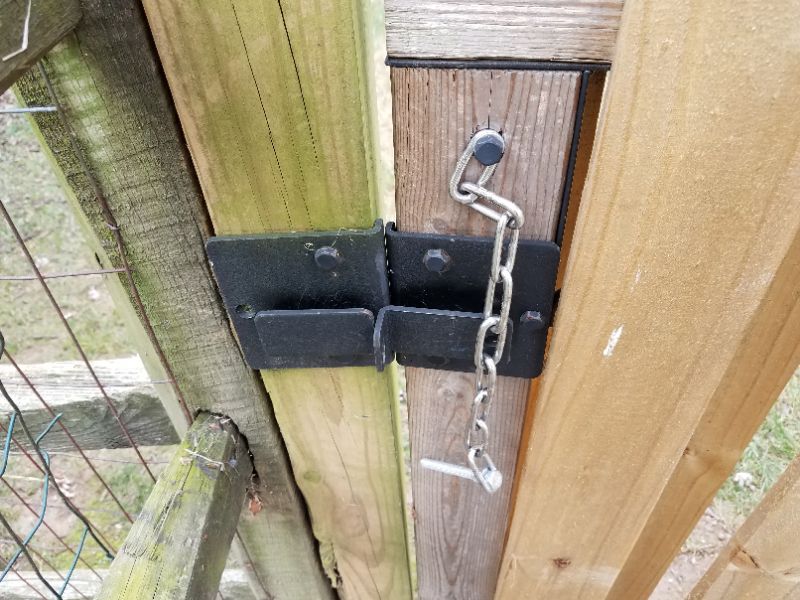
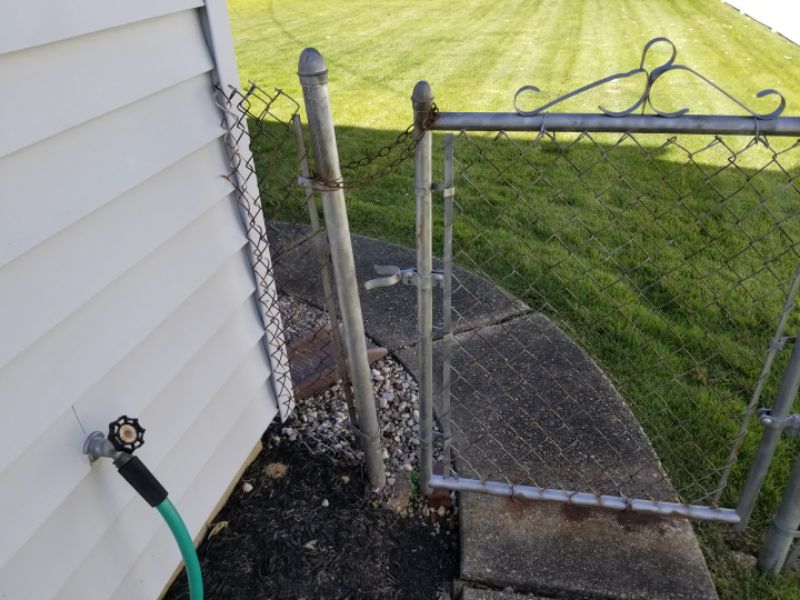
The fence gate latch hardware is missing. This will affect its function. Replace the hardware.

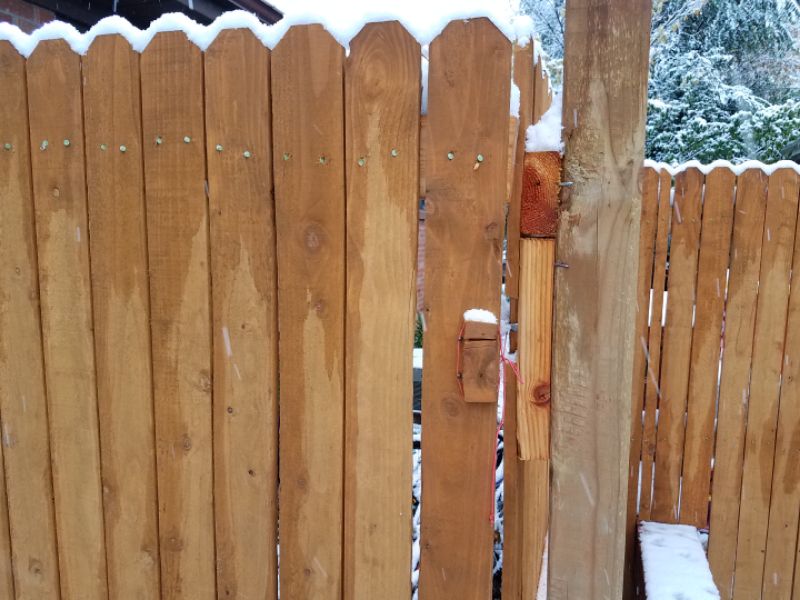
The fence gate hinges are broken, preventing the fence gate from opening/closing properly. Repair or replace the hinges.
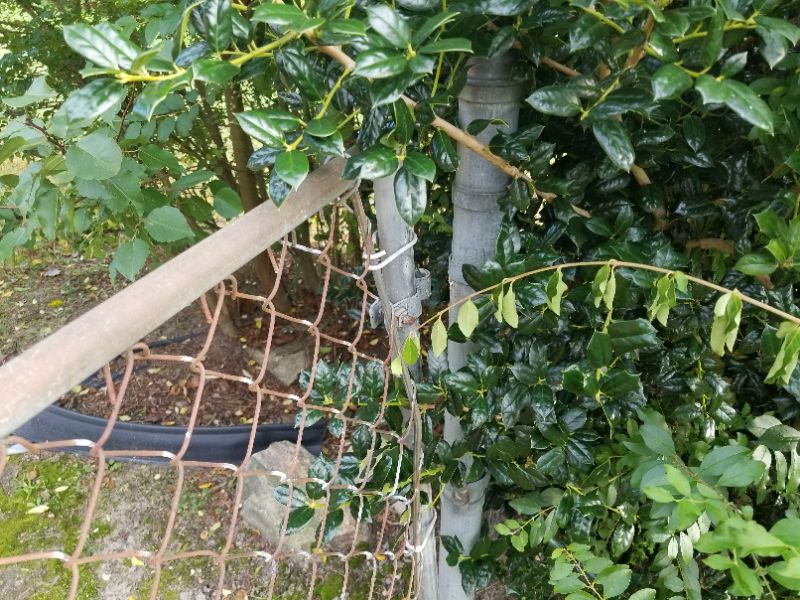
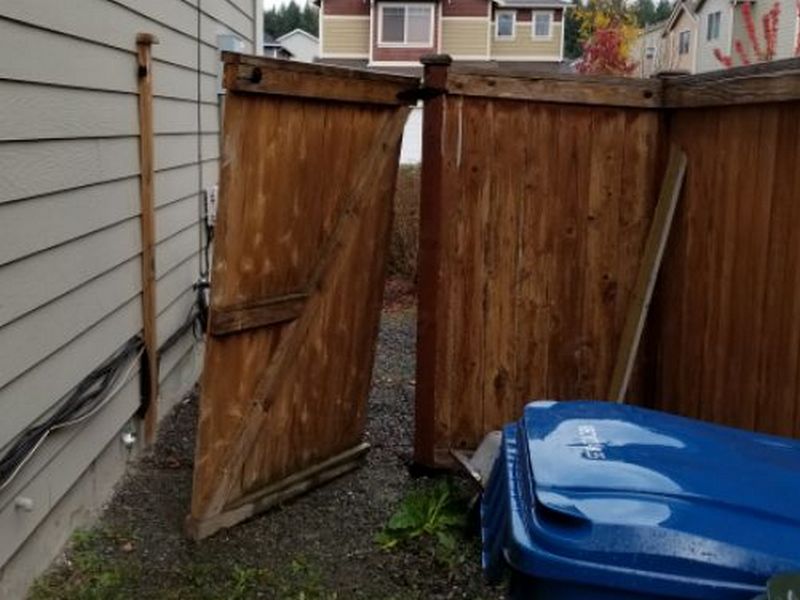
The fence gate binds when operated. This will affect its function. Repair or replace the gate.
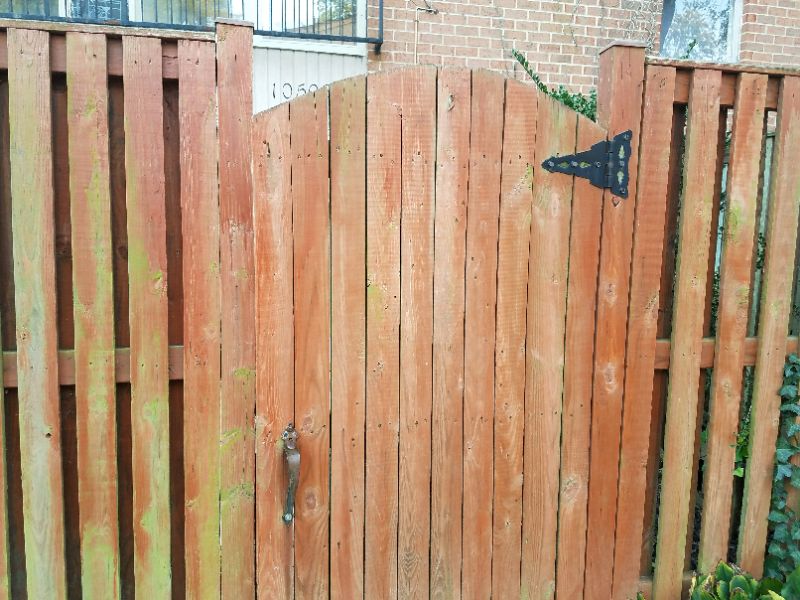
The fence gate is rubbing the ground, preventing proper operation. Repair or replace the gate.
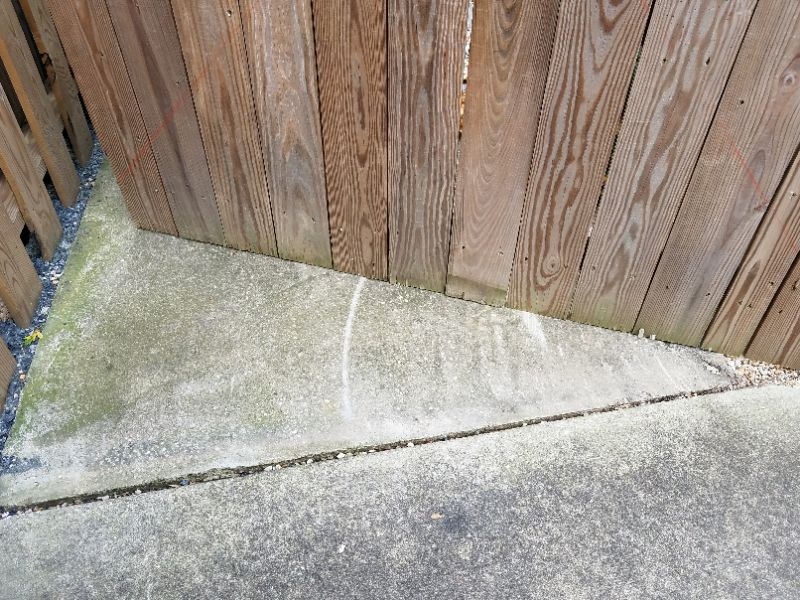
The fence gate is damaged/deteriorated, and is inoperative. This will affect its function. Replace the gate.
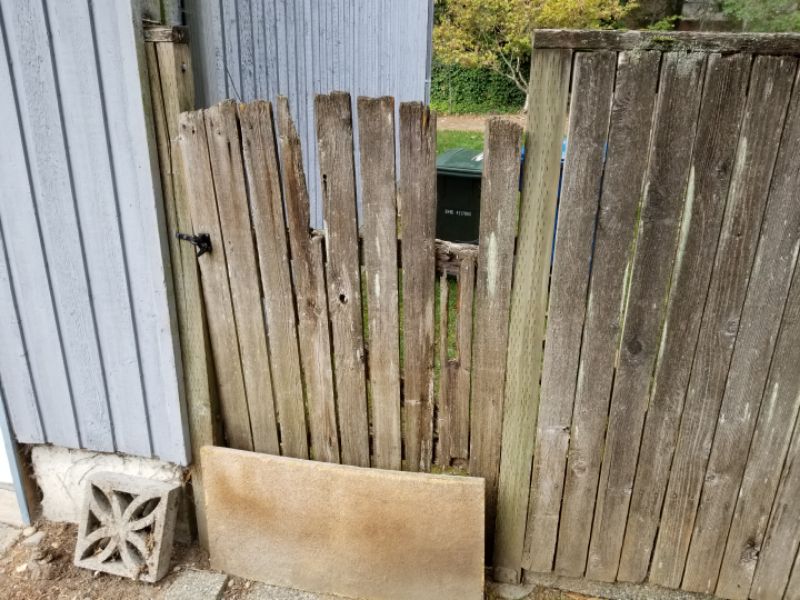
Fence Limitation and Information Statements
Near/at end useful life, budget for replacement: The fence is near or at the end of its useful life. We recommend establishing a budget to replace the fence.
Past end useful life, budget for replacement: The fence is past the end of its useful life. We recommend establishing a budget to replace the fence.
Electric fence, beyond scope: The property includes an electric fence, which is beyond the scope of a home inspection.
Pasture fencing, beyond scope: The property includes pasture fencing, which is beyond the scope of a home inspection. Pasture fences generally require ongoing maintenance.